by Marcela M. | Sep 5, 2011 | Blog, Cakes, Cooking basics and tutorials, Recipe Box, Recipes, Sweets, Uncategorized
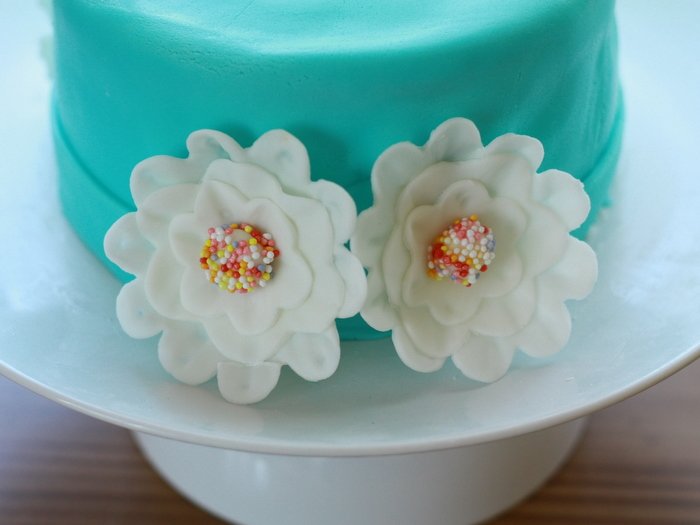
Good morning friends! I hope you had a great weekend and that you are ready to start a new week.
As I promised in my last post, here is the tutorial for making fondant flowers like the ones with which I decorated my daughter’s 3rd birthday cake. You will see that they are very easy to make, and that you can do so with tools that you most probably already have at home. I have included step-by-step pictures to make it easier to follow the instructions, but if you have any doubts, please do not hesitate to contact me!
So, let’s begin! Here is what you will need:
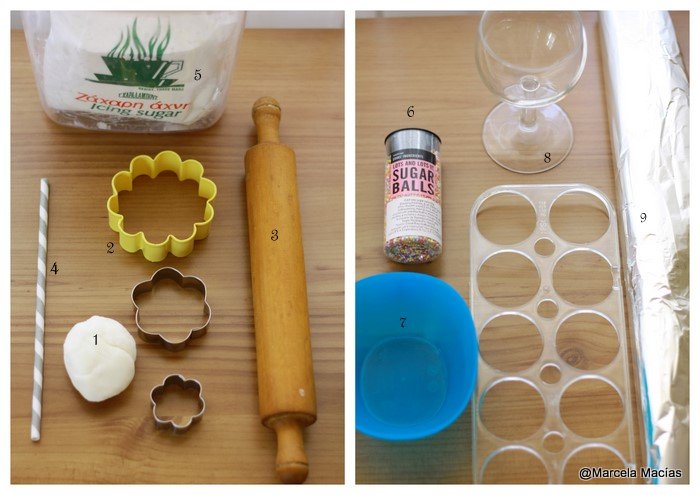
1- Fondant in whatever colour/colours you want your flower to be. I used only white, but you may combine different ones, according to the colours of your cake/what you have available.
2- Flower cut-outs of 3 different sizes. I used cutters from 2 different sets: the bigger one is from this Wilton cookie cutter set, and the two smaller ones from this set, also by Wilton.
3- Rolling pin (the one in the picture was given to me by my grandmother, as a present, when I was 8 years old)
4- A paper straw. You can also use a lollipop stick. Or the back of a brush. Whatever you have on hand!
5- Icing sugar, so that the fondant doesn’t stick to the table. When the weather is too hot, I use a combination of icing sugar and cornstarch.
6- Non-pareils (I used multi-coloured ones)
7- A small bowl, for putting the non-pareils in it.
8- A glass/ an egg tray (from your fridge), depending on the size of your flowers, to shape them (I will show you how to do this)
9- Aluminium foil
10- Sugar syrup/sugar glue, and a small brush (not in the picture). To make sugar syrup, put sugar in a small pan, cover with water and bring to the boil until it thickens (about 5 minutes). This will help glue the different parts of the flower together, but I must warn you that it works only when fondant is not dry yet. Once the flowers are dry, use royal icing to attach them to the cake.
Instructions:
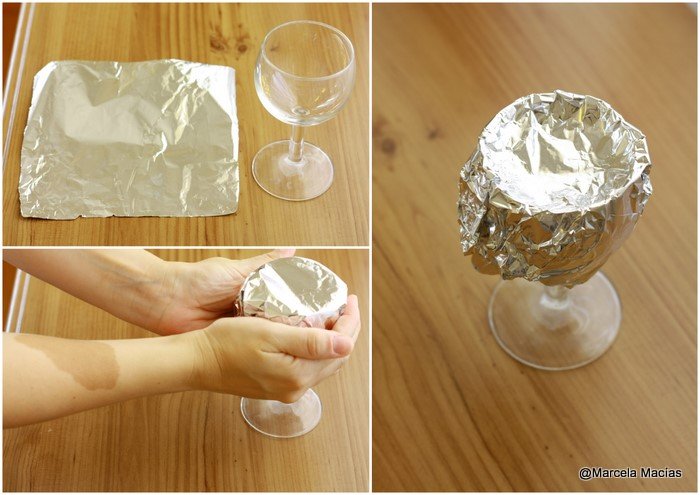
1- The first thing you will need to do, is to prepare the flower drying trays (which are the place where your flowers will dry, so that they will look like real flowers and not be flat). In order to do so, cut a rectangle of aluminium foil and, using your hands, place it on top of a cup. Once it is attached to the sides of the cup, lift it a little bit, very carefully, and curve the top by pressing in the middle with your fingers. It should look as in the picture on the right:
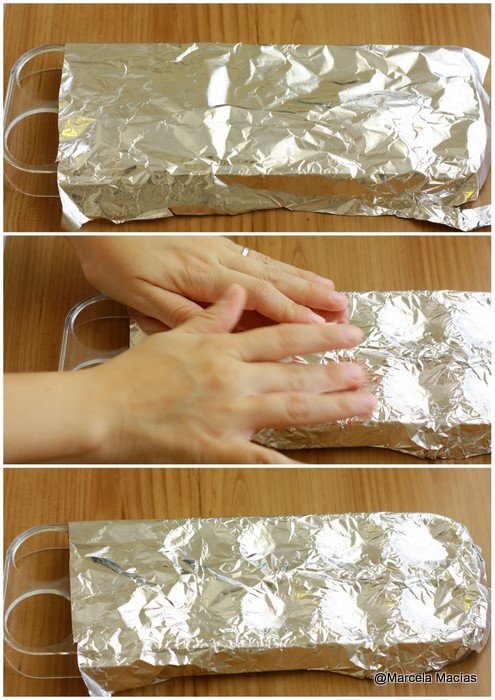
2- If you need to make several small flowers or blossoms, you may use an egg tray from your fridge. Cut aluminium foil to cover the tray (or as many holes as flowers you are planning to make) and, using the same method above, work it until you have the drying tray ready, as in the pictures below:
3- Now that your former/drying cup and tray are ready, it is time to make the flowers! Begin by kneading a little bit of fondant. Put some icing sugar on the table, and extend the fondant using a rolling pin. Roll it as thin as possible, so that the flower petals look more realistic.
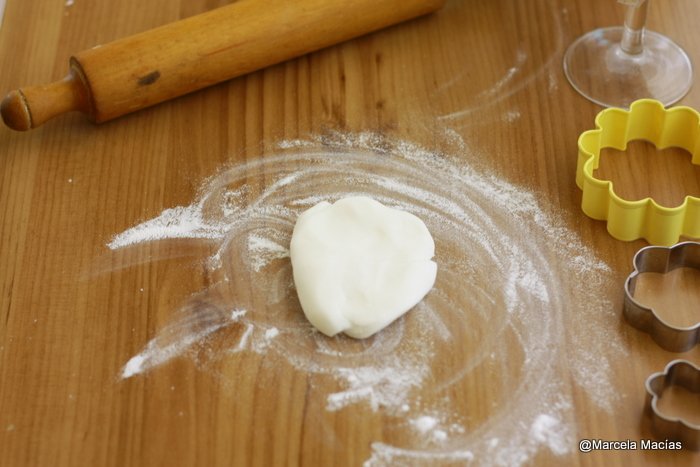
4- Cut the flowers in three different sizes. You will need one of each per flower.
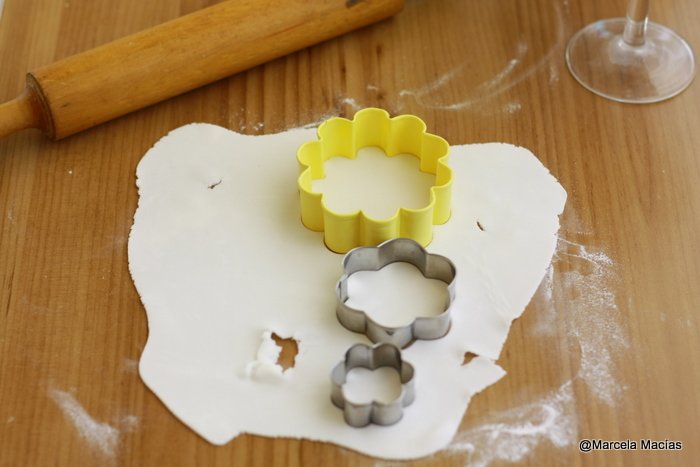
5- Start by working on the biggest size. Leave the other two aside, and put the remaining fondant in a plastic bag so that it will not dry out.
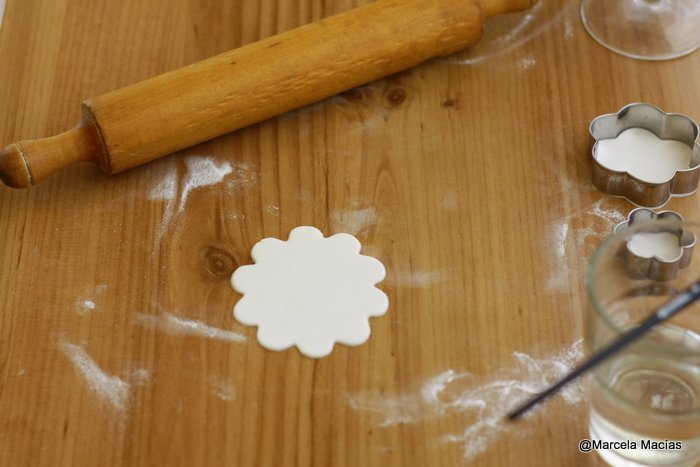
6- Take the flower with your hands and, slowly and gently, press the petals with your thumbs, so as to make them thinner (If you have one, you may use a ball tool to do this instead)
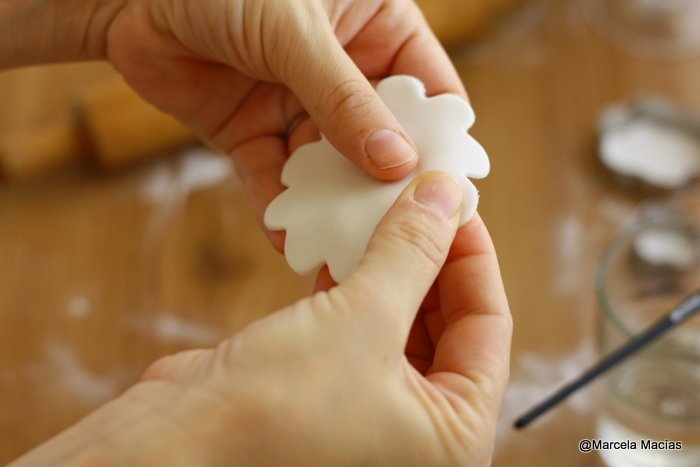
This is how the flower will look when you are done. It is very important that you do it slowly or the petals may break!
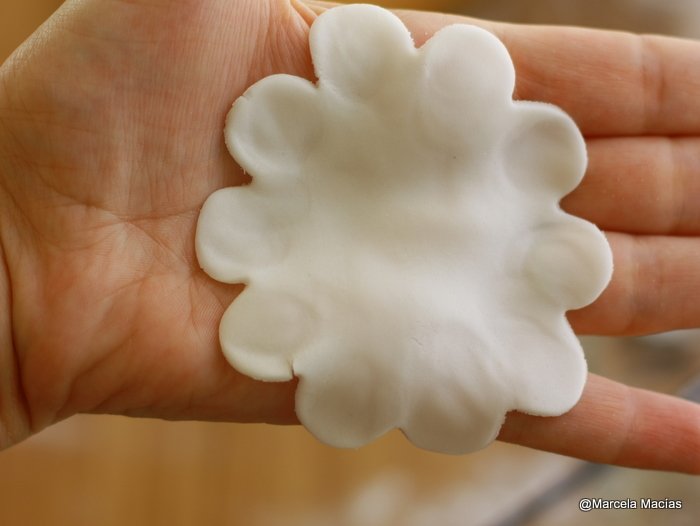
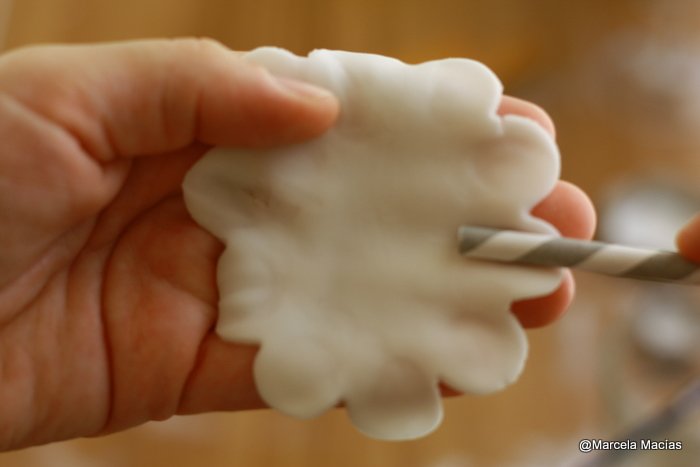
7- Gently (VERY gently) roll a paper straw, a lollipop stick or the back of your brush, on each petal. This will give the petals some shape.
8- Place the petal in the drying cup, on top of the foil. Don’t worry, it won’t stick to it and, once it is dry (about 24 hours), you will be able to remove it easily.
9- Using the same method, shape the middle- sized flower.
10- Put a drop of sugar syrup in the center of the big flower and add the middle- sized flower to it. Make sure the petals of the smaller flower are placed between the petals of the bigger one. Press softly in the center for the petals to pop up.
11- Using the same method, shape the smallest flower.
12- Put a drop of sugar syrup in the centre of the middle-sized flower and add the smallest flower to it, as you did before. Press softly in the centre for the petals to pop up.
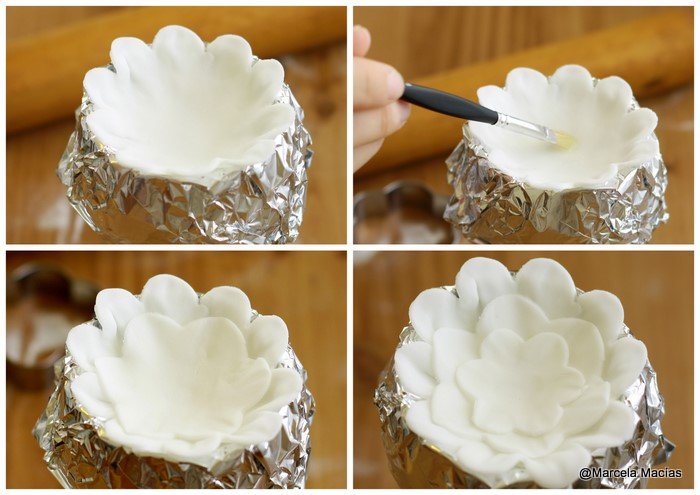
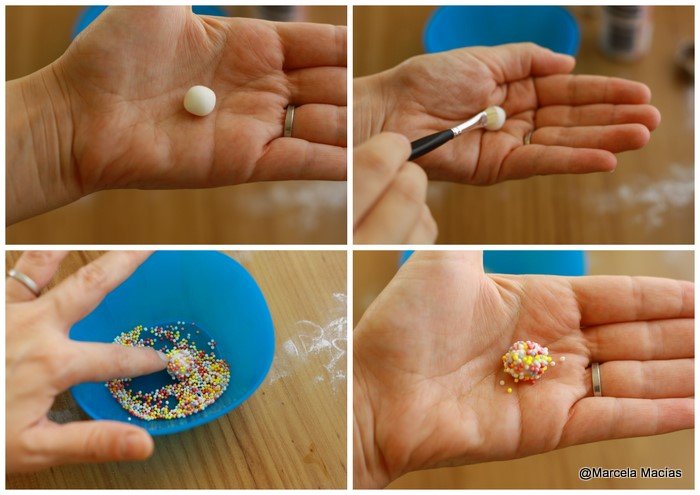
13- Now it is time to make the stigma (the centre of the flower). You will need a small ball of fondant, sugar syrup and non-pareils.
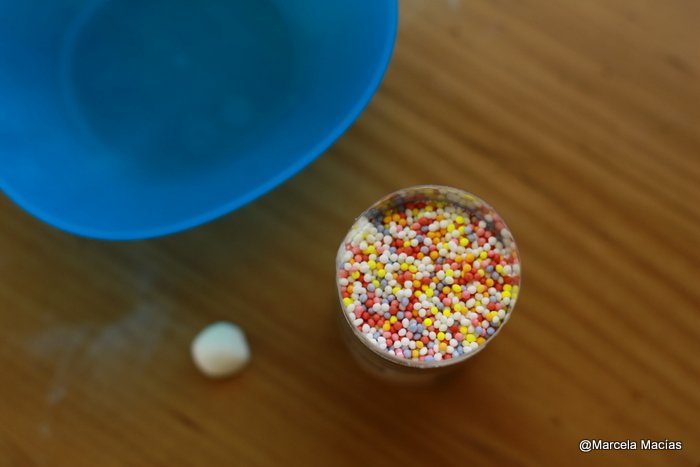
14- Make a small ball of fondant.
15- Brush it with sugar syrup
16- Put a few non-pareils in a small bowl. Place the fondant ball inside and roll it all over, until it getscompletely covered in non-pareils.
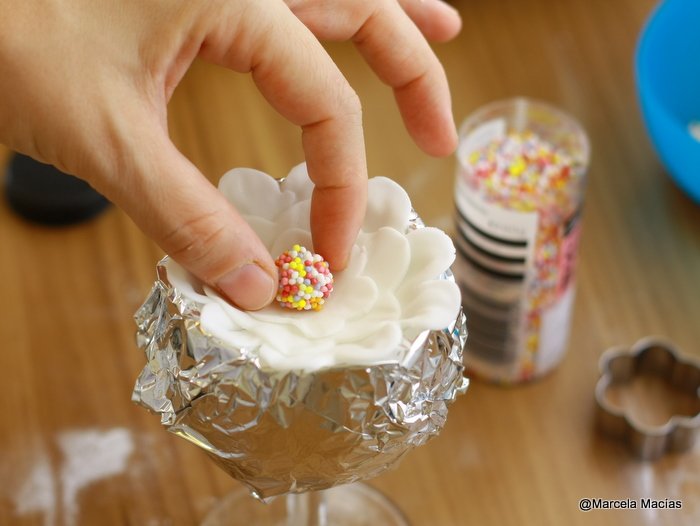
17- Put a drop of sugar syrup in the centre of the drying flower and place the stigma on top of it. Press softly so that it adheres to the flower.
18- Repeat the process to make as many flowers as you need in your decoration.
19 – Let dry for 24 hours, remove slowly from the drying cup and attach with royal icing to your cake.
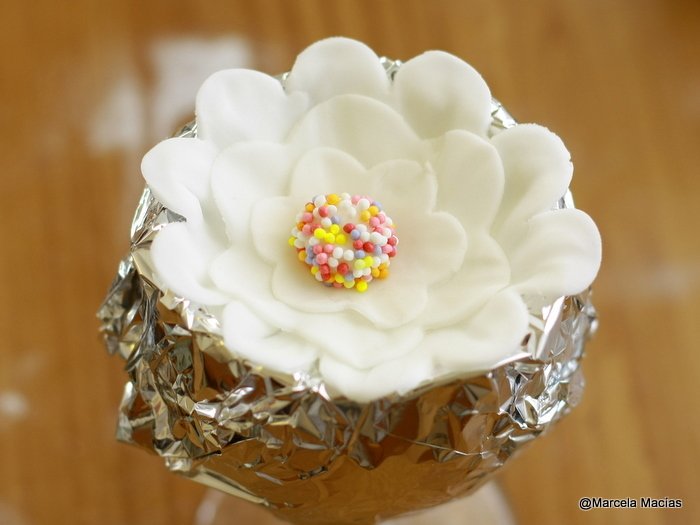
Very easy, isn’t it? I know how hard it can be to find gum-paste/fondant modelling tools in some countries, and how expensive these can be too, so I wanted to show you how you can get around buying them and still get some pretty flowers. I hope I achieved my goal!
May you have a wonderful week!
by Marcela M. | Aug 28, 2011 | Blog, Cakes, Parties, Recipe Box, Recipes, Sweets, Uncategorized
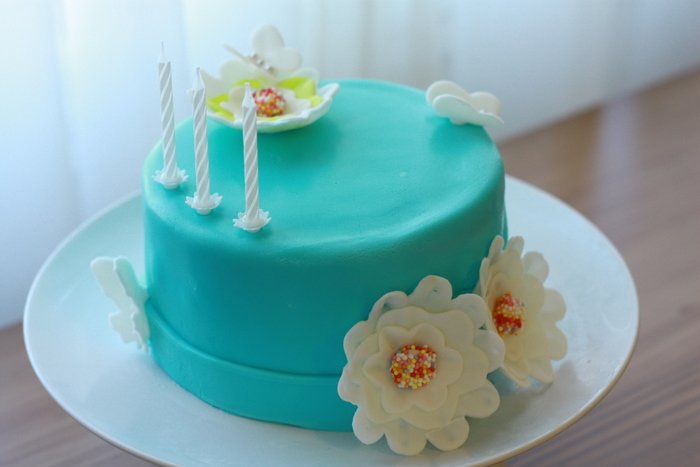
Hello dear friends! How are you today? How was your weekend? Are you ready to start this week? I hope you are and that it will be one full of wonderful surprises.
In this post I am showing the cake I made for my daughter, Zoe, for her birthday.
I changed the design in my mind many times, until I finally decided to improvise. One thing I knew: It had to have flowers and butterflies in it, because Zoe had loved the ones in the cake I made at the cake decorating course, last June. But until I started making the decorations, I didn’t really know what type of flowers I was going to make, or how many butterflies I wanted in it.
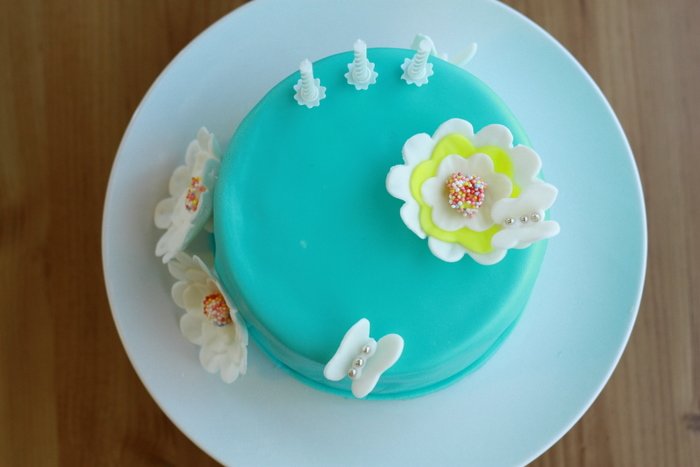
I do not own special tools for shaping neither butterflies nor flowers, and I did not have any gum paste or modelling paste on hand either. I could not buy any because neither of the cake shops I know in Nicosia were open (It is August, when most shops close), so I had to get creative. I did have fondant, food colouring, a few sugar pearls, non-pareils and sprinkles, as well as an internet connection to google ways of replacing what I didn’t have.

I started working on the flowers and butterflies the night before decorating the cake, to allow the fondant 24 hours drying time. I wanted to be able to place the decorations on the cake without fearing that they would lose shape. If I had used modelling paste, which dries faster, a few hours would have been enough. In my next post, I will show you step by step pictures of how I did it, and you will see how easy it is.
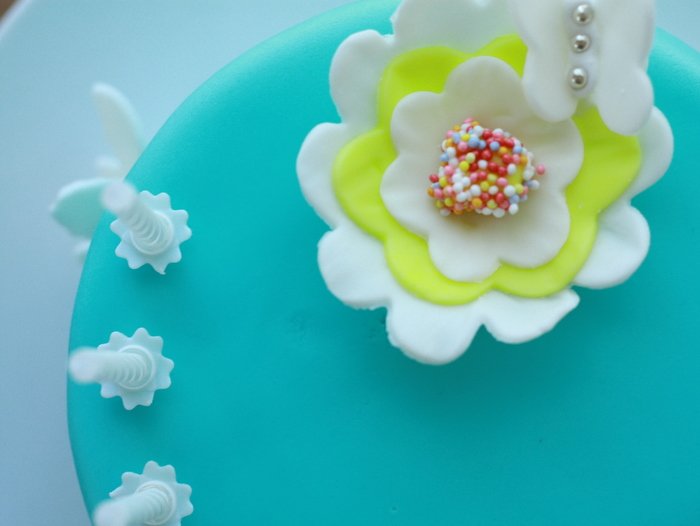
I dyed fondant using Wilton’s gel food colouring in Teal (my favourite colour) and covered the cake with it. I then rolled some more fondant and, using a small ruler, I cut a strip, like a ribbon, to cover the lower side of the cake, to give it a more finished look.
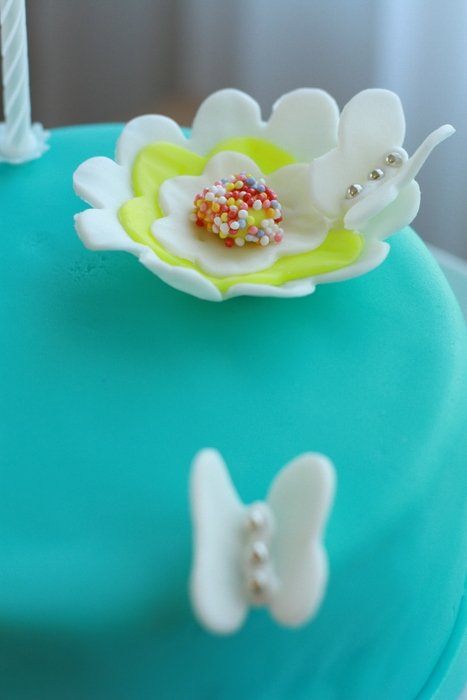
I then started playing around with the flowers and the butterflies until I was happy with the way the cake looked. I used 3 flowers and 3 small butterflies (as many as Zoe’s years), eventhough I had originally made 6 butterflies of different sizes.
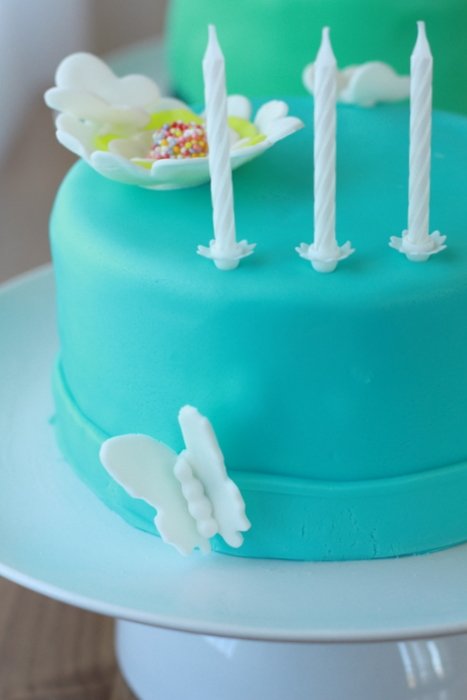
Finally, I added 3 white candles and the cake was ready!
Zoe saw her cake for the first time when I brought it to the living-room to sing the happy birthday, and for her to blow the candles. She was fascinated with the fire in the candles and with the decorations. As soon as the candles were blown, she grabbed the yellow and white flower and the butterfly that was attached to it, and started eating them. Luka followed her soon after with the rest of the butterflies. Then we cut the cake and ate it!
Have a lovely week and see you in a few days!
by Marcela M. | Aug 24, 2011 | Blog, Cakes, Parties, Recipe Box, Recipes, Sweets, Uncategorized

Good morning dear friends! I hope you are having a lovely week.
As I promised, here is the first post with the birthday cakes I prepared and decorated for my babies’3rd birthday (can I still call them babies? until they are 21?).
This year we decided to postpone their birthday party until November. We are travelling to Argentina for the first time since theywere born, so we thought that it would be a good opportunity to share this special moment with friends and family. We did have, anyway, a small family celebration : we filled the living room floor with balloons the night before, so that they would find them when waking up, and left their presents in their small table. And of course, there were cakes! Since it was just the four of us, the cakes were small , but I still thought it was important for each of them to have their own, and for the cakes to be decorated according to their personalities.
Both cakes had the same flavours: 2 layers of lemon cake, and 1 layer of chocolate cake, filled with 1 layer of blueberry jam and 1 layer of chocolate buttercream, and covered in fondant.

Luka’s cake was covered in green fondant and decorated with racing cars made with fondant. I made the racing cars the night before decorating the rest of the cake, to let them dry properly, following this tutorial from Cake Journal. I do not have all the instruments required so I had to be creative, for eg: in order to shape the car, I used a big knife and a fondant smoother (instead of two fondant smoothers), I used a lollipop stick to curve the car to make space for the head of the driver to sit in (instead of a ball tool), and instead of sugar glue, I used sugar syrup (=almibar).
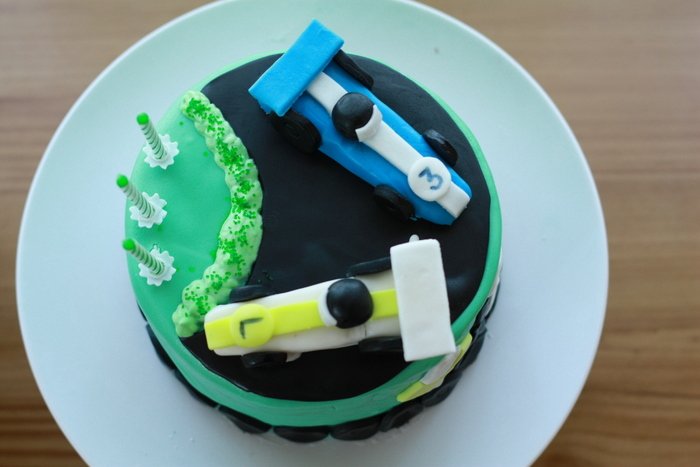
In order to make the asphalt, I rolled black fondant, I placed the cake pan in which I had baked the cake on top of it, and I cut around it its perimeter with a pizza cutter. That gave me a circle of the exact same size as the top of the cake, but I didn’t want that much grass so, using the same pan to guide me, I cut a portion of the circle, creating a crease. I then placed the crescent moon on top of the cake, draw white lines in it with royal icing and glued the cars on top. I made grass with royal icing, using a #133 piping tip and added a few grains of green sugar sprinkles.
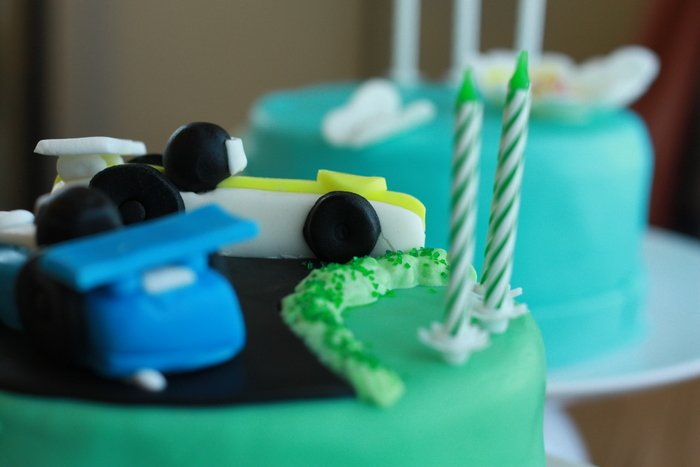
I covered the perimeter of the cake with tyres, made with the back of a #2D piping tip, and embossed in the center with a #10 tip. I also made two racing flags (I didn’t take a picture of them, sorry!) to put in front of the cake). One was yellow and white and the other one was black and white. To make them, I used a small square cookie cutter, and cut 1 white square, 1 black square and 1 yellow square. I then divided each square in four parts and mixed them to create the flags.
I finally added the candles, and that was all, the cake was ready!

As you can see it was a very easy cake, but Luka loved it. He was so excited about the cars, the candles and the wheels around it! He loves cars, trucks, trains, anything that has wheels in it. I was happy to see him happy.
In my next post I’ll show you Zoe’s cake, which was girly, like her.
Have a nice week!
by Marcela M. | Aug 21, 2011 | About, Blog, Uncategorized
Today my babies turned 3 years old. They are not babies any more.
I cannot believe it is already three years since the day they were born, tiny, at 34.5 weeks gestation, on a hot Cypriot summer afternoon, by emergency c-section. I cannot believe three full years have passed since the first time I saw their faces. I almost cannot believe that they no longer sleep in the same crib like they used to, that they no longer look like this:
On the day they were born, I went to the gynecologist for a scheduled checkup. I was having them twice a week by then, and I had been on full bed rest for fifteen days already. We were two weeks away from the date of a scheduled c-section, but the doctor decided to leave me hospitalized that day, in order to monitor me closely. That afternoon, during a regular fetal monitoring, I started having contractions, and, after checking, the doctor realized I was already dilated. 30 minutes after that, I entered the operation room. 10 minutes after that, Zoe was born and Luka followed her 3 minutes after.
I remember their crying , their faces, their little hands, as if it had just happened, and I suppose I always will. Zoe came out screaming her lungs out and kept kicking the paediatrician with all the strength of her 2.180 grs. She was so full of force that at some point the doctor looked at me and said: “Well, I guess she doesn’t need breathing assistance” and everybody started laughing. Luka came out with a frown, as if he had been disturbed in the quietness of the womb by all the fuzz.
The doctors checked them, wrapped them in the same paper protector they had checked them on, and brought them to me for a quick kiss before taking them to the neonatology unit. I remember thinking that I had woken up that day as a pregnant woman for the last time, and that I was going to bed as a mother.
Luka and Zoe grew under our eyes fast and beautifully: One day they were barely moving, the next one they were crawling and little after that they were walking, even running.One day they were breastfed, the next one they were eating solids with their own fork and spoon (we are still working on choosing fork over finger, but I know that will come). One day they were in their cribs and the next one we were turning those same cribs into beds.
Ok, it was not that fast. But it feels like that today.
Two years ago, they looked like this:

Today, they are lively toddlers who sing, run, play, dance, and have started speaking.
Feliz cumpleaños, amores de mi vida. Happy birthday, loves of my life.
May your life be always full of love, laughter, joy, and happy memories. Thank you for making my life happier than I ever thought it would be.
by Marcela M. | Aug 17, 2011 | Blog, Recipe Box, Salads and dips, Savories, Uncategorized
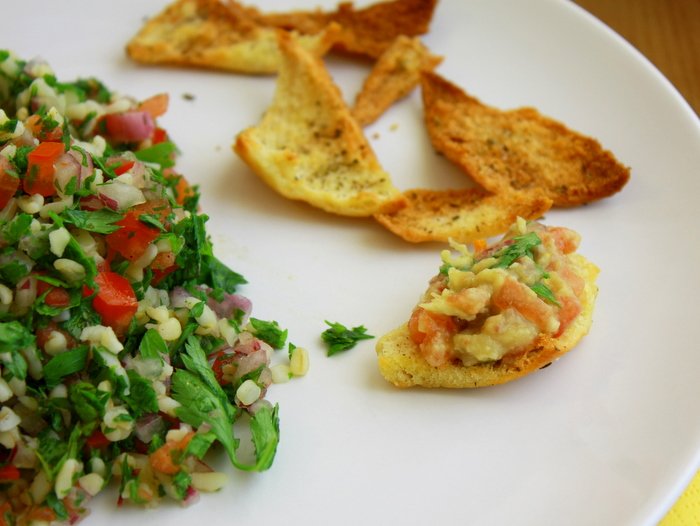
Good morning dear friends! How are you today? I hope you are all doing great.
I apologize for not posting last week. We had a very dear friend visiting us from abroad and we spent our days showing her around, and just enjoying her company. We had a great time, remembering good old times in Abidjan, Ivory Coast, where we all used to lived 4 years ago. Living outside of my home country has required a lot of adapting, and one of the things I have had to accept is having friends scattered all over the globe, and not being able to see them for long stretches of time. So, when we finally do meet, we try to squeeze time as much as we can and some other things fall behind.
But here I am again! Today, I am bringing you the rest of the recipes from our summer lunch, which consisted of tzatziki, guacamole, tabbouleh salad, crispy pitta bread slices and lemon coconut mousse for dessert. These are not my recipes, they are actually very common dishes, and I have read many different versions of each of them, but this is how I usually make them. They are ideal for this time of the year because they are fresh and simple, but I must confess that I LOVE tabbouleh all year-long.
I became a fan of Lebanese food in Abidjan, actually. Ivory Coast (and most of West Africa) has a large number of Lebanese people living in the country, and there are many Lebanese restaurants where one can try dishes such as tabbouleh, kebbeh, falafel, fatoush, etc. Tabbouleh was always one of my favourites and I would order it every time. I learnt how to make Guacamole from a recipe book, so my dear Amanda will have to tell me whether it’s a good one or not!

In order to make Guacamole you will need:
-1 ripe avocado, mashed
– 1/2 a tomato, peeled, de-seeded and cut in small cubes.
-1/2 garlic clove, crushed
– 1/2 red onion, finely diced
– Juice of 1/2 lime or lemon
– 1 teaspoon of olive oil
-salt and pepper to taste
– a few parsley leaves, to garnish.
Preparation is very simple:
1) Peel and mash the avocado with the lime/lemon juice.Put in a bowl.
2) Peel and de-seed the tomatoes. Dice them finely and add to the mashed avocado.
3) Peel and dice the onion, crush the garlic clove and add both to the avocado/tomato mixture.
4) Add olive oil, salt and pepper. Mix everything.
5) Chop a few parsley leaves and add to garnish. Serve.
Voilà!
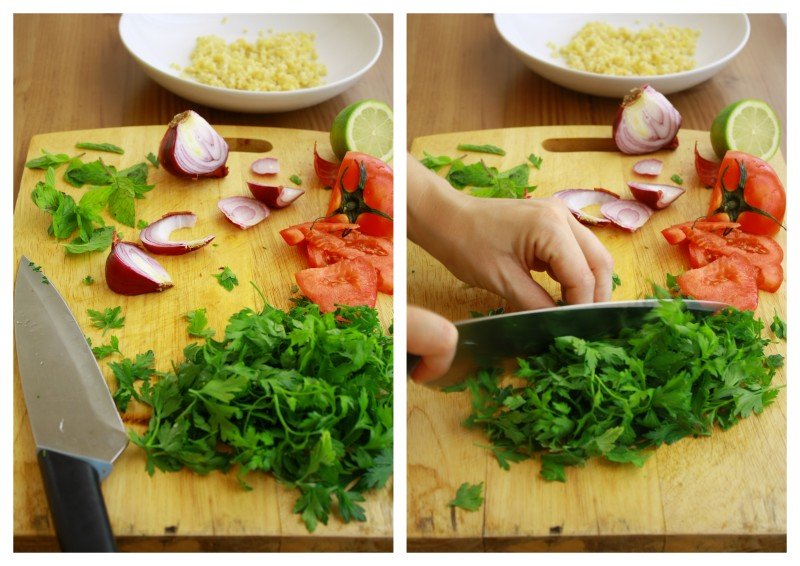
In order to make Tabbouleh, you will need:
-1 cup (a large bunch) of parsley leaves (you need only the leaves!)
– 1/3 cup of mint leaves
– 1/3 cup of bulgur wheat (If you have a gluten-free diet, you can replace it by Quinoa)
– 1 Tomato, finely diced
– 1/2 red onion
– Juice of 1/2 lime
– 1 teaspoon olive oil
– salt and pepper
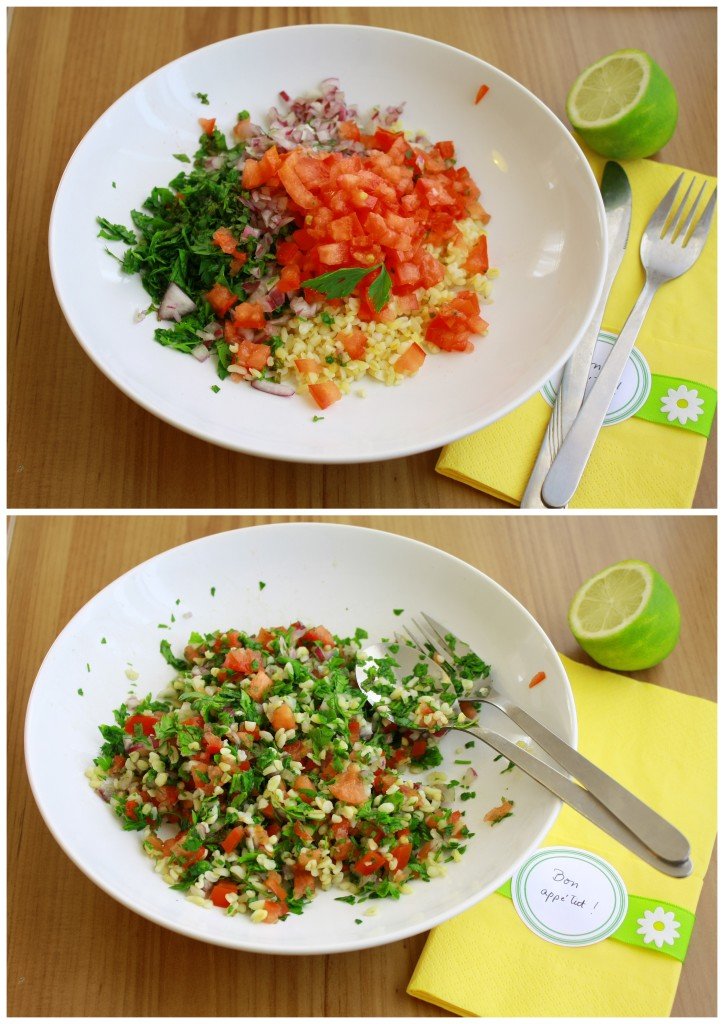
Preparation:
1)The first thing you need to do is wash and rinse the wheat twice. After you have done that, put it in a bowl and cover it with boiling water. Cover the bowl and let it sit for about 20 minutes, until the wheat absorbs the water.When the wheat is ready, put in a serving dish.
2) Using a knife, finely chop the parsley and mint leaves. I know it is tempting to use the food processor (if you have one) to chop all ingredients at once, but it changes the herb’s flavour, so do it the traditional way. Add the chopped leaves to the wheat.
3) Dice the tomatoes and the onion. Add to the rest of the ingredients.
4) Mix olive oil and lime juice. Add to the rest of the salad, together with salt and pepper to taste.
5) Toss all ingredients together several times. Serve.
Finally, I toasted some pitta bread in the oven with a drizzle of olive oil and oregano, and served the guacamole in them.
I simply cut one pitta bread into rectangles, then sliced it diagonally to form triangles. I put these slices in an oven tray covered with aluminium foil, drizzled them with olive oil, added salt and oregano and put them in the oven at 200 C for 5 minutes.
This is how they looked when they were done. They are very crispy, flavourful, and great for serving dips in them:

Have you had Tabbouleh and/or guacamole before? Dis you like them?
If you do like them, do you make your own at home too? Are your recipes similar to these ones or very different?
May you have a happy Wednesday. See you next week!
by Marcela M. | Aug 3, 2011 | Blog, Mousses and ice cream, Recipe Box, Recipes, Sweets, Uncategorized
Happy Wednesday everyone! How are you today? How is this week going, so far? I hope you are all enjoying the warmth of Summer or the chilly days of winter, wherever you may be.
I had originally planned to bring you the recipes for the rest of the salads and dips that we had for our simple summer lunch, last week, but I received so many requests for the Lemon Coconut Mousse one that I decided to leave the salads for the next post. I guess my readers have a sweet tooth! 😉
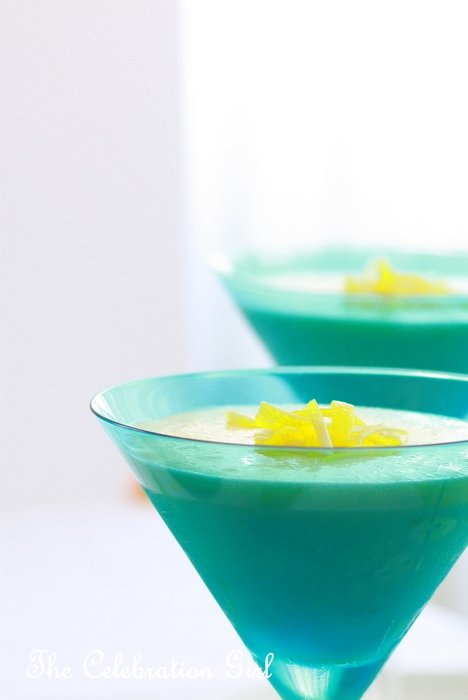
This Lemon Coconut mousse was adapted from a recipe by Ina Garten and it’s easy to do even though it does take some time. Basically, I make my own lemon curd (with a recipe I had completely forgotten I had and I rediscovered when going through an old recipe notebook!) and I replace the sweetened whipped cream of her original recipe, by coconut cream (I find that the mousse is already sweet enough, and I like the addition of the subtle coconut flavor). I also doubled the amount of lemon zest because I like it very lemony.
In order to make this mousse you will need:
Ingredients:
For the Lemon Curd (serves two and half cups):
1 egg
2 egg yolks
zest and juice of 2 lemons
40 grs of butter
150 grs of sugar
2 tablespoons of cornstarch
250 ml of water
For the Lemon Custard:
3 XL whole eggs
3 XL egg yolks
1 cup of sugar
1/2 cup of lemon juice
4 teaspoons of lemon zest
a dash of salt
Additionally, to turn the custard into mousse:
3 egg whites, whipped into a firm meringue together with 2 tablespoons of sugar
1 cup coconut cream.
You can find coconut cream in the Asian food aisle of your supermarket, or you can simply put a can of unopened coconut milk in the fridge overnight. When you open the can, cream will have formed on top. Scoop it and add it to the rest of the preparation, it’s that easy!
1) The first thing to do when making this mousse is to prepare the Lemon Curd. I like to do this the day before, to make my life easier, but you can also do everything on the same day.
In order to make the lemon curd, put all ingredients in a pan and cook until it thickens, stirring constantly so that the cream doesn’t burn/sticks to the bottom of the pan. It will take about 6/7 minutes. Let it cool for about 15 minutes and then let it rest on the fridge.
2) The second step is to make the Lemon Custard. I know the original recipe says that the whole recipe takes a total 15 minutes preparation but, in my experience it takes double as much time just to get the custard ready. But from then on, it’s only a few extra minutes!
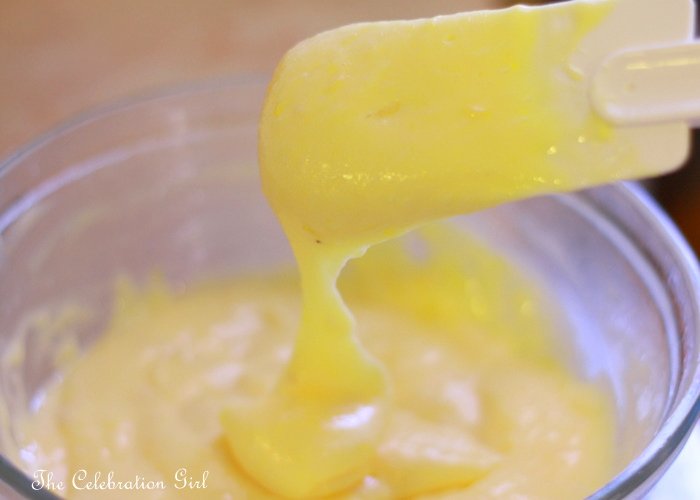
In order to make the custard, put all ingredients in a heat-proof bowl and put this one on top of a pan with simmering water. Let it cook, beating constantly with a whisk. After about 10 minutes it will start to thicken. Continue beating until it reaches pudding consistency (Argentinian friends: tiene que tener la textura de un postrecito). When it does, take the bowl off the heat and let it cool for about 15 minutes. Then, cover with plastic wrap and put in the fridge for 1-2 hours. When I make this mousse for a special occasion, I generally prepare both the Lemon Curd and the Lemon Custard the day before and let them sit in the fridge overnight.
After taking the custard out of the fridge it should look like this:
3) When the custard is ready, whip the egg whites until firm. Add the two tablespoons of sugar, one at a time, and continue beating until the meringue becomes glossy and firm.
4) Fold the egg whites carefully into the lemon custard with a spatula.
5) Add the coconut cream, making sure it incorporates evenly into the preparation.
6) Add 1 cup of Lemon Curd. Incorporate.
7) Put the Lemon Mousse in the fridge and chill for several hours. Serve and enjoy!
If you like lemony desserts, I am sure you will love this mousse: it is sweet and it has a wonderful, luscious texture.
In order to decorate it, I used just a few thin slices of lemon zest.

Would you like to have some?
I wish you a wonderful rest of the week and weekend. See you in a few days with a new post!


