by Marcela M. | Jun 29, 2011 | Blog, Cooking basics and tutorials, cupcakes, Recipe Box, Recipes, Sweets, Uncategorized

Hello there!
This blog is one month old today, so we’ll celebrate with a double post! In this one I’ll reveal the secret to my birthday’s flowery cupcakes and in the next one we’ll talk cake-pops.
The secret is…that there is no secret 😉 My flowery cupcakes were inspired by Glory Albin’s fabulous hydrangea cupcakes. I saw them in her blog, Glorious Treats, long ago, but the right occasion for making them never seemed to appear. Until my last birthday! And I will definitely be making them again.
My cupcakes were chocolate ones, as Glory’s, but I did not follow her recipe. I used, instead, one of the recipes that Bakerella shares in her book . This is a recipe my children LOVE, so if you have the book, I recommend it*. But if you don’t have the book, your favorite chocolate cupcake recipe will do. You could also try this one or this one (which Bakerella says adapts very well to cupcakes, without the frosting), which are delicious as well.
For the frosting, I used regular vegan buttercream, from the same batch I used for frosting my birthday cake.
How did I make those flowers? With the help of my trustworthy friend, Wilton’s 2D tip:
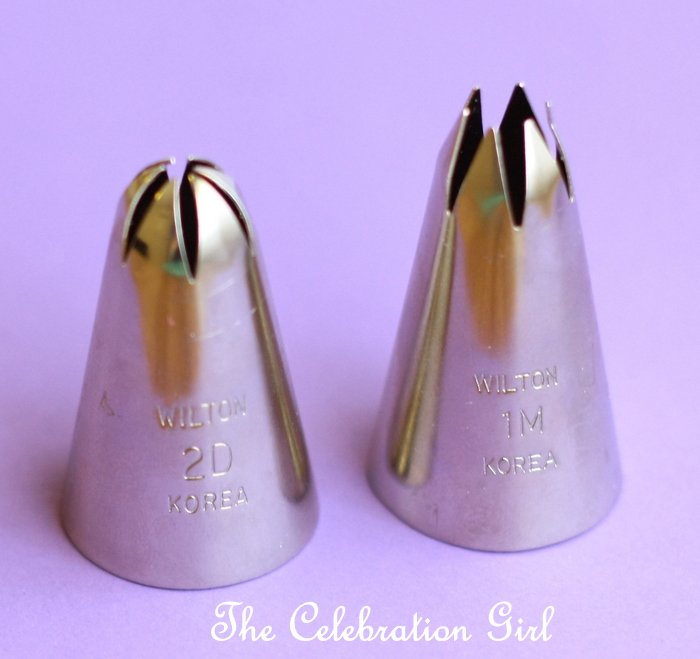
I divided the frosting in two, coloured each batch, put both colours side by side in the piping bag and then I simply piped the flowers. In order to see a VERY clear tutorial on how to do it, including pictures, check Glory’s blog here. Actually you should go visit her blog anyway because her confections, dessert tables and crafting ideas are truly amazing!
So there you have it: the secret to beautiful and easy hydrangea cupcakes!
I’ll see you later today with a post on cake-pops! Have a nice morning!
Note: There is a Dutch and a Brazilian version of Bakerella’s book “Cake Pops”. So one in Spanish may be on its way too!
by Marcela M. | Jun 24, 2011 | Blog, Crafts and DIY, Uncategorized

Hello everyone!
Today I’m bringing you a very easy DIY for making food labels for a party. Why add food labels at all? Well, in my opinion adding printables in general (food labels, cupcake toppers, cupcake wrappers, etc) helps give a table a more polished look. These ones that I will show you how to do today are super easy and fun to make, and can be tailored to many celebrations.
A few weeks before my birthday I had ordered The Twinery’s Sample Pack which contains 8 gorgeous, vibrant colors of baker’s twine. When I ordered them I had in mind a craft I am planning for my kids’ birthday, but when I saw the colors Caribbean and lilac, I wanted to include them in my own birthday celebration as well.
I browsed the internet and went to my local craft store for inspiration and decided to design very simple food labels, to which I could add the twine. So, using only Microsoft Publisher (I’m not confident in Corel, Photoshop or any other design software) and inspired by my blog’s logo, I designed a very simple aqua, lavender and grey bounty flag and wrote the names of the food I was planning to serve in French Script. Designing the flag was simply a matter of making a row of triangles, adjusting their size and filling them with colors. Easy enough for me! I then printed the labels on pale ivory textured cardboard paper (It took me only an A4 size page) and got ready to embellish them!
This is what I used to do it:

– 1 glue pen
– Baker’s twine in Caribbean (As I previously said, I purchased mine from The Twinery, and I am mentioning this because not all shops ship their products to Europe, and because I am very satisfied with how fast the pack arrived and with how beautiful the colors are.*)
– A pair of scissors
– Scrapbooking gems
– Tweezers
– Food labels
And here is what I did:
1) I put a dot of glue on the left hand corner of the food label’s bounty flag

2) Using tweezers, I added the scrapbooking gem, and pressed for a few seconds in order to make sure it had adhered properly.

This is how it looked like when added:

3) I then repeated steps 1 and 2 on the other corner. The label was looking like this by then:

3) I drew a line of glue all along the upper part of the bounty flag

5) After that, I immediately attached the twine. I tried both Caribbean and lilac and preferred the former for these cards, but both colors are gorgeous.

6) I pressed the twine unto the card for a few seconds and, when I was confident that it was properly attached, I cut the excess from the border, just above the gem located on the right-hand corner. This is how the label looked by then:

6) I finally folded the label just above the upper portion of the flag and it was finished!

This is how they looked in daylight

I find them simple, yet girlie and pretty, and I believe the design to be versatile. One could use the same idea for a circus/parade party, for a 4th of July celebration, etc, by simply changing the flag’s colours and the twine used and avoiding the use of gems.
Have you ever handcrafted your own food labels/invitations or other printables using different materials? If you have, please share! I would love to see what you have done!
Have a lovely weekend and see you next week with more recipes and ideas!
* NOTE: I receive no compensation of any kind for the recommendations I make in this blog. I simply mention what works for me, and provide the corresponding links so that readers have all necessary information. If you purchase something I recommend by clicking on the amazon widget, I will get a commission within their sales’s associate program, but you are free not to do it that way. My only aim is to provide my readers with accurate information on what products I find good and reliable.
by Marcela M. | Jun 22, 2011 | Blog, Cakes, Recipe Box, Recipes, Sweets, Uncategorized

Since I published the pictures of the dessert table I created for my birthday, I received several questions about how I made this cake. So here go all the details!
The inspiration: I was inspired by this cake, from one of my favorite blogs, Call me cupcake, a place where food and art become one.
The recipe: For the batter, I used one of my very favorite recipes, the one for Country Living’s Lemon Blackberry Cake, which appears in the book Great Cakes (which I have listed in the amazon widget included in the right hand bar, because it has a wonderful compilation of amazing, reliable recipes). The quantities for one cake are enough for a two layer 9 inch cake or, as in this case, a 4 layer 6 inch cake. One of the beauties of this cake is that it bakes perfectly, and comes out of the even with an even top, so most of the time it is not necessary to level it.
The ombré look: I baked each layer separately, as is recommended by the recipe. I followed the recipe’s baking times but watched it carefully just in case (since my layers were smaller than the ones of the original recipe)
Since I have two 6x 2 inch Wilton cake pans , I did it in 2 sets and put the batter in the fridge in the meantime. For colouring the layers I used a toothpick (I use Wilton gel colors) and added 4,3,2, and 1 toothpick of lavender to each layer. For the softer shades, I also added just a little tiny bit of pink.
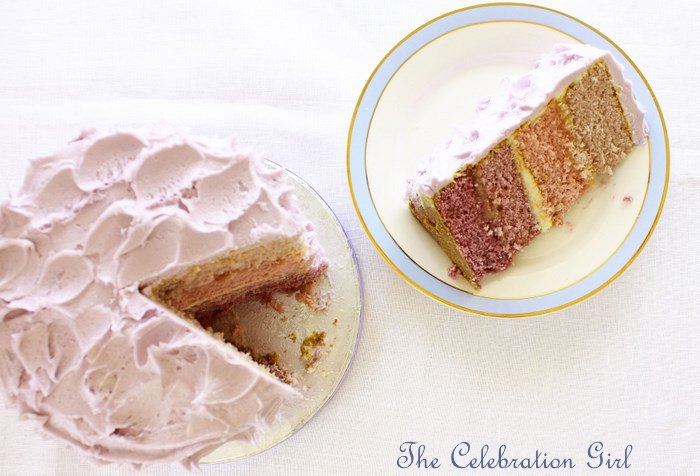
The Fillings: I filled the cake with two layers of lemon curd and one layer of vanilla buttercream. The buttercream was vegan, home- made, following this recipe (I used a combination of margarine and non-hidrogenated shortening). The lemon curd was store-bought because I was running out of time ;). When I do make my own lemon curd, I sometimes use this recipe from Country Living.
The frosting: I frosted the cake in lavender coloured vanilla buttercream. I used very little food coloring because I didn’t want the frosting to overpower the ombré layers, or to be too dominant in the whole design of the table.
I frosted the cake in 3 layers: First, I did the crumb coating, and let it sit in the fridge for 1 hour. After that, I added a thick coat, and smoothed it. I let the cake sit in the fridge for another hour and, finally, I added a 3rd thin layer of buttercream and, with the back of a teaspoon, shaped it as seen in the pictures. Very, very easy!
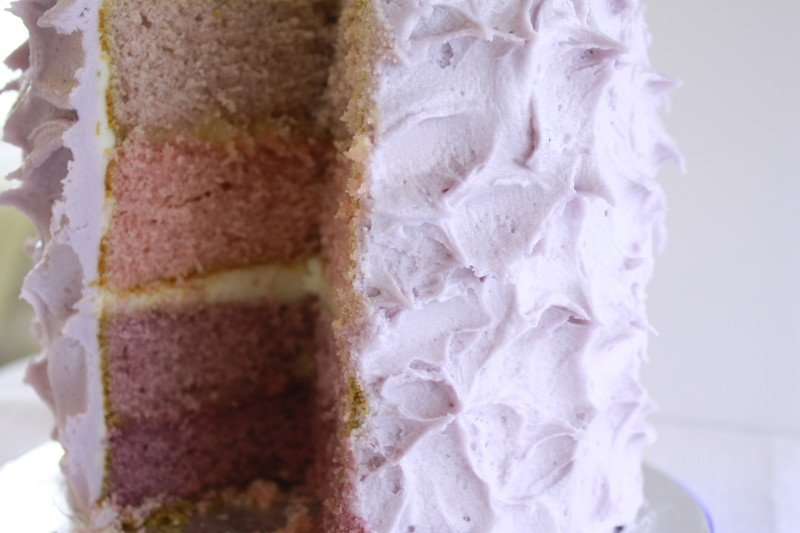
Would you like to bake this cake? I hope that you will and, if you do, please send me pictures!
Have a nice week!
by Marcela M. | Jun 16, 2011 | Blog, cookies, Cooking basics and tutorials, Recipe Box, Recipes, Sweets, Uncategorized

A few readers have asked me how I decorated the oreos I served for my birthday, so here goes the tutorial.
The truth is that I am not very good at drawing, nor do I own a copy cat projector, so piping elaborate designs becomes a challenge (and for me anything other than a circle falls under “elaborate”). But I really wanted to draw flowers on cookies for my birthday’s dessert table, so I had to find an easy and affordable way to do it.
The idea for these cookies occurred to me during a visit to my local baking supplies store, where I saw these Wilton Fondant Garden Shapes cut outs, and noticed that they were smaller than a normal round cookie. So I bought them and came out with the following super easy method for decorating chocolate dipped oreos (which is probably already used by somebody else too, because it is really, really simple). I did the transfer with royal icing and not with chocolate or candy melts because I must confess that I haven’t yet mastered either, but it could also be used with them too, if you prefer.
With regards to royal icing consistency, I follow Sweet Sugar Belle’s 20 second rule, because it allows me to use only one piping bag per color- as opposed to two (1 for outlining, 1 for flooding). It is also great for achieving the 3D look of the first and last row of cookies. As with most recipes, it is a matter of personal preference, this is just what works for me.
For decorating the oreos as I did you will need:
1- Chocolate dipped oreos
2- fondant cut outs/small cookie cutters of any shape you want
3- Piping bags filled with as many colors of royal icing as you wish to use in your design
4- I used number 2 piping tips, but I believe a number 3 may also work. If you want to outline the cookies with a fine line, use a number 1 tip.
Here is what I did to guide my not-really-skillfull piping:
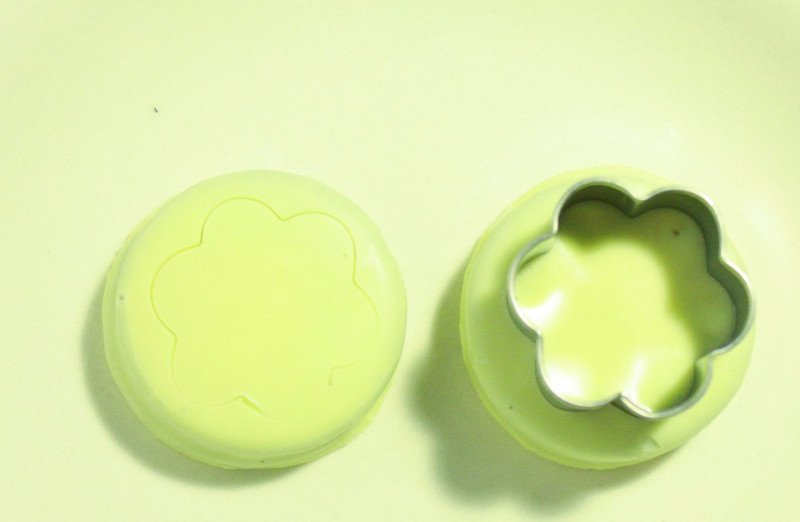
1) In the picture below you can see the chocolate dipped oreos and the fondant cutters. I used the ones I mentioned above, from Wilton, but you can use any which fits inside the shape of the cookie you want to decorate.

2) I pressed the cutters, firmly but softly, on top of the cookies. The pressure has to be enough so that it will leave a mark, but not that much that it will break the cookie!
Here you can see how the cutter left a shape in the cookie:
Now the method changes according to how you want to decorate your cookies.
3) a- If you want to decorate them as in the 2nd and 3rd rows, follow the next steps.
a1- Using a piping tip number 2 or 3, pipe around the shape left by the cutter. You may use a toothpick to guide the royal icing into the carving left by the cutter, and to make sure that the shape is respected:
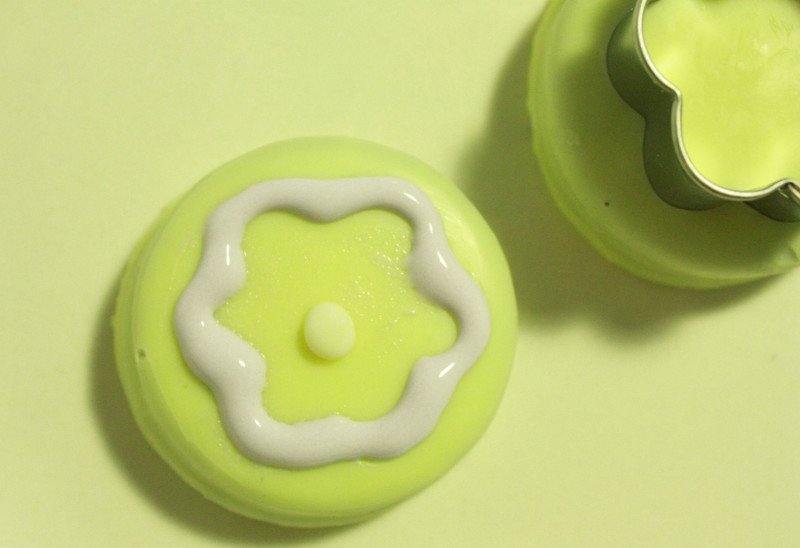
a2- Flood the inside of the cookie immediately. Pipe a dot in the middle of the daisies immediately after flooding. When you are finished they will look like this:

a3- Let dry for at least 2 hours. After that, outline the cookies with the same color.
3) b- If you want to give the decoration a 3D feeling (as the daisies of the 1st and 4th row), do as follows:
b1- Using a piping tip number 2/3, pipe a dot in the center of the daisies (as in the bottom right cookie). Let dry for 30 minutes.

b2- Pipe half of the petals, leaving always a blank one in between , as shown above. Let dry for 30 minutes.
b3- Pipe the remaining petals. Let dry completely.
And that’s all! Easy, isn’t it?
It is very important that you allow the piping to dry for 30 minutes between each step, in order to ensure that the different colors don’t mix. If you don’t, your cookies may end up looking like this:

Here is another picture of the finished cookies.
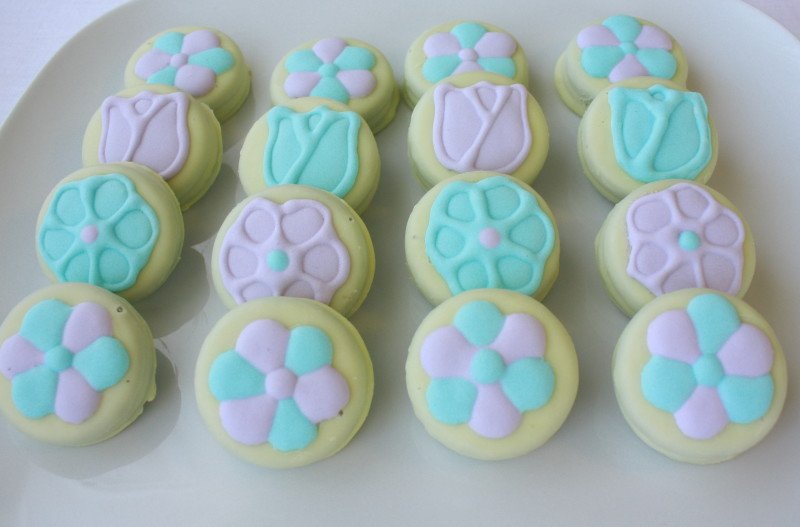
You can use this method with any shape of cutter, you can use different colors, add shimmer or disco dust, etc. There are so many possibilities and decorating cookies is so much fun!
What is your favourite method for decorating cookies?
by Marcela M. | Jun 12, 2011 | About, Blog, Parties, Uncategorized

Last weekend I celebrated my 35th birthday with a small gathering of friends. I do not normally celebrate but this time it was special: it was half a decade: time to thank for the good things in my life and to reflect on where I want to be five years from now. So I prepared a small dessert table, because the celebration was to take place in the afternoon (it was easy for all of us with children, as there was no need to hire baby sitters!).
I wanted the table to have a girlie feeling, but not to be too girlie-hence no pink! I kept the color palette simple, with my two favorite colors: aqua and lavender, and I kept the details simple as well. Since my birthday takes place in the Spring, I thought I could include flowers in the design of the sweets, and so I did. All sweets were prepared by myself and I also made the food labels and the cake-pops’ flags.
Sweets included white chocolate dipped oreos (store-bought), decorated with royal icing (by myself)…

Chocolate cake pops, dipped in white chocolate and covered in sprinkles…

Meringue cookies…

Mini alfajores de maizena/ cornstarch cookies, filled with lemon curd (the aqua ones) and vanilla buttercream (the lavender ones)…

Chocolate cupcakes with vanilla buttercream…

And the birthday cake…

It consisted of four layers of lemon cake, colored in different shades of lavender, filled with two layers of lemon curd, and one layer of vanilla buttercream, and frosted with vanilla buttercream.
Do you like to celebrate your birthdays?
I had an Amy Atlas moment!
by Marcela M. | Jun 7, 2011 | Blog, Cakes, Recipe Box, Recipes, Sweets, Uncategorized

Yesterday I took a cake decorating course in a nearby city, 5 whole hours dedicated to carving and beautifying a wonky cake.
It was a wonderful experience. I really enjoy cake decorating but my sole experience with fondant had come from decorating my babies’ birthday cakes, and some cupcakes for Christmas, and whatever I knew, I had learnt watching videos on youtube or reading whatever material I could find on the internet. So I felt that I needed some kind of more formal training, a professor to whom I could ask some questions, and who could show me, hands on, how to do things. I started looking for course earlier this year and, through a facebook add (go figure!) I found Sugar Designs, the bakery where the course took place.
We were five students, and a teacher, which was a nice number. Everything was prepared for us to start working and laid out nicely on the working space. We were taught how to carve a cake to give it a wonky shape, how to smooth it with buttercream to make sure that all edges were sharp and that the surface was ready for fondant, how to cover a cake drum and a cake, how to insert cake dowels and how to stack the upper tier of a wonky cake, as well as how to make butterflies and roses out of modelling paste, and little fondant balls and green grass. All these techniques would of course require a lot of practice to master them, but I am quite happy with the result, being the first time I tried them!
If you enjoy cake decorating, I would encourage you to take a course. It is great fun and the techniques one learns can be applied to so many other cake creations!
Here are some other pictures of the cake I made:
There were flowers…

…and butterflies…

…and roses…

…and green grass…

This is a view of the lower tier:

Here is a view of the upper tier:

And here are some other views of it, from the back, from the sides and from above:


Did you ever take a cake decorating or other baking course? Would you like to?
Have a nice week!


