by Marcela M. | Apr 15, 2013 | Blog, Children, Crafts and DIY, Paper crafts and card making

Almost one year ago, when Luka and Zoe were about to turn 4, we decided that their shared room needed a major re-haul. Their room had evolved in a disorganized way from the baby days to toddler-hood and, what had once been a cute baby room, had turned into a more or less well managed chaos.
The main problem was what I called “the toy storage situation”. It’s not that Luka and Zoe had that many toys, because we purge every 6 months, but that what they had didn’t have a place of its own. We had a couple of big toy baskets where everything was just thrown in at the end of the day and, even if you may think that this is a good idea because cleanup is easy, let me tell you this: it’s the opposite. When everything gets thrown into a big basket at the end of the day, nothing is easily found the following morning. Our living room’s floor (which is our main playing area because the rooms are rather small) was permanently covered in toys, the children were frustrated because they couldn’t find fast what they wanted and I was frustrated because the house was a constant mess. So we decided to do something about it, and started planning the new room.
I repainted the walls in white and we chose white furniture to make the room look a little bit bigger. We bought the beds, converted their old changing table into a bookshelf for Luka and Zoe’s books and big puzzles and, after measuring, re measuring and various visits to Ikea, we opted for their TROFAST toy storage system, which we adore. Big toys and teddies were placed in boxes under the beds, and everything else was stored in the TROFAST containers, with a preference for smaller ones, to allow greater classification. Toys inside some of the containers were also classified: small puzzles, for example, were placed inside different Ikea freezer bags, so that the different pieces wouldn’t get mixed up. Big, medium-sized and small toys were under control, hurray! Luka and Zoe loved the system and adapted in no time.
But until recently, we hadn’t found a solution for tiny toys…you know the ones, the cute little wooden pegs, the tiny puzzles or, if you have a little girl, the tiny hair accessories that seem to end up everywhere. The boxes I found in stores were either too big, too ugly, had no cover or costed a lot. Leaving the toys just laying on the shelves means that cleaning takes longer, so we had to come up with another solution…and we did!
What I am talking about? Origami boxes!
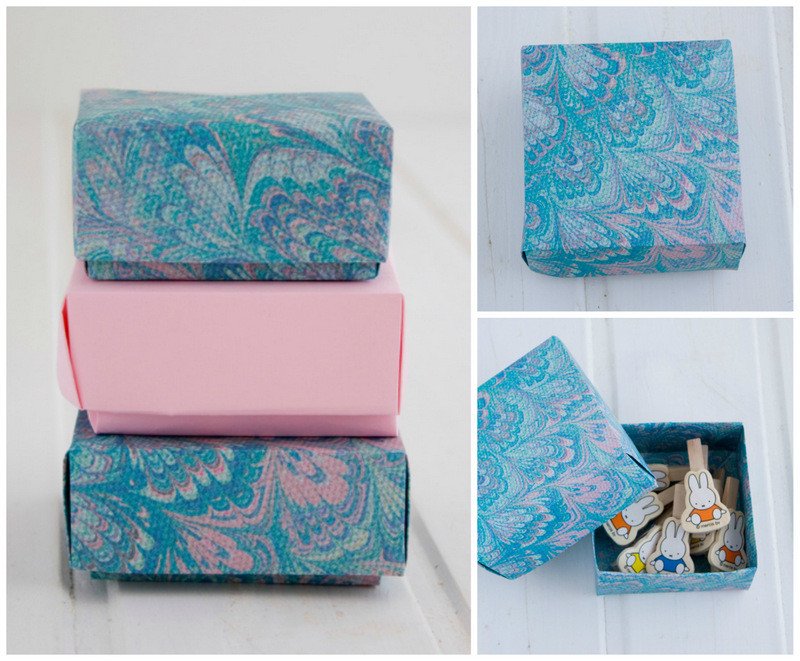
Materials needed? Only paper! And they are so easy, that you can make as many as you want, in whatever size you need and you can customize them for virtually no money. You don’t even need origami paper to make them, a simple sheet of paper will suffice. If your children are old enough, you can have fun making a few with them, and the decorate them together with some glitter, washi tape, ribbon, scrapbook paper and supplies, buttons or whatever you have in hand!
Let me show you how to do it:
For making each box you will need 2 sheets of paper. If you have a bone folder, it is handy for pressing the folds but if you don’t, don’t worry!. The paper needs to be squared, so if you are using regular A4 size sheets, you will need to trim them before you begin.

Now let’s get started!
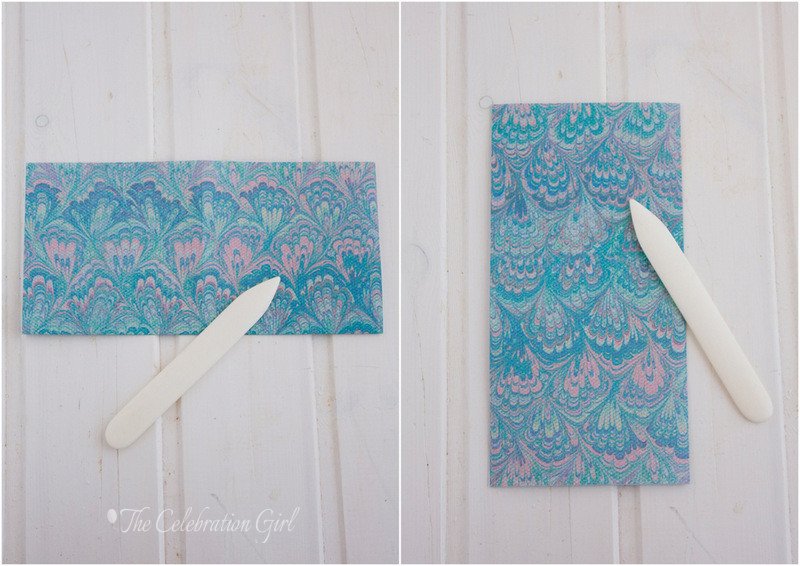
1) Put the paper on the table, patterned side down (the white side should be facing you). Fold the paper in half, horizontally, making sure that the corners match perfectly. Then open the paper again and fold it vertically (lengthwise). Press with the bone folder (or your nails) and open it again.
2) The previous folds will have formed a cross. Fold each corner, so that they all meet at the center of the page. When you are done, your paper will look as the picture on the right.
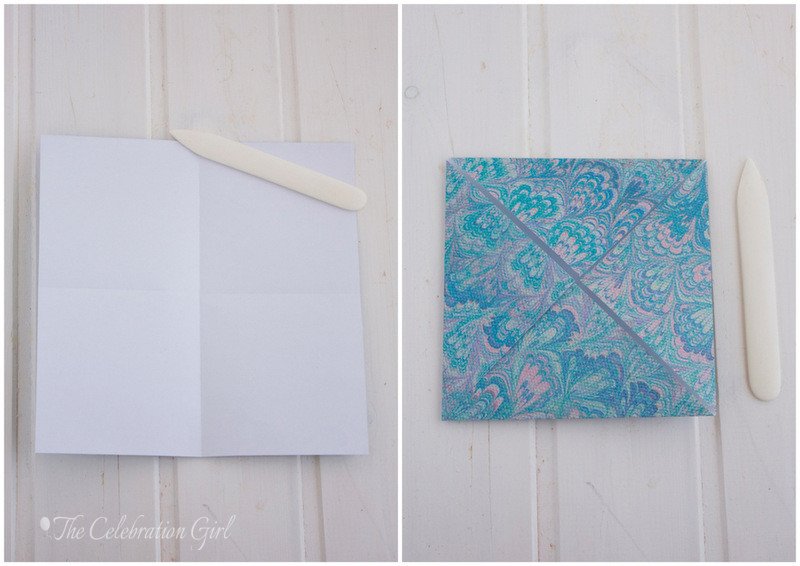
3) Fold the bottom side of the paper in half, to meet the center. Make sure that it meets exactly the center of the page. Do the same with the upper side. When you are finished, your paper will look as in the picture on the right.
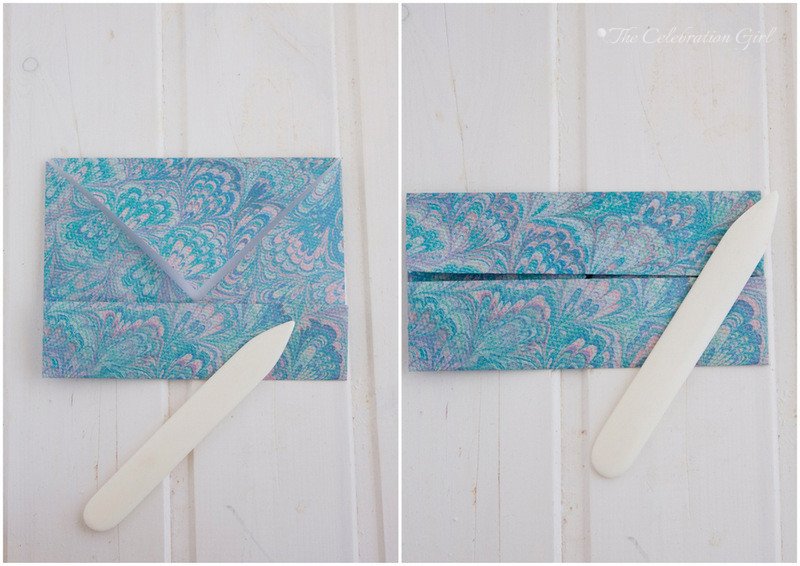
4) Open the bottom and upper folds. This time, fold the paper left and right side of the paper in half, so that they meet at the center (in the picture above I folded just one side to show you the mechanics)
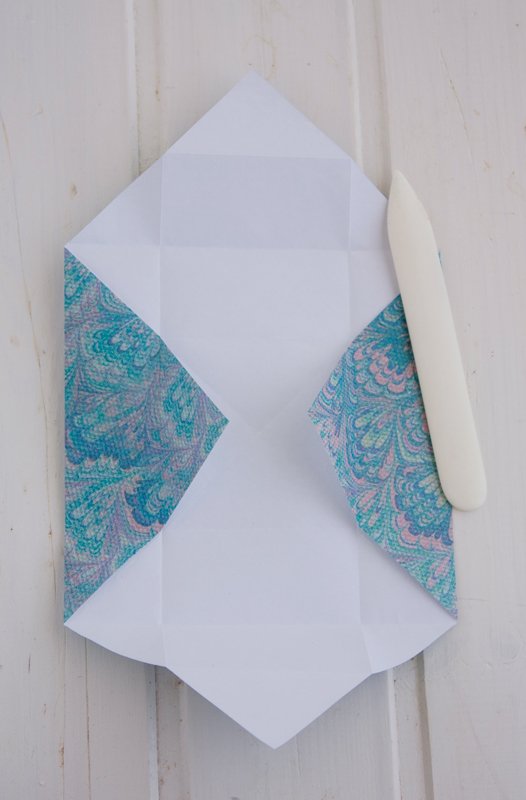
5) Open the folds as in the picture on the left.
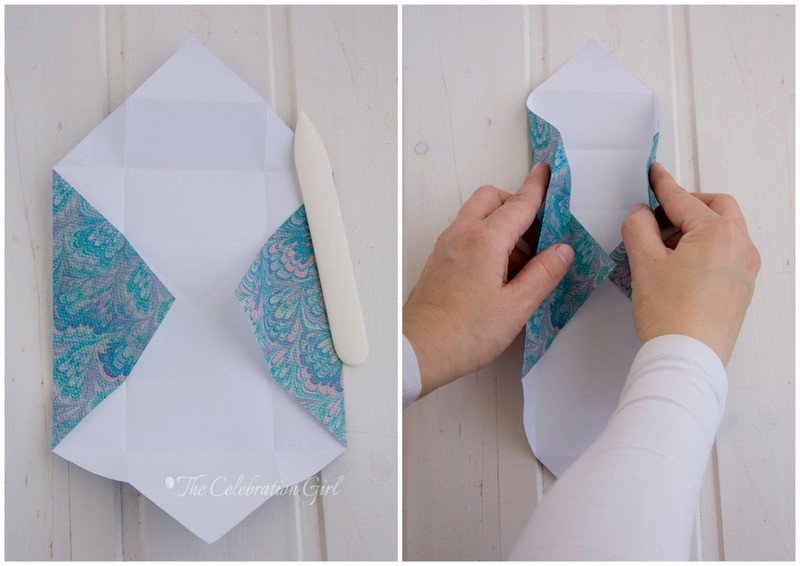
6) Take the paper with your hands, lift the sides slightly and press with your fingers on the upper corners to make a “reverse fold”.
7) Press the fold as in the picture of the left and, then, lift the upper side and fold the flap. When you are finished, it will look like the picture on the right.
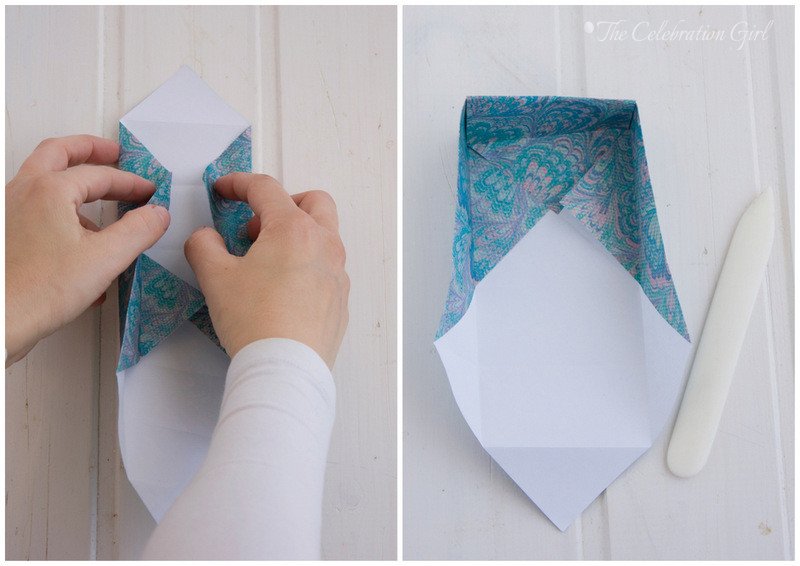
8) Repeat the reverse fold on the other side, lift and fold the the flap. And you are done! Your box is ready!

Now, in order to make the box’s cover, you will need to make just one small variation to the steps shown above. Here’s the step by step explanation and a picture of the modification needed:
1) Take your sheet of paper and repeat steps 1 and 2 above.
2) Here’s what you need to do differently: When you come to steps 3 and 4, instead of folding the paper in half to meet the center, fold it just a few centimeters before it. This will make the cover slightly bigger than the box, so that you can close it.
3) Proceed with steps 5 to 8 as in the box pictures.
You are now ready to fill your box with whatever tiny thing is going around your children’s bedroom, or even in your desk (they are great for small pins, clips, etc, so you can have your desk’s drawers tidy!). You can also make them in different colors to make it easy to identify what is inside.
Now, I’m curious: How do YOU organize your children’s toys? Please, share in the comments below!

Con sabor latino…
Hace poco menos de un año, cuando Luka y Zoe estaban a punto de cumplir 4, decidimos que su habitación (que es compartida), necesitaban un cambio urgente. Su cuarto había evolucionado de forma desordenada desde su nacimiento y, lo que en algun momento había sido una dulce habitación de bebé, se había transformado en un caos medianamente manejable.
El mayor problema que teníamos era lo que yo había dado en llamar “la situación jugueteril”. Y ojo, no es que Luka y Zoe tuvieran taaantos juguetes, sino que los que tenían no contaban con un espacio propio donde ser guardados. Teníamos un par de canastos grandes en el todos los juguetes eran colocados, sin orden alguno, al final del día y, aunque esto pueda parecerles una forma facil de limpiar dejenme decirles lo siguiente: es lo opuesto.Esos mismos juguetes que tirabamos a los apurones por la noche, eran aquellos con los que los niños querían jugar por la mañana y, al no encontrar rápidamente aquél que buscaban, terminaban tirando todo al suelo nuevamente ni bien se despertaban. La casa era un caos permanente, con juguetes alfombrando el piso del living (nuestra area de juegos, ya que las habitaciones son pequeñas), Luka y Zoe estaban frustrados porque no encontraban lo que buscaban, y yo estaba frustrada por el lío descomunal. Así que decidimos cambiar esta situación y comenzamos a planificar la reforma del cuarto.
Comenzamos pintando las paredes de blanco, y compramos muebles del mismo color, para agrandar un poco el espacio, que de por sí es pequeño. Compramos camas de niño, transformamos su viejo mueble cambiador en mini biblioteca para sus libritos y sus rompecabezas y, luego de medir, volver a medir y medir una vez más, elegimos el sistema de almacenamiento de juguetes de Ikea llamado TROFAST, del que estamos enamorados. Los juguetes grandes y los peluches, fueron colocados en cajas debajo de las camas, y los juguetes medianos y pequeños, organizados en los recipientes de plastico del sistema TROFAST (que tienen hasta tapa para que no se llenen de polvo!). Dentro de este sistema, elegimos recipientes chicos, que nos obligaran a clasificar los juguetes lo más posible y, cuando optamos por recipientes más grandes, clasificamos de diferentes maneras lo que colocamos dentro (por ejemplo, los puzzles que perdieron su caja original están colocados dentro de uno de los recipientes rosas de Zoe, pero separados dentro de bolsas de freezer de Ikea, para que no se mezclen las piezas). Juguetes grandes, medianos y pequeños, estaban en su lugar, yay! Luka y Zoe amaron el nuevo orden instantaneamente y se adaptaron al mismo en un santiamén.
Pero aún teniamos un problema: los juguetitos diminutos…ustedes me entienden, los mini broches de madera que ahora están en todas partes, los mini puzzles y, si tienen niñas, los millones de gomitas y prensitas para el cabello que terminan en todos los rincones. Las cajitas que encontraba por allí eran o demasiado grandes, o feas, sin tapa o carísimas, y dejar los juguetitos en los estantes no era una opción porque ésto dificulta muchisimo la limpieza….necesitábamos otra solución, y la encontramos!
A qué me refiero? A cajitas de origami!
Material necesario? Solo papel! Además son tán faciles de hacer que puedan hacerlas en cantidad, de diferentes colores y hasta decorarlas como más les guste por casi nada de dinero. Ni siquiera hace falta que usen papel de arroz, una simple hoja que tengan a man basta, y si tienen niños más grande, pueden hacerlas con ellos y luego divertirse decorandolas con papel, cintas, glitter, restos de scrap, washi tape,botones, o lo que se les ocurra.
Para cada cajita necesitarán dos hojas de papel. Si tienen ese instrumento llamado bone folder que se ve en las fotos, es super usarlo para afirmar los pliegues, pero si no tienen uno, no se hagan problemas, que las uñas sirven igual! El papel que utilicen tiene que ser cuadrado, asi que si estan adaptando una hoja de papel A4, cortenla cuadradita antes de comenzar.
Aquí están las instrucciones que acompañan las fotos:
1)Si su papel tiene diseño solo de un lado, coloquenlo con el mismo sobre la mesa y la parte blanca mirandolos a ustedes. Doblen el papel por la mitad horizontalmente.Luego, abran el papel y vuelvan a doblar, pero verticalmente. Presionen sobre los pliegues con el bone folder o los dedos, y vuelvan a abrir el papel.
2) Al abrir el papel notarán que los pliegues previos han dejado marcas en el mismo (una cruz). Estas marcas guiarán los proximos pliegues. A continuación, doblen cada una de las puntas del papel hacia el centro del mismo (que toquen el centro). Fijense en la foto de la derecha que están sobre el punto numero 2 para ver cómo tiene que quedar el papel luego de los pliegues.
3) Doblen la parte inferior del papel por la mitad, haciendola llegar hasta el centro. A continuación doblen la parte superior de la misma manera. La foto de la derecha correspondiente al numero 3 les mostrará cómo debe quedar el papel liego de estos pliegues.
4) Desdoblen el papel hasta que les quede como al terminar el punto 2. Vamos a repetir los dobleces del punto 3, pero en lugar de hacerlo con las partes superior e inferior del papel, lo haremos con los lados, izquierdo y derecho.
5) Deshagan casi todos los dobleces, hasta que el papel les quede como en la foto de la izquierda (arriba del numero 5).
6) Tomando el papel con sus manos, levanten los costados del papel y presionen levemente sobre la parte superior para generar lo que se conoce como “doblez invertido” (las marcas del papel guiarán la forma, no se preocupen).
7) Presionen el doblez invertido con los dedos (como en la foto), levanten la parte superior de cajita y cierren la pestaña. Su cajita tendrá listas ya 3 paredes.
8) Repitan el doblez invertido en la parte inferior de la misma, levanten la parte superior y cierren la pestaña como en los pasos anteriores…y su cajita estará lista!
Para hacer la tapa de la cajita, deberán seguir casi los mismos pasos, con una sola variación, como les explico a continuación:
1) Tomen su hoja de papel y realicen los mismos pliegues que en los puntos 1 y 2.
2) Cuando lleguen al punto 3 y 4, deberán hacer una pequeña cosa diferente: en lugar de doblar los costados por la mitad,para que lleguen al centro, dejen un espacio entre el centro y el borde. Esta simple diferencia hará que la tapa sea ligeramente más grande que la cajita y les permitirá cerrarla! Observen la foto correspondiente para darse una idea de cómo hacerlo.
3) Repitan los pasos 5 a 8 tal y como están explicados para hacer el cuerpo de la caja.
Y listo! Ahora su cajita estará lista para ser llenada con esas pequeñas cositas que puedan andar dando vuelta por las habitaciones de los niños, o aun en su escritorio, porque son ideales para guardar clips, broches, alfileres, y tutti cuanti, y así mantener los cajones organizados. Pueden, incluso, hacer varias de diferentes colores para identificar más facilmente lo que haya dentro!
Ahora tengo curiosidad, cuentenme ¿cómo organizan ustedes los juguetes de sus niños?
by Marcela M. | Dec 23, 2012 | Blog, Crafts and DIY
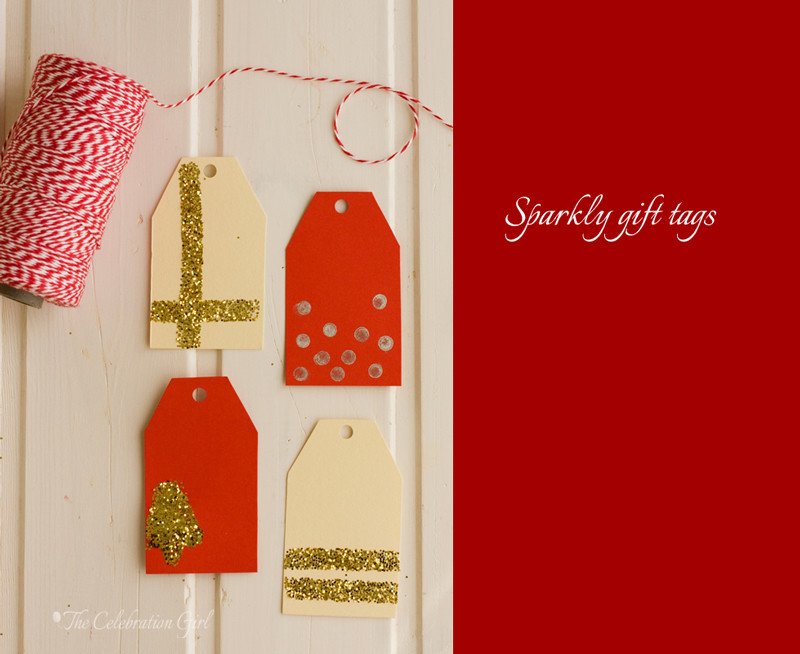
Good morning dear friends! Only 2 days left until Christmas! Time has really passed by so quickly, don’t you think?
Today we will continue beautifying our presents, this time with super easy but very sparkly gift tags. All you will need is cardboard in the color of your choice, glitter, double sided tape, a rubber pencil and a stamp pad or ink (I chose to use a silver inked stamp pad, because that’s what I had at home, but you may use tempera or other types of paint). I also used a small circle punch and a pencil, to trace the template onto the cardboard.
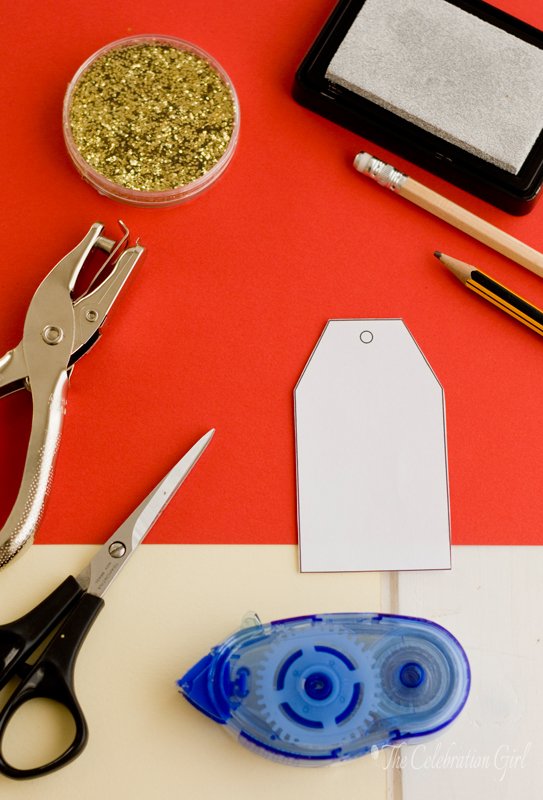
I cut the gift tags using a template that I downloaded from HERE. You will see that they have several different ones, so you have many options. You could also use a tag punch, if you have one.
These are the two methods I used:
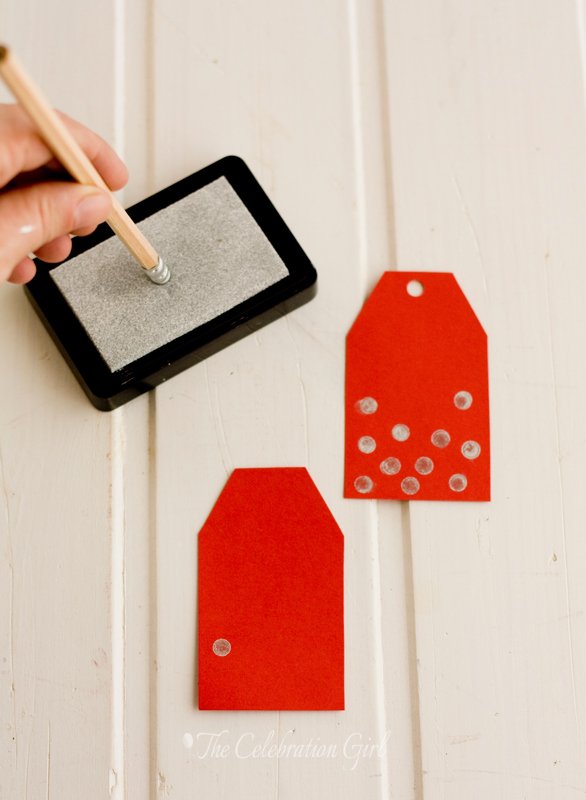
1) Rubber stamped gift tag: I had seen this method on pinterest some time ago, and I really wanted to try it. It is so simple and versatile. All you have to do is to press the rubber side of a rubber pencil against the ink pad, to dip it in ink, and then press with it onto the tag, to stamp it, as in the picture below. I used a red tag and silver ink, but you could also different colors, to make it look like confetti. I have also done this with tempera, with my kids and it’s a lot of fun.
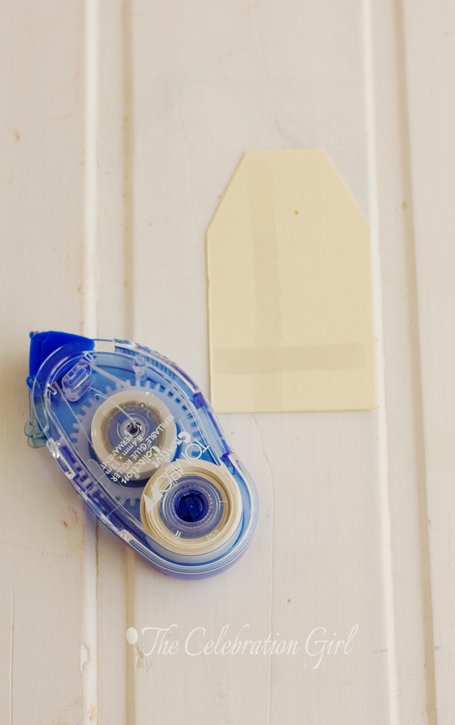
2) Glittered tags: Another very easy, affordable way to add some sparkle. Put your gift tag on top of a sheet of paper (glitter is very sticky and a pain to remove, so you want to make sure that you work on a surface that will minimize the mess). Place double sided tape along the gift tag, wherever you want the glitter to go, and sprinkle it on top. Let it sit and then lift the tag to remove the excess. If there’s glitter somewhere you don’t want it to be, dust it slowly with a brush.
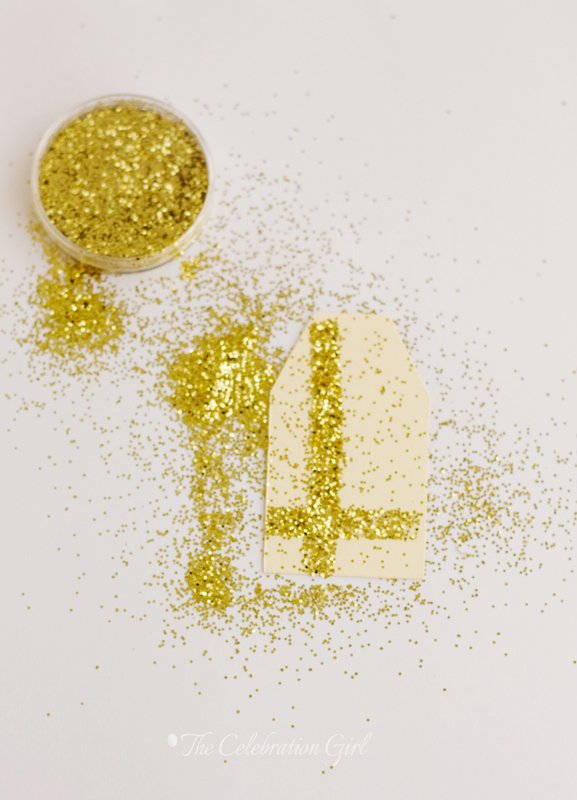
You may also use a glue pen glue to draw shapes, as I did with the little pine tree that can be seen in the picture below, or even a glitter pen.
When you are done applying glitter to all your tags, lift the paper holding it by both sides and put the remaining glitter back in its container or discard.
Happy wrapping!
Con sabor latino…
Buenos días queridos amigos! Sólo faltan 2 días para la navidad ¿pueden creerlo? El tiempo ha volado este mes de diciembre ¿no les parece?
En el post de hoy seguimos embelleciendo nuestros paquetes de regalo, esta vez con etiquetas brillantes, luminosas y facilísimas. Lo único que necesitan es cartulina, brillantina o givré, cinta doble faz, tinta y almohadilla para sellos (o tempera) y un lapiz con goma. Yo usé tambien tijera, un lapiz para trazar el molde de la etiqueta y un troquel de circulo individual para hacer el huequito por el cual pasar la cinta para atar las etiquetas.
Corté las etiquetas usando un modelo que descargué de ESTA PAGINA. Como pueden ver, allí hay 6 diferentes, así que tienen variedad para elegir el que más les guste.
Aquí estan los dos métodos que yo usé para hacer mis etiquetas:
1) Etiqueta estampada con goma de borrar: Había visto esta idea en pinterest pero utilizada para otra cosa, y tenía muchas ganas de probarla. Y es tan simple y versatil! Todo lo que hay que hacer es presionar la goma del lapiz en la almohada para sellos, que habremos embebido antes con la tinta qué más nos guste, y luego presionamos con la misma goma en el papel, para dejar el sello. Yo usé tarjeta colorada y tinta plateada, pero puede usarse cualquier color, y hasta hacer sellos multicolores , como si fuera confetti, usando nada más que tempera u otra tinta que tengamos a mano. Es genial para hacer con niños, ya que ellos se divierten como locos estampando en todas partes.
2) Etiqueta abrillantada: Otra técnica facilísima y super barata para agregar brillo a sus etiquetas. Antes de comenzar, eso sí, coloquen la etiqueta sobre una hoja de papel, porque la brillantina es super pegajosa y dificil de sacar, así que asegurense de trabajar prolijamente y de manera a evitar el enchastre. Coloquen cinta doble faz sobre la etiqueta, en los lugares donde quieran que se vea brillante luego. Inmediatamente despues, tiren brillantina arriba y dejen que se adhiera, apenas un ratito. Levanten la etiqueta y sacudanla un poco para sacar el exceso. Si queda algo de brillantina en lugares donde no les gusta, saquenla usando un pincelito limpio. Tambien puede usarse una lapicera de pegamento para dibujar formas, como yo hice con el pinito que ven en la primera y en la última foto, o una lapicera con brillo (pero con estas ultimas queda menos uniforme).
Cuando terminen de aplicar brillantina, levanten la hoja de papel de ambos lados y vuelvan a colocar el sobrante en el recipiente, o descarten.
Espero que se diviertan mucho envolviendo regalitos!
by Marcela M. | Dec 22, 2012 | Blog, Crafts and DIY
Good morning dear friends! We are in the final countdown for Christmas, only 2 more days to go! These days are generally the more hectic ones, so I’ll keep all posts short and easy.
Have you finished wrapping your presents? If you haven’t, here are a few simple ideas to inspire your last minute preparations:
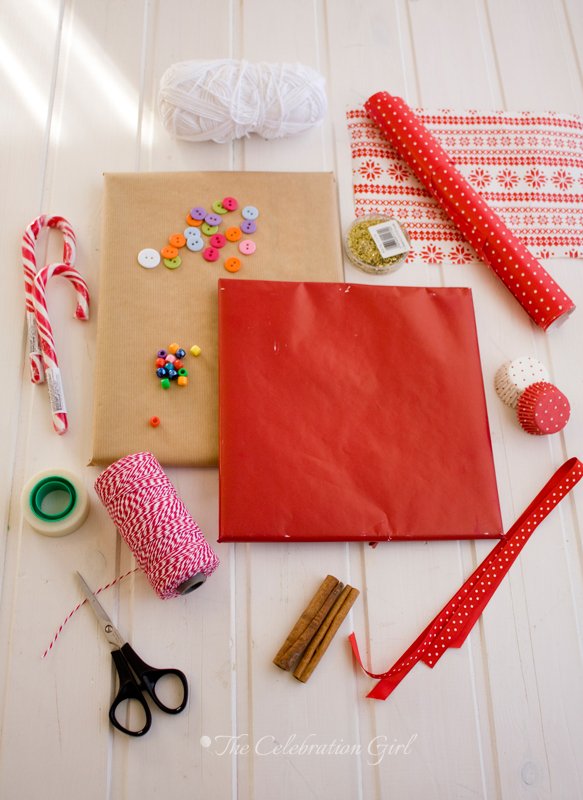
The materials that you need for these wrapping ideas are very simple: paper (I used red and kraft), scraps of paper, ribbon, twine or wool, candy cane or cinnamon sticks, buttons, beads, cupcake cases, scissors and scotch tape. As I promised before, no expensive or rare materials.
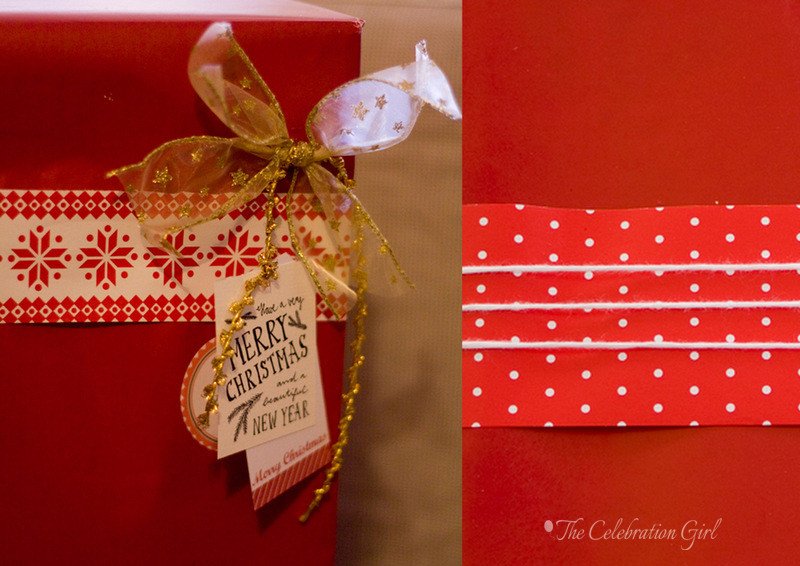
1) Layer different papers: The simplest, most inexpensive idea: add details using paper, either in the same or in contrasting colors to the one of the main wrap. I normally cut a stripe of paper and wrap the present horizontally, to add detail, then finish with a bow and a few gift tags. You may also use scraps of fabric, if you have some available.
2) Layer paper and twine/wool/thread: Departing from the idea above, add twine, ribbon, yarn or even wool (as in the right picture, above). I like to use wool because it is inexpensive and adds a winter feeling to the package. Play with it and experiment, try different looks, sometimes adding many stripes instead of one makes all the difference.
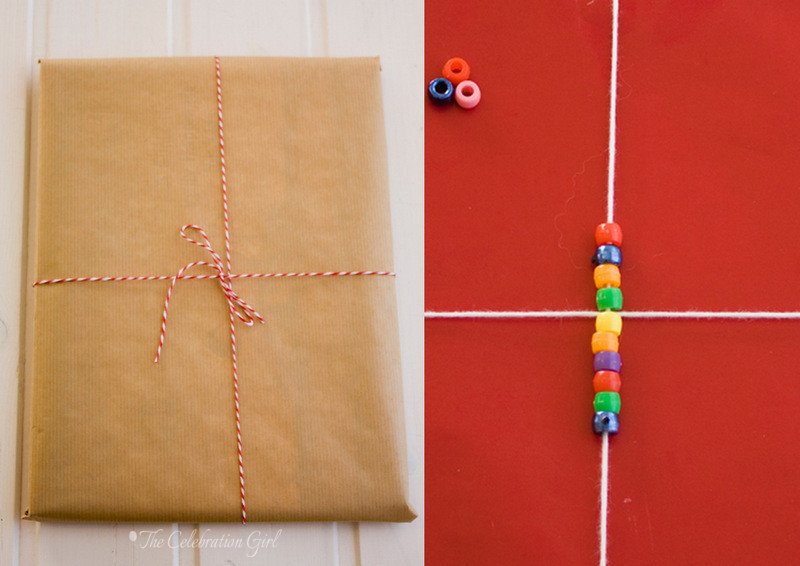
3) Use beads to decorate a simple thread of wool: In the picture above, I had started with a simple thread wrapping the present in a cross (as in the picture of the left) but at the last minute decided to add some beads (I took these from my children’s arts and crafts box!)
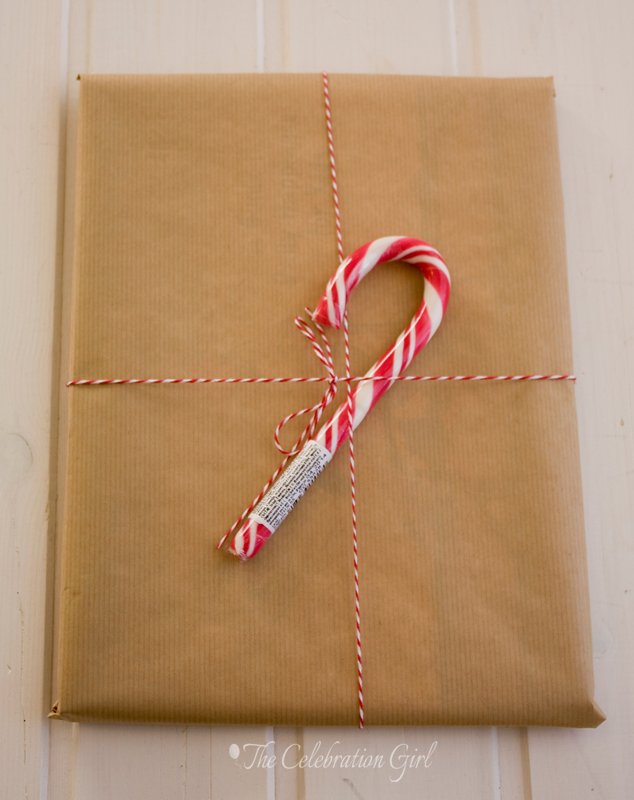
4) Add something edible, like a candy cane to a simple cross wrap: For children, I like candy cane and, depending on what I am gifting, a few cinnamon sticks tied with red ribbon also look very pretty.
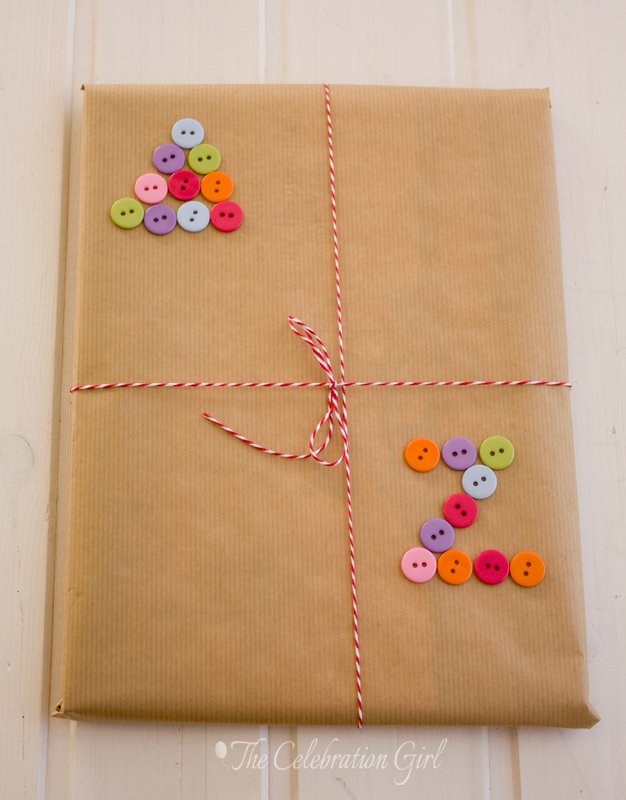
5) Draw shapes with buttons: Collect all those mismatched buttons that are going around the house and play with them, drawing shapes or even the recipient’s initials. I attached them using a hot glue gun.
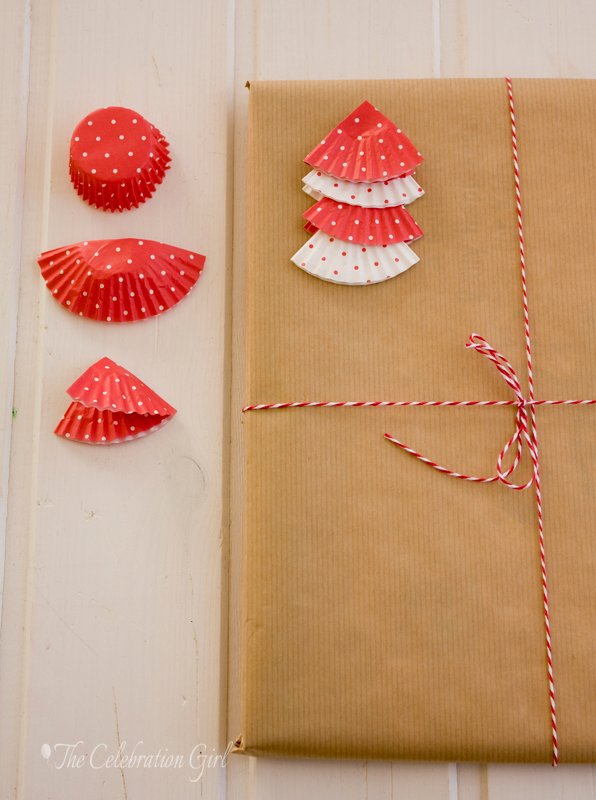
6) Make a tree by folding and overlapping cupcake cases: I used mini cupcake cases because the gift was small, but if all you have are average sized ones, simply fold them once more. After you have folded all cases, attach them with a drop of glue, inserting each one inside the fold of the upper one, as in the picture.
Do you need some more ideas? Check my “Pretty packaging” pinterest board for plenty of inspiration!
Con sabor latino…
Buenos días queridos amigos! Parece mentira pero ya estamos en la recta final de este calendario de adviento, y la navidad nos está pisando los talones. Estos días suelen ser los más agitados, así que prometo mantener los últimos posts cortitos y bien sencillos.
Ya terminaron de envolver sus regalos? Si no lo hicieron aún, aquí les dejo algunas ideas que espero les sirvan de inspiración. Los materiales usados son muy simples: papel de regalo, retazos de papeles texturados y estampados, hilo, lana, cintas, botones, cuentas, pirotines de cupcakes, bastones de caramelo, ramas de canela, tijeras y cinta adhesiva. Tal y como les prometí, nada de materiales caros ni dificiles de conseguir! Aqui estan las ideas:
1) Superpongan diferentes papeles: La más sencilla de las ideas, agregar detalles en papel, ya sea dentro de la misma paleta de color o en tonos contrastantes. Yo suelo recortar una tira de papel diferente a la del envoltorio principal, con la que envuelvo el regalo horizontalmente, y luego lo termino con moños y etiquetas. Tambien pueden hacer lo mismo pero con retazos de tela en lugar de papel.
2) Superpongan papeles e hilos: Partiendo de la idea anterior, agreguen hilos, lanas o cintas. La lana me gusta mucho porque le da un toque invernal. Jueguen, experimenten con distintos looks, a veces agregar varias vueltas en lugar de una sola hace toda la diferencia.
3)Usen cuentas para decorar un hilo colocado en cruz: En el regalo de la derecha yo habia colocado lana blanca en cruz, como en la foto de la izquierda, y a ultimo momento decidí agregar cuentas (que saqué del gabinete de arte de mis hijos!)para darle más detalle y color.
4) Agreguen un detalle comestible: Puede ser un bastoncito de caramelo, que quedan tan lindos y a los niños les llaman tanto la atención, o ramitas de canela atadas con un moñito rojo, por ejemplo.
5) Usen botones para dibujar sobre el papel: Junten todos esos botones sueltos que andan desperdigados por la casa y jueguen sobre el papel, dibujando formas o hasta las iniciales de la persona regalada. Yo pegué los botones con una pistola de pegamento caliente.
6) Usen pirotines de cupcakes para armar un arbolito de navidad: Yo usé pirotines tamaño miniatura porque mi regalo era pequeño, pero si sólo encuentran de tamaño tradicional, sólo deberan doblarlos una vez más. En la última foto pueden ver la forma de doblarlo y, una vez hecho esto,sólo tienen que pegarlos con una gota de cola en la parte de adentro del pirotin superior, para que la punta de los inferiores quede escondida.
Necesitan más ideas? No dejen de ver mi board de pinterest!
by Marcela M. | Dec 21, 2012 | Blog, Crafts and DIY
Good evening dear friends! I’m still catching up with posts and getting up to speed with the last days of the advent calendar, so here comes today’s original post ( a little late but here we are!)
For the last days of the calendar, I am bringing you a series of gift wrapping ideas. This first post is about greeting cards, because I usually find that gift tags don’t have enough space for writing all that I would want to express so, whenever I give something to a loved one, I prefer to add a greeting card as well. Tomorrow I’ll give you some gift wrapping ideas, on Sunday we’ll make some gift tags and on Monday there will be one final super easy dessert. I hope you will join me in every post!
I started experimenting with card making back in November and I must confess that I am quite addicted to it! I will be making a few tutorials on card making basics, as I learn, but for now, let’s start with something very, very simple, which you can also make with your children. If they don’t use scissors yet, simply pre-cut a few designs and give them to them to play around.
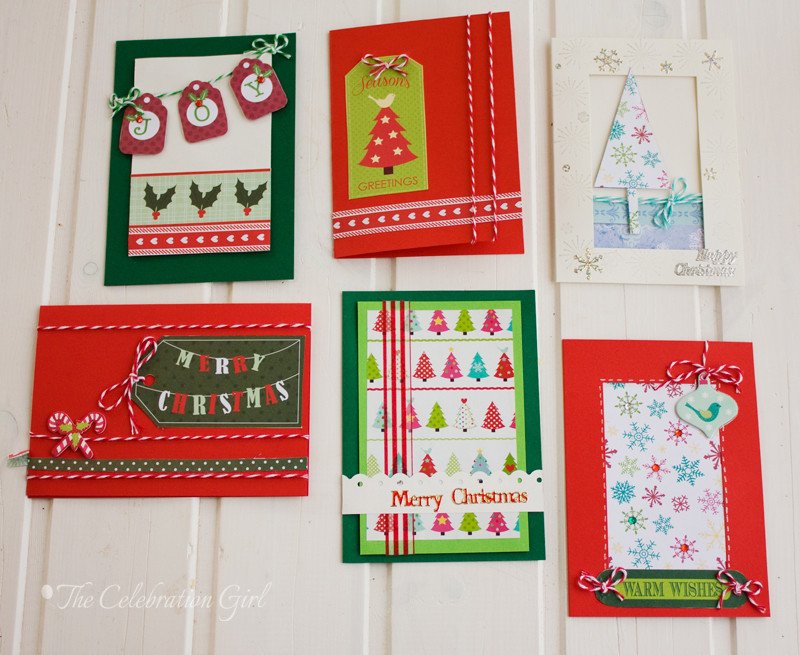
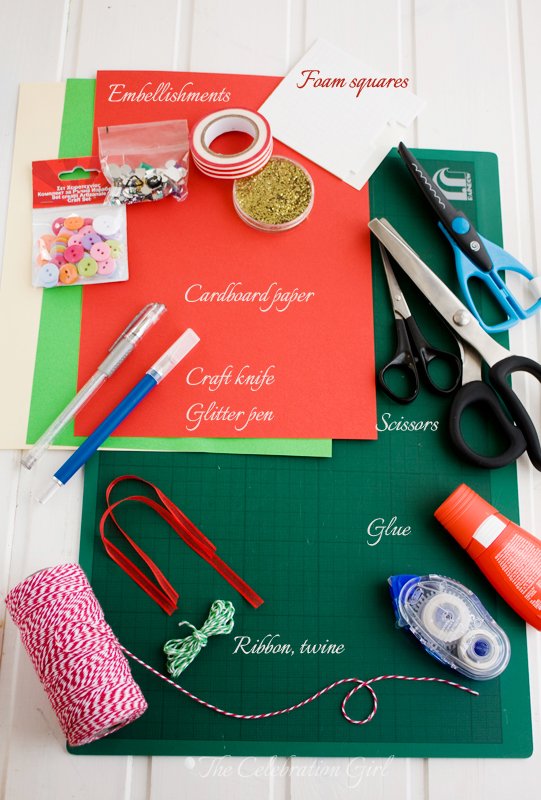
Now, before you start thinking that you may have to buy some pricey supplies, let me tell you right away that nothing special is needed here. Yes, card making can become an expensive hobby because there are so many tools that can enhance our work (stamps, inks of different colors, embossing material, papers of every possible kind, craft punches or die cut machines, letterpress machines, ribbon, twine, washi tape…you name it!). But for these cards all you need are paper, scissors, glue, ribbon, twine (or thread or wool) and some extra embellishments, as glitter or gemstones, if you want. They can be omitted as well. I promise, you won’t even need to go buy patterned papers, because I have looked for free online resources that you can print at home on cardboard paper (which are the ones seen on the picture above) . You can find them HERE, HERE, AND HERE. You can also use free party printables, which normally have really pretty designs, such as the ones offered by Catch my Party HERE.
Let’s begin! I will show you how I made the first card, step by step and then I’ll describe the process I followed with two other cards, so that you are ready to start experimenting yourself!
The first thing you need to do is to create the actual card. You may buy pre-cut cards or you can make your own with cardboard paper, which is what I do. I take an A4 page of the colour I want to use, score it in the middle and cut all along with a craft knife (I don’t have a guillotine). Then I fold each part in half, pressing with a bone folder to mark the fold.
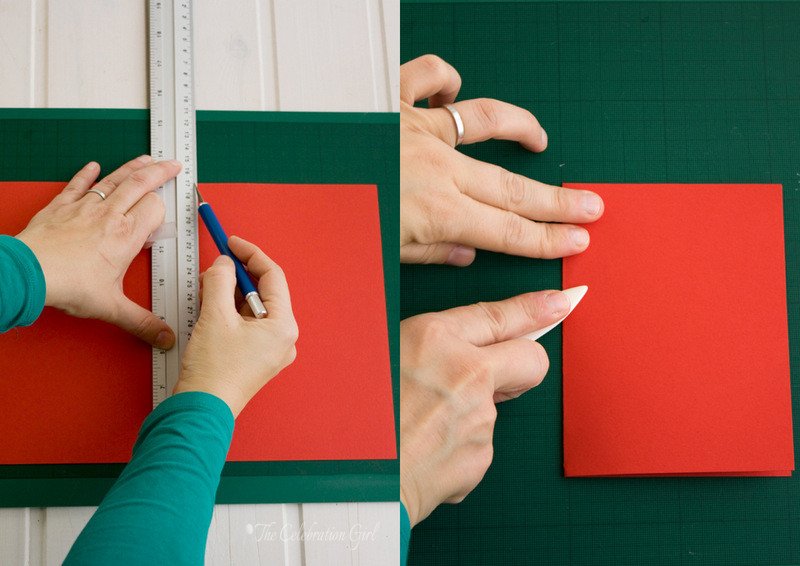
Once you have your card, it’s time to start thinking about the design. There are so many possibilities! I normally go through the papers I have (the one above is a free download from crafts beautiful magazine) , I chose one item that I like and then build the rest from there.
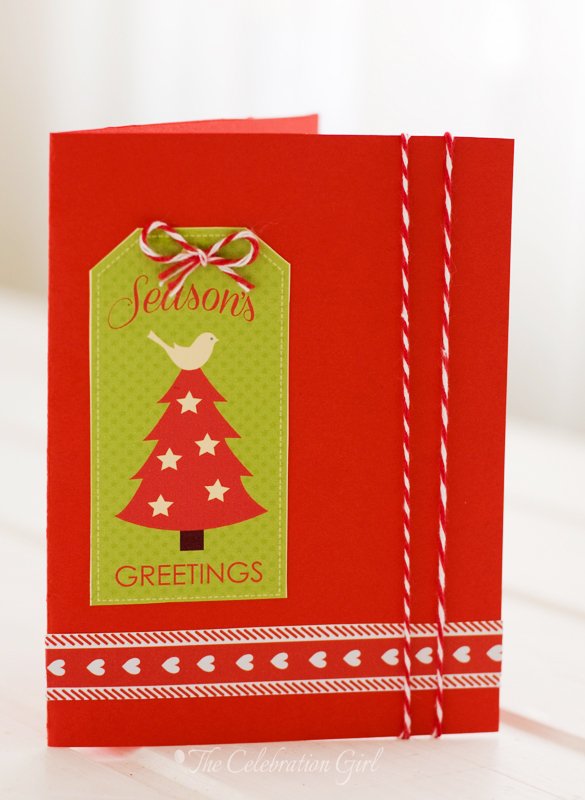
For this card, I wanted to keep the color palette simple, almost monochromatic, so I chose a green, red and white tag. I cut it with scissors, opted for a vertical layout and then started looking for other additions. I cut a stripe of paper with red and white hearts, and red twine. I glued them all with double sided tape, except the twine bow, which I attached on top of the tag with a drop of invisible liquid glue. Finally, I added a double string of twine, which I attached to the back with a small knot (you can see the detail in the picture below).
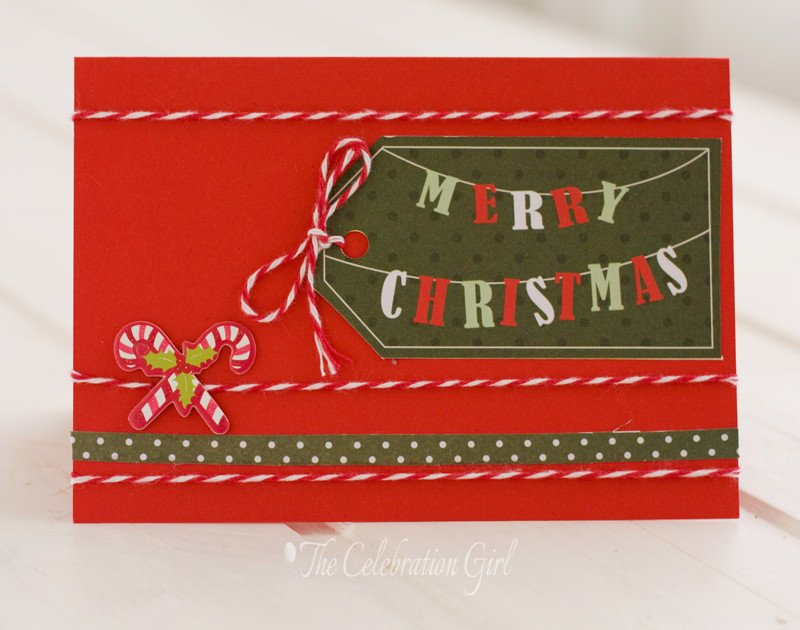
The second card (pictured below) follows the same procedure: a gift tag, a twine bow, a stripe of paper and stripes of twine. The only two changes from the card above were the horizontal layout, and that I also added a sticker with two candy canes.
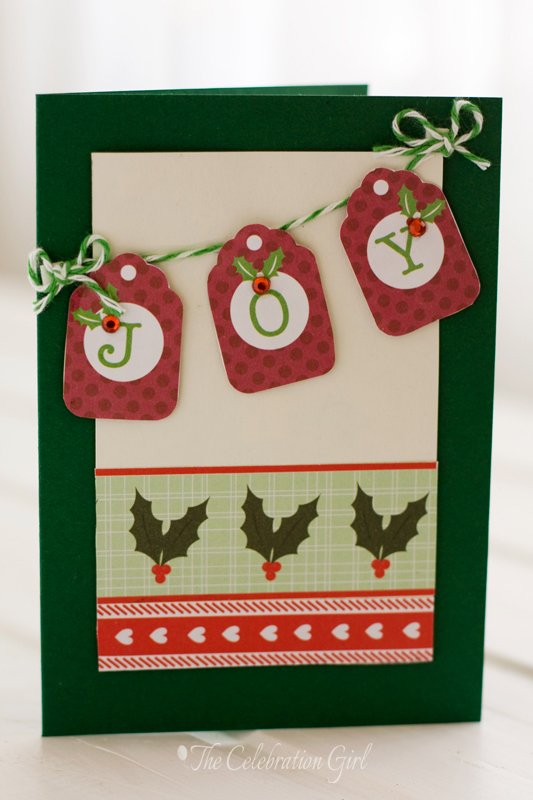
For the third card, I changed the color and I decided to use a 3d effect for which I used self adhesive foam squares for layering some of its parts. I started by cutting a rectangle of white cardboard that was 1 cm smaller than the card in all its parts. I glued two different stripes of paper to its bottom (the one with red hearts and the one with holly) and I cut the letters that spell “joy” using scissors. I decided to place them as a banner, so I also cut three stripes of twine. I placed one all along the upper part of the white card, and made bows with the other two,which I added to the sides of the first one. After that, I attached the letters with a foam square, for a 3D effect and embellished them with a gemstone each. Once the white card was ready, I attached it to the main card in green, also with foam squares.
I also made some other cards this season. It is a nice, relaxing craft that I am planning to explore deeper after the holidays.
Have you ever made greetings cards before? If so, what are your favorite tools and materials? If not, would you like to?
Con sabor latino…
Buenas noches queridos amigos! Aun estoy poniendome al día con los posts atrasados, para llegar a publicar los últimos días del calendario de adviento a tiempo, así que aquí, aunque tarde, está el post correspondiente al día de hoy.
Para estos últimos días del calendario les traigo una serie de ideas para acompañar y embellecer los regalos. En este primer post les mostraré cómo hacer unas tarjetas fáciles, porque no sé si a ustedes les pasa como a mí, pero siempre me quedo sin espacio suficiente para escribir en las etiquetas, y es por eso que para mis seres queridos más cercanos, suelo optar por tarjetitas que hago a mano. Mañana les voy a mostrar unas ideas para envoltorios, el domingo veremos etiquetas (que tambien son necesarias y quedan tan bonitas cuando las adjuntamos a un paquetito) y el lunes, para el último post, veremos un postre para un brindis diferente sencillíiiiiiisimo. Espero que me acompañen hasta el final de este calendario!
Les cuento que comencé a experimentar en esto de hacer tarjetas hace muy poco, apenas en noviembre, pero debo confesarles que me resulta adictivo. Despues de las fiestas pienso hacer algunos tutoriales mostrando otras técnicas, a medida que las voy aprendiendo, pero por hoy comenzaremos con algo extremadamente simple, que pueden hacer hasta con los niños. Si sus pequeños no usan tijeras aún, corten por adelantado un par de figuritas y dejenlos experimentar con ellas sobre el papel.
Ahora bien, una aclaración antes de que haya quejas relacionadas con gastos o material que no se encuentra donde viven: para hacer estas tarjetas no necesitan nada especial. Sí, es cierto que este es un hobby que puede tornarse oneroso muy rápidamente, porque hay millones de herramientas y elementos a utilizar (sellos, tintas de distinto tipo y color, relieves, troqueles, papeles especiales…de todo!), pero para hacer estas tarjetas sólo necesitarán cartulina, tijeras, cola de pegar, moños o hilo encerado y algunas cositas adicionales como gemas o glitter (pueden omitir estos ultimos tambien). Ni siquiera necesitan comprar papeles con diseños especiales, porque he buscado algunos gratis que pueden bajar e imprimir AQUI AQUI Y AQUI. Y tambien pueden usar los printables de fiesta gratuitos que se encuentran en lugares como Catch my Party, AQUI.
Comencemos! A continuación, voy a mostrarles cómo hice la primer tarjeta, paso a paso, y luego les mostraré dos tarjetas más y describiré los procedimientos usados para cada una. Recien empiezo a experimentar con esto de hacer tarjetas, asi que me falta muchisimo por mejorar, pero vamos paso a paso, disfrutando del aprendizaje.
Lo primero que necesitan hacer es crear la tarjeta misma. Tambien pueden comprarlas ya hechas, pero yo suelo hacerlas yo misma con una hoja de cartulina tamaño A4. Mido dónde queda el medio, y luego corto todo a lo ancho con un bisturí de manualidades, porque no tengo gillotina. Despues doblo cada parte por la mitad y, usando un cuchillo de hueso, aliso el doblez, para que la tarjeta no “se levante”.
Una vez que tienen lista la tarjeta, es hora de pensar en el diseño. Aquí tambien hay muchísimas posibilidades! Yo normalmente reviso una y otra vez los papeles que tengo y elijo un motivo de base, y en base al mismo armo todo el diseño. Para esta tarjeta quise mantener la paleta de colores muy tranquila, casi monocromática, así que elegí un pinito de navidad en verde, rojo y blanco. Lo recorté con tijeras, elegí ponerlo en formato vertical, y seguí buscando entre mis papeles por otras adiciones. Me decidí por una tira de papel con corazones rojos y blancos, que recorté y pequé con cinta doble faz. Luego agregué un moño hecho con hilo encerado bicolor, y até dos tiras del mismo hilo por detrás de la tapa de la tarjeta, con un nudo pequeño (Pueden ver el detalle en las fotos).
Para la segunda tarjeta, el procedimiento y los materiales fueron practicamente los mismos: tiras y moño de hilo encerado, tira de papel y tarjeta con forma de etiqueta, pero esta vez elegí un formato horizontal y agregué un sticker en forma de bastoncitos de caramelo. En la tercer tarjeta, por su parte, cambié el color rojo por el verde y decidí usar un efecto tridimensional, para lo cual usé cuadrados de goma. Comencé por cortar un rectangulo de cartulina blanca 1 cm más pequeño que la tarjeta principal en todos sus lados. Elegí dos tiras de papel de colores y diseños diferentes (corazones rojos y acebos verdes) y las pequé en la parte inferior de la cartulina blanca. Luego, recorté las letras que forman la palabra joy (alegría) y decidí colocarlas como si fueran un banderín. Para ello, recorté tres tiras de hilo encerado, coloqué la primera a lo largo de la parte superior de la tarjeta y, con las otras dos, hice moños que coloqué en los extremos de la primera. Luego pegué las letras con cuadrados de goma y les adicioné una gema a cada una, para darles brillo. Finalmente, pegué la cartulina blanca a la tarjeta principa, también con cuadrados de goma.
En la última foto pueden ver otras de las tarjetas que hice esta temporada navideña. Es una actividad que encuentro muy relajante y que planeo explorar más despues de las fiestas.
¿Ustedes han hecho tarjetas alguna vez? Si asi lo han hecho, cuentenme ¿cuales son sus materiales y herramientas preferidas? Si no lo han hecho ¿les gustaría hacerlo? ¿ se animan a probar?
by Marcela M. | Dec 15, 2012 | Blog, Children, Crafts and DIY
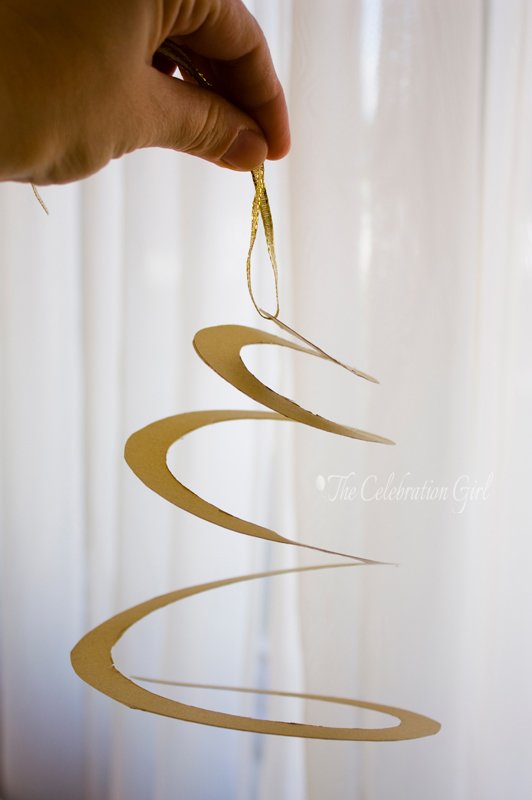
Good afternoon dear friends! Only 9 days left until Christmas’ eve! If you live in the Southern Hemisphere, your children have most probably finished school and started their Summer vacations ( am I right?)and, if you live in the Northern Hemisphere, as I do, they are soon going to start their Winter break and weather is getting colder and colder, thereby reducing chances for outdoor play.
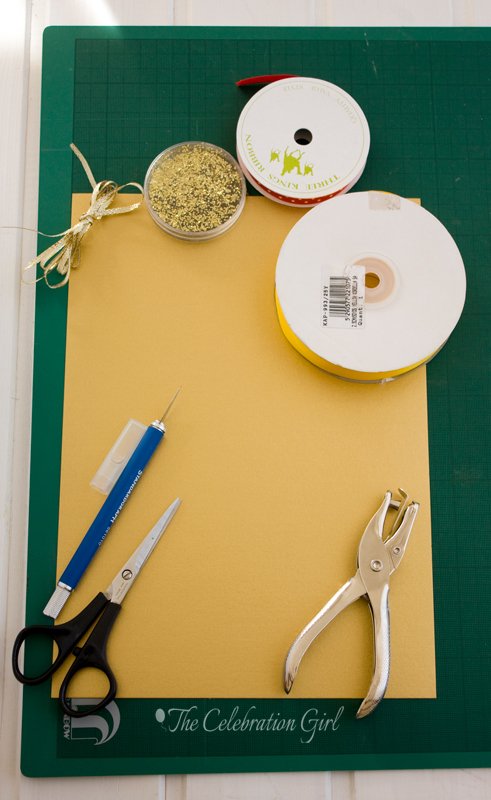
Either way, Summer or Winter, I thought it could be fun to give you a couple of ideas for crafting some extra Christmas decorations with your little ones. They are both very easy and require only a paper of your choice (children tend to prefer shiny, sparkly, or glittery paper, but you can always add glitter after cutting) a pencil/X acto knife and a pair of scissors. I also use an individual hole punch, but this is entirely optional. You could also use a needle to pass the thread in order to hang them. I also used a series of circles to guide me when tracing the spiral for the first mobile, but you can also download a spiral template and use it to guide your cutting.
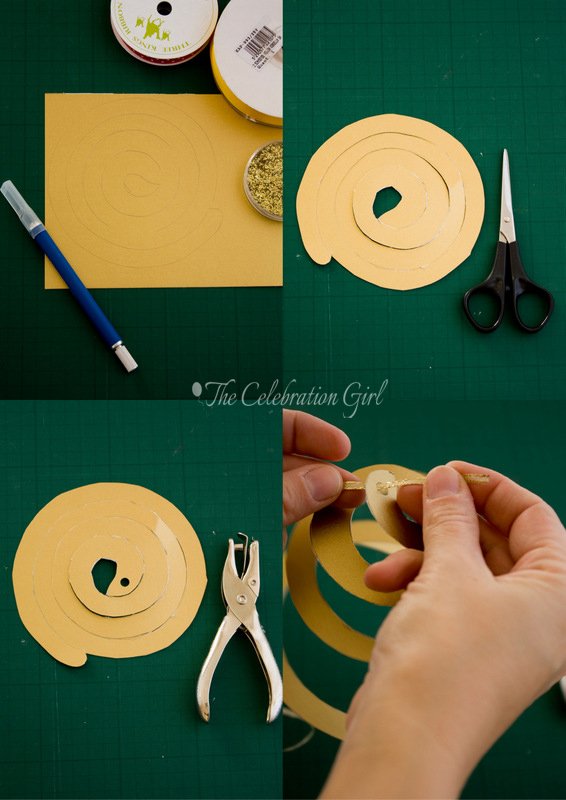
1) SPIRAL MOBILE: In order to make the first mobile, begin by tracing a spiral on a piece of paper (picture 1). I did it with a craft knife so there would be no trace left, but you can also do it with a pencil. Cut the spiral using sharp scissors (picture 2), punch a hole in the center (picture 3) and pass a thread or ribbon by it, in order to hang it (picture 4). When you pull the ribbon/thread, you will have a pretty shiny mobile. They look particularly nice when hung from a window, in groups of 3 or 4.
2) HANGING BELL MOBILE:This mobile looks especially nice when done with a large piece of paper and when the cuts are made very deep, almost touching the sides. I did it with a small piece of paper in this occasion, because it was easier to show you the technique this way but, if you can, trace a circle using a plate and proceed as in the pictures below.
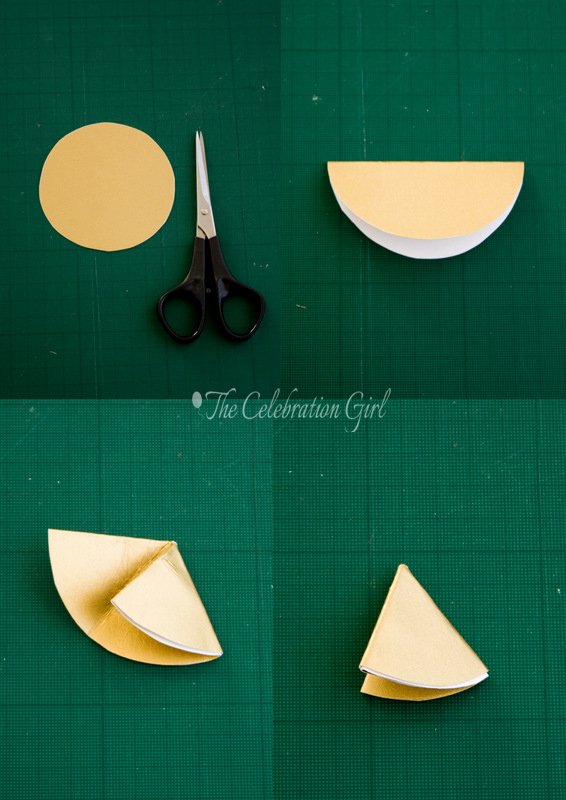
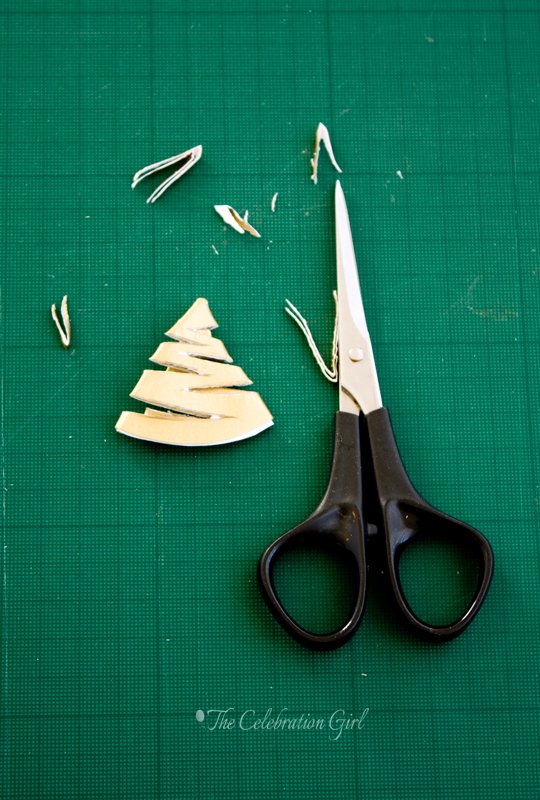
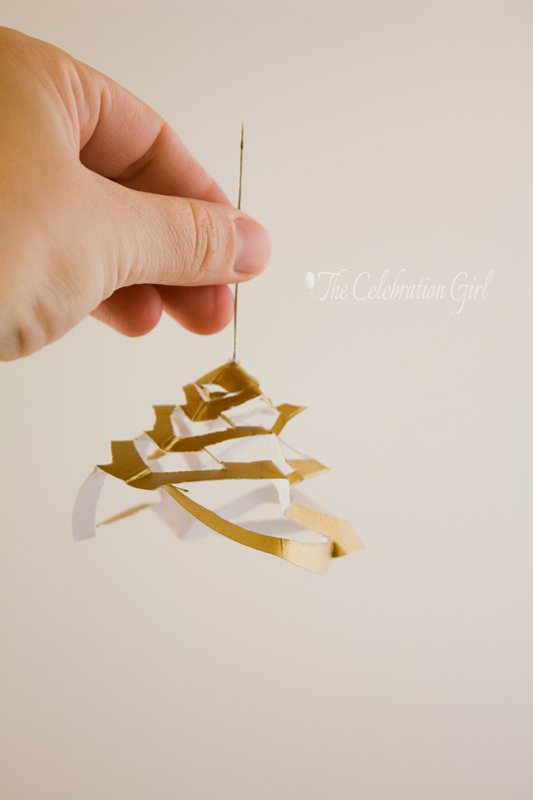
Begin by tracing a circle in a piece of paper and cut it with scissors, a rotary cutter or a punch (picture 1). Fold it in half (picture 2) and then fold the sides towards the center so as to form a cone with perfectly matching sides (pictures 3 and 4). Finally, make horizontal cuts all over the cone, as in the picture above. The closer the cuts are to each other and the deeper they are, the prettier the bell will look. When you finish cutting, open the figure with a lot of care, pass a needle with ribbon or thread by the center and continue to expand the sides of the mobile, so as to open the cuts.
Do you like to craft with your children? Do they like to decorate the house with handmade items for the holidays ?
Con sabor latino…
Buenas tardes queridos amigos! Faltan sólo 9 días para la nochebuena! Si viven en el hemisferio sur, seguramente sus hijos están entrando en vacaciones escolares de verano (o me equivoco?)y, si viven en el hemisferio norte como yo,seguramente comenzarán pronto sus vacaciones de invierno y el clima estará tornandose cada vez más frío, limitando las posibilidades de jugar afuera por mucho tiempo.
Verano o invierno, pensé que sería lindo acercarles dos propuestas para que entretengan a los niños y, de paso, den los ultimos toques decorativos a la casa junto a ellos. Ambos moviles son muy sencillos y sólo requieren papel y tijera. Si tienen papeles metalizados, brillantes o tornasolados, mejor, pero si no es asi,siempre pueden agregar algo de brillo una vez cortados los mobiles, a mano. Yo usé tambien un troquel individual, para hacer el hueco por donde pasé el hilo para colgarlos pero esto no es necesario en absoluto, pueden usar una aguja para hacerlo. Tambien usé una serie de materiales de forma circular (los que ven en la segunda foto) para ayudarme a trazar el espiral, pero ustedes pueden bajar un modelo de internet (googleen spiral template y aparecerán varios) o bien trazarlo a mano.
1) Movil de espiral: Para hacer el primer movil, comiencen por trazar un espiral en una hoja de papel. Yo lo hice con un bisturí (craft knife) para que no deje traza, pero pueden hacerlo tranquilamente con un lápiz. Corten el espiral con una tijera, hagan un hueco en el centro del mismo y pasen un hilo o cinta por dicho. Una vez que estiren el mobil desde el hilo/cinta, se formará un movil rotativo llamativo y bonito que queda especialmente bello colgado en la ventana en grupos de 3 o 4.
2) Movil de campana colgante: Este mobil luce especialmiento bien si se lo hace en una hoja grande de papel y se hacen los cortes bien profundos, de lado a lado, y bien juntos uno de otro. Yo lo hice pequeño, porque me era mas facil sacar las fotos de esa manera, pero tengan en cuenta este aspecto relativo al tamaño cuando lo hagan en casa, y tracen el círculo inicial con un plato playo.
Comiencen trazando un circulo en una hoja de papel y cortenlo usando una tijera, o un troquel. Doblen el circulo por la mitad y luego plieguen los lados de modo que formen un cono (como en las fotos). Luego hagan cortes horizontales, de ambos lados, y lo mas juntos posible el uno del otro, todo a lo largo del cono. Cuando terminen de cortar, abran la figura con mucho cuidado, pasen una aguja con un hilo o cinta por el medio y estiren el centro hacia arriba. Continuen abriendo los cortes, estirando los lados hacia abajo, dandole forma de campana, hasta que les guste como quede.
Les gusta hacer manualidades con sus hijos? Y a ellos, les gusta decorar la casa para las fiestas con cosas hechas por sus propias manos?
by Marcela M. | Dec 14, 2012 | Blog, Holidays, Parties
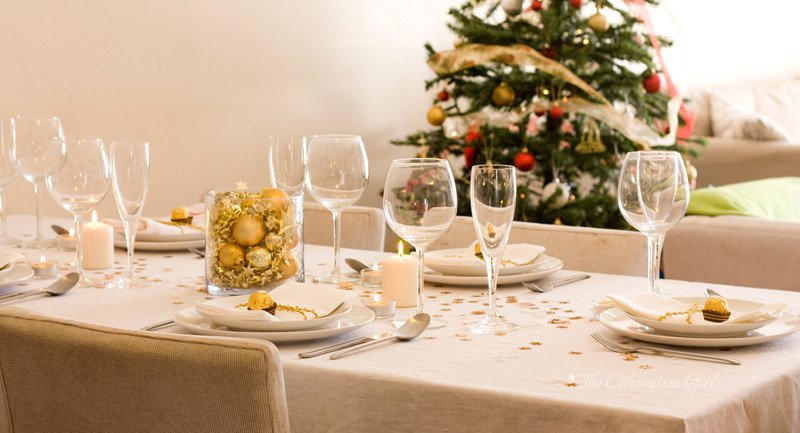
Good morning friends! It’s 10 days only until Christmas eve, so I thought it was time to bring you another table setting idea for you holiday celebrations. When I started planning the decoration and entertaining ideas for this advent calendar, I knew I wanted each tablescape to use different colors and elements, so that you could adapt them to whatever you have in hand, if you wish to do so. I wanted them to be simple, easy to put together, but pretty.
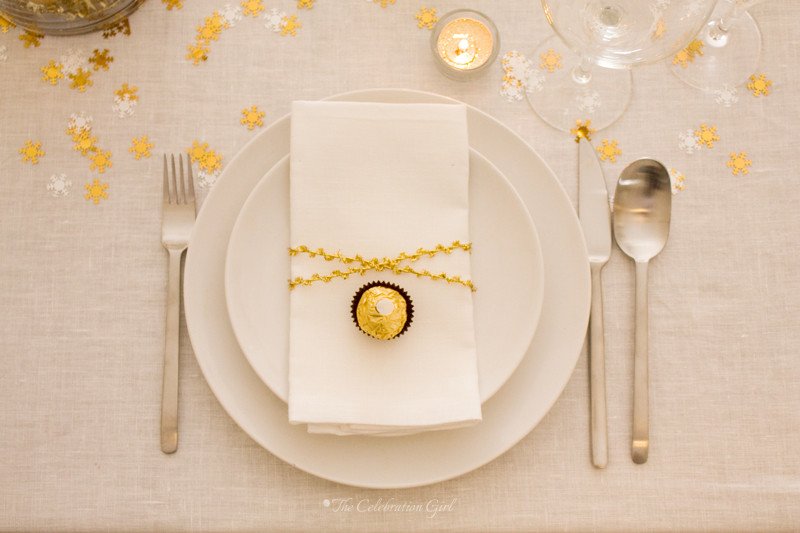
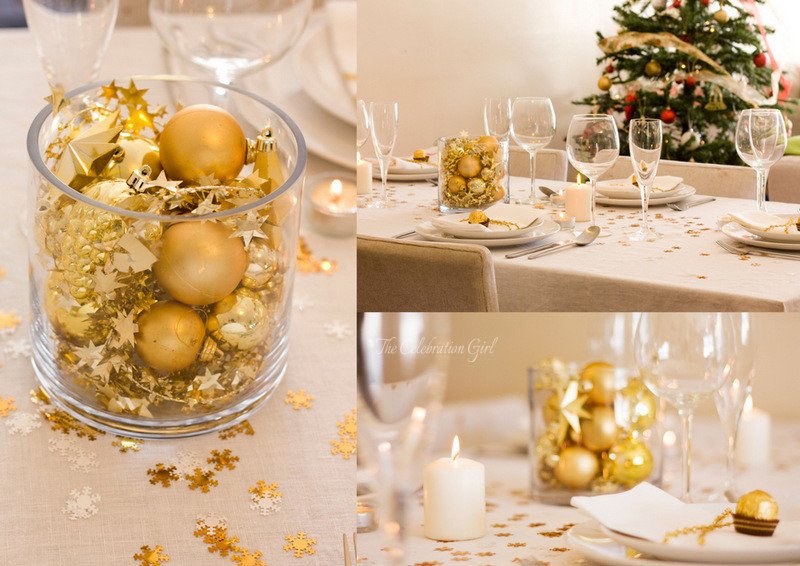
For the first tablescape, I chose red, ribbon and baubles to complement the basic white background. For this tablescape I opted, instead, for Gold thread, confetti and chocolates, making it apt for both Christmas and New Year’s. I also swapped the white votive candles for glittered ones (you can learn how to make them HERE), to add even more sparkle.
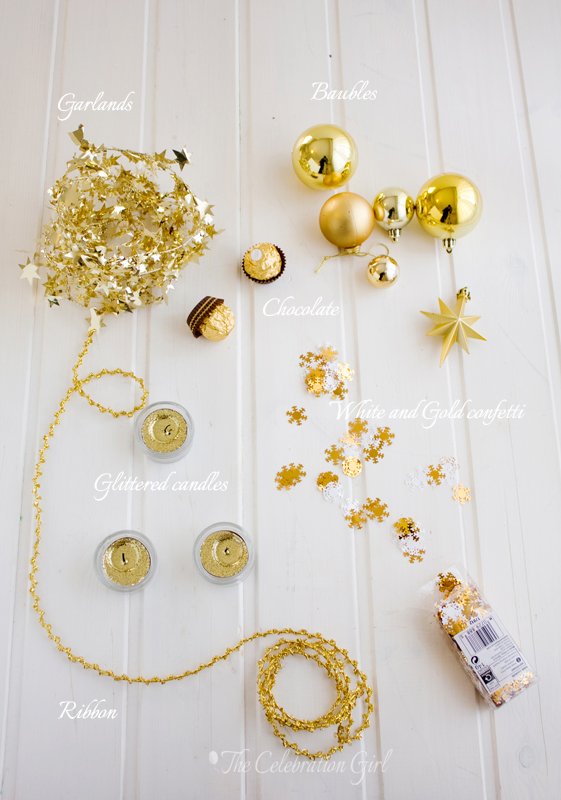
I started, as always, with an all white canvas: white tablecloth and napkins, white plates, our everyday cutlery, white and champagne glasses and two unscented white candles. Then it was time to have fun and spread the confetti all over the table! I only needed to use one small pack (you can see how small it was from the picture above) and it really was more than enough. I love how fun, sparkly and celebratory it looks! They make the table glow, don’t you think?
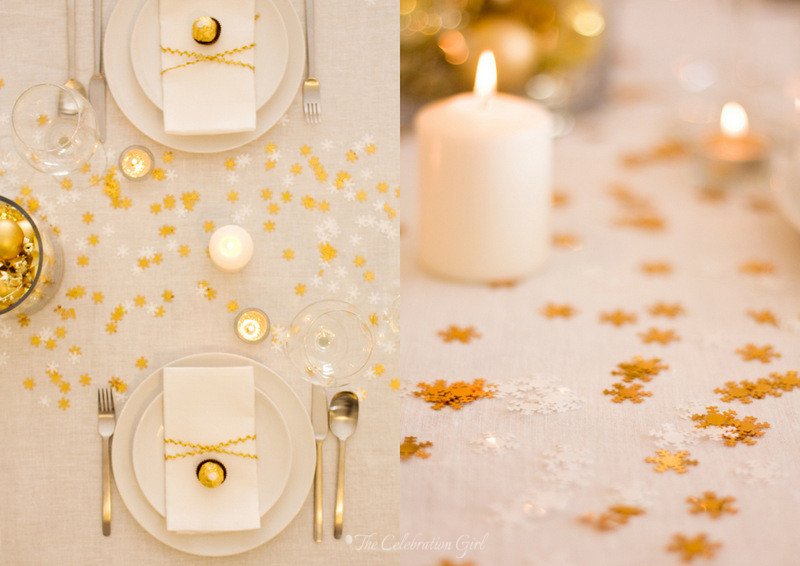
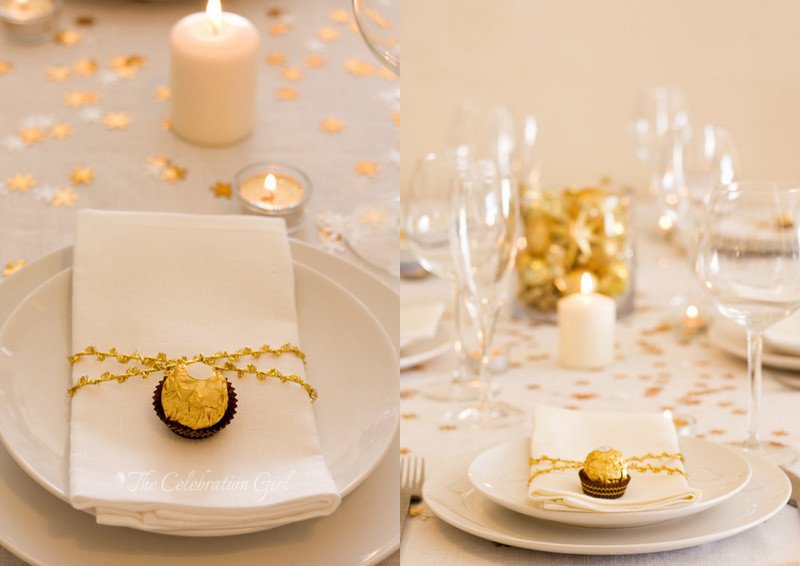
I placed the napkins on top of the plates, wrapped them in gold thread making a cross (the two sides were tied with a simple knot behind) and added a little chocolate truffle on top. You could replace the truffle for a chocolate coin, which would probably be more popular with kids. Then I placed the cutlery in the international informal way and added a glittered votive candle next to each plate.
I also made a terribly simple centerpiece with a recycled glass vase, a starry garland and a few old golden baubles that I hadn’t used in our tree this year. I simply added them in a more or less random manner, to add some visual impact, without much care.
Do you like it? Is this a color combination you would use in your home?
Con sabor latino…
Buenos días queridos amigos! Faltan ya sólo 1o días para la navidad, así que pensé que ya era tiempo de traerles otra opción para decorar la mesa de fin de año. Cuando comencé a planificar los posts para este adviento, quise traerles opciones diferentes y por eso me propuse que cada diseño estuviera logrado con colores distintos y utilizando objetos diferentes, de manera que ustedes pudieran ver diferentes opciones y luego adaptarlas a su gusto y a los materiales que tuvieran a su disposición. Y la consigna para todos ellos era que tenian que ser simples, fáciles de armar y bonitos.
La primer mesa que les presenté estaba decorada en blanco, usando como complementos el color rojo en tela, cintas y adornos navideños. En esta ocasión, en cambio, opté por el color dorado en todos los acentos: confetti,hilo dorado y envoltorio de los chocolates, lo que la hace una mesa apta no sólo para navidad, sino tambien para recibir el año nuevo.Tambien cambié las velas blancas por velas con purpurina (pueden aprender a hacerlas AQUI), para darles más brillo a la mesa.
Comencé, como siempre, por una base completamente blanca: mantel de lino blanco, servilletas blancas, platos blancos , nuestros cubiertos de diario, copas de vino y champagne y velas blancas sin aroma. Luego llegó el tiempo de divertirse y esparcir el confetti por todas partes! Usé sólo un pequeño paquetito (el que ven en la segunda foto), y verdaderamente no hizo falta más. Les confieso que me encanta cuan divertido, brillante y festivo queda! Ilumina la mesa, no les parece?
Coloqué las servilletas encima de los platos, las até en cruz con hilo dorado, y agregué una trufa de chocolate sobre las mismas. Otra opción sería colocar una moneda de chocolate en lugar de la trufa, opción que seguramente sería más popular con los niños. Finalmente coloqué los cubiertos a los costados, conforme el estilo informal internacional, y agregué una vela pequeña con purpurina al lado de los mismos.
Hice tambien un pequeño centro de mesa con un florero de vidrio reciclado, una guirnalda de estrellas y bolas doradas que no había puesto en el arbol este año. Agregué todo sin mucho cuidado, al azar, buscando sólo que la mesa tuviera un centro de atención visual.
Qué me dicen, les gusta? Son estos colores que usarían en sus casas? Cuentenme, que ya saben que soy curiosa!


