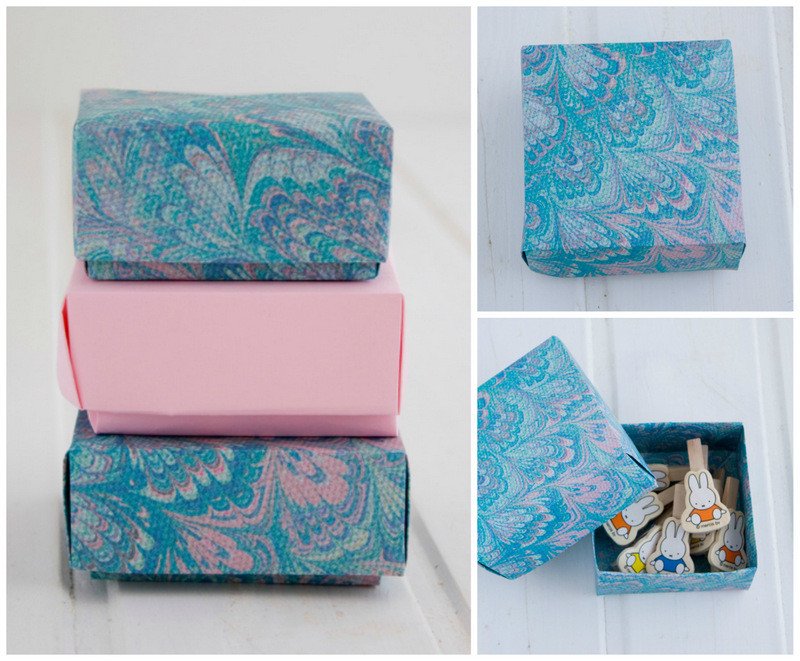
Tiny toys storage solution: DIY Origami Boxes-with tutorial!
Almost one year ago, when Luka and Zoe were about to turn 4, we decided that their shared room needed a major re-haul. Their room had evolved in a disorganized way from the baby days to toddler-hood and, what had once been a cute baby room, had turned into a more or less well managed chaos.
The main problem was what I called “the toy storage situation”. It’s not that Luka and Zoe had that many toys, because we purge every 6 months, but that what they had didn’t have a place of its own. We had a couple of big toy baskets where everything was just thrown in at the end of the day and, even if you may think that this is a good idea because cleanup is easy, let me tell you this: it’s the opposite. When everything gets thrown into a big basket at the end of the day, nothing is easily found the following morning. Our living room’s floor (which is our main playing area because the rooms are rather small) was permanently covered in toys, the children were frustrated because they couldn’t find fast what they wanted and I was frustrated because the house was a constant mess. So we decided to do something about it, and started planning the new room.
I repainted the walls in white and we chose white furniture to make the room look a little bit bigger. We bought the beds, converted their old changing table into a bookshelf for Luka and Zoe’s books and big puzzles and, after measuring, re measuring and various visits to Ikea, we opted for their TROFAST toy storage system, which we adore. Big toys and teddies were placed in boxes under the beds, and everything else was stored in the TROFAST containers, with a preference for smaller ones, to allow greater classification. Toys inside some of the containers were also classified: small puzzles, for example, were placed inside different Ikea freezer bags, so that the different pieces wouldn’t get mixed up. Big, medium-sized and small toys were under control, hurray! Luka and Zoe loved the system and adapted in no time.
But until recently, we hadn’t found a solution for tiny toys…you know the ones, the cute little wooden pegs, the tiny puzzles or, if you have a little girl, the tiny hair accessories that seem to end up everywhere. The boxes I found in stores were either too big, too ugly, had no cover or costed a lot. Leaving the toys just laying on the shelves means that cleaning takes longer, so we had to come up with another solution…and we did!
What I am talking about? Origami boxes!
Materials needed? Only paper! And they are so easy, that you can make as many as you want, in whatever size you need and you can customize them for virtually no money. You don’t even need origami paper to make them, a simple sheet of paper will suffice. If your children are old enough, you can have fun making a few with them, and the decorate them together with some glitter, washi tape, ribbon, scrapbook paper and supplies, buttons or whatever you have in hand!
Let me show you how to do it:
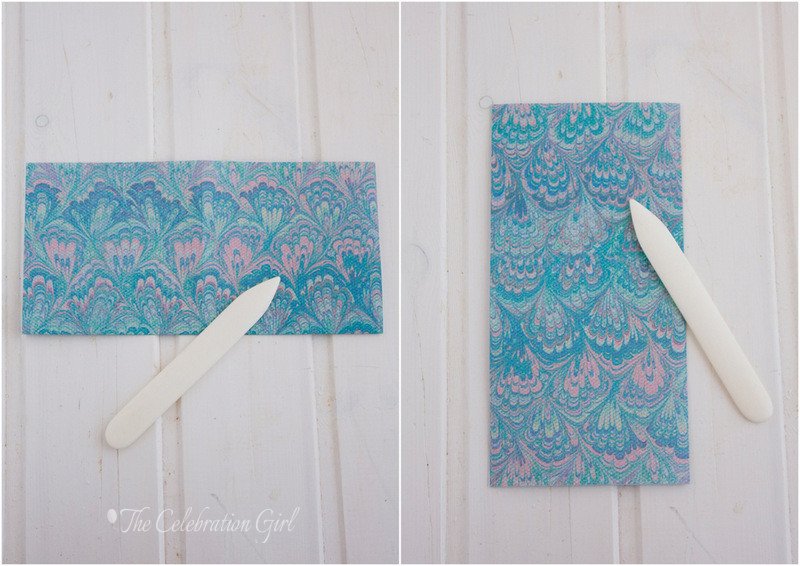
For making each box you will need 2 sheets of paper. If you have a bone folder, it is handy for pressing the folds but if you don’t, don’t worry!. The paper needs to be squared, so if you are using regular A4 size sheets, you will need to trim them before you begin.
Now let’s get started!
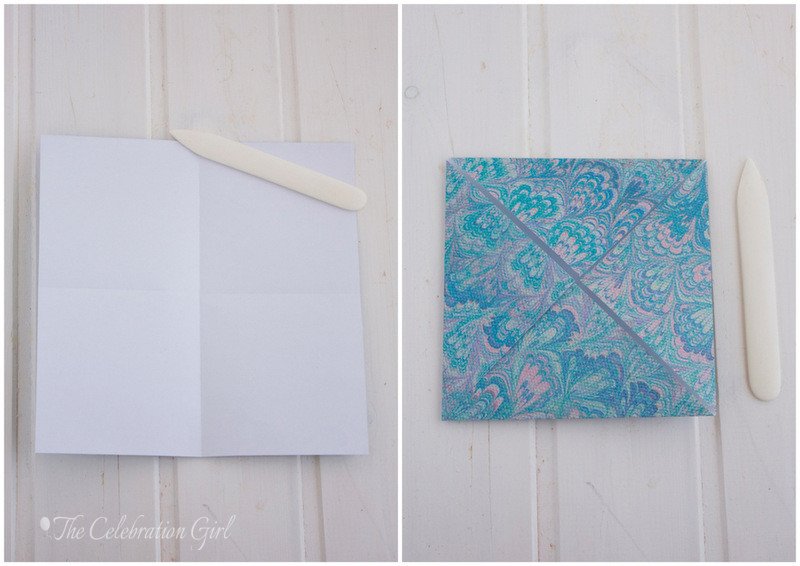
1) Put the paper on the table, patterned side down (the white side should be facing you). Fold the paper in half, horizontally, making sure that the corners match perfectly. Then open the paper again and fold it vertically (lengthwise). Press with the bone folder (or your nails) and open it again.
2) The previous folds will have formed a cross. Fold each corner, so that they all meet at the center of the page. When you are done, your paper will look as the picture on the right.
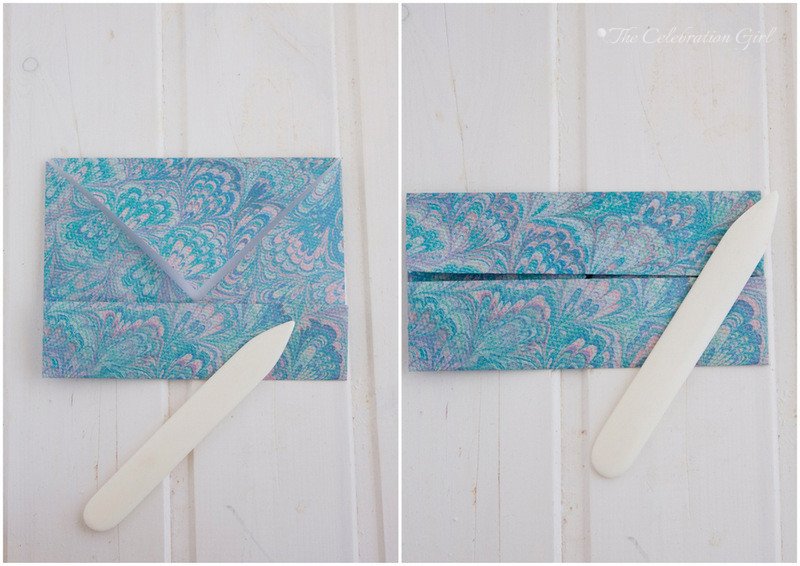
3) Fold the bottom side of the paper in half, to meet the center. Make sure that it meets exactly the center of the page. Do the same with the upper side. When you are finished, your paper will look as in the picture on the right.
4) Open the bottom and upper folds. This time, fold the paper left and right side of the paper in half, so that they meet at the center (in the picture above I folded just one side to show you the mechanics)
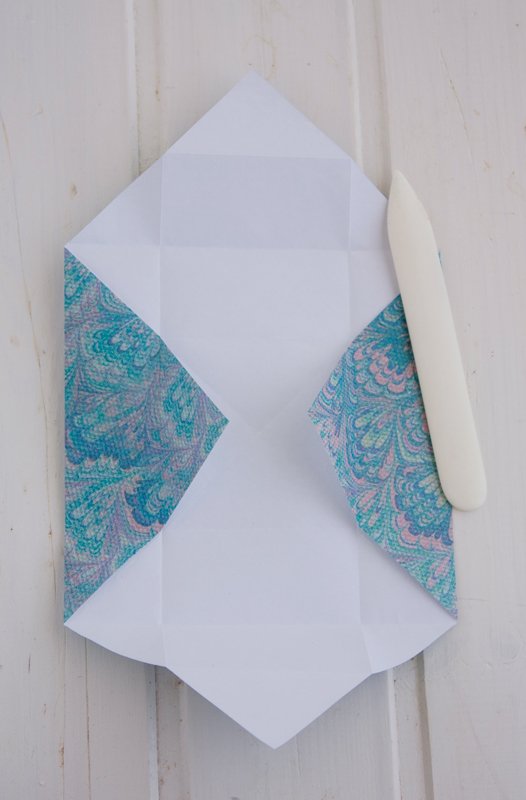
5) Open the folds as in the picture on the left.
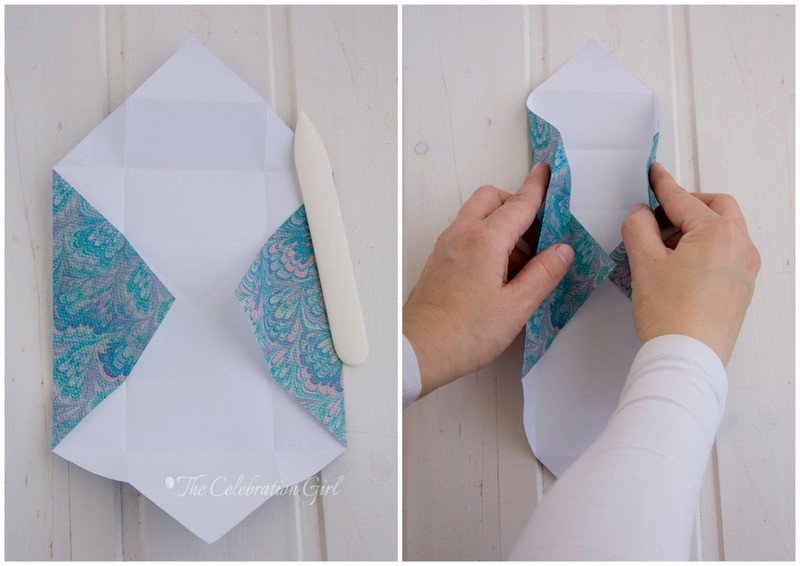
6) Take the paper with your hands, lift the sides slightly and press with your fingers on the upper corners to make a “reverse fold”.
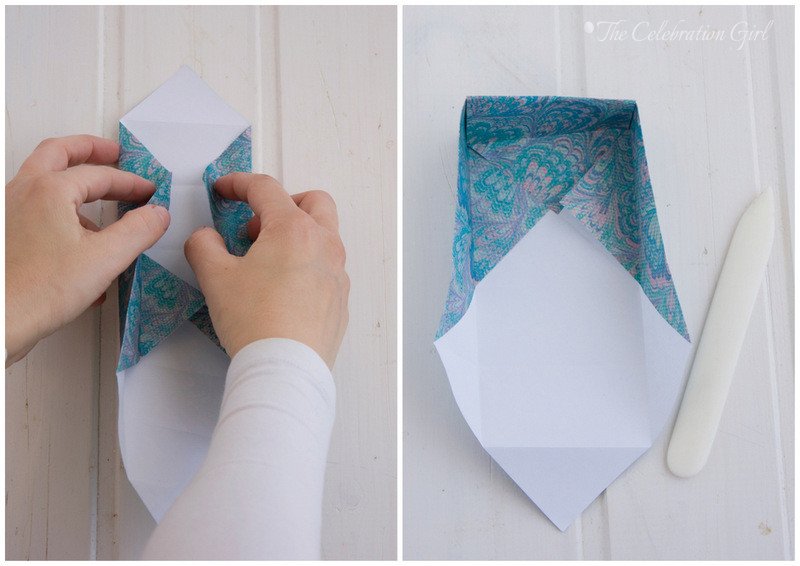
7) Press the fold as in the picture of the left and, then, lift the upper side and fold the flap. When you are finished, it will look like the picture on the right.
8) Repeat the reverse fold on the other side, lift and fold the the flap. And you are done! Your box is ready!
Now, in order to make the box’s cover, you will need to make just one small variation to the steps shown above. Here’s the step by step explanation and a picture of the modification needed:
1) Take your sheet of paper and repeat steps 1 and 2 above.
2) Here’s what you need to do differently: When you come to steps 3 and 4, instead of folding the paper in half to meet the center, fold it just a few centimeters before it. This will make the cover slightly bigger than the box, so that you can close it.
3) Proceed with steps 5 to 8 as in the box pictures.
You are now ready to fill your box with whatever tiny thing is going around your children’s bedroom, or even in your desk (they are great for small pins, clips, etc, so you can have your desk’s drawers tidy!). You can also make them in different colors to make it easy to identify what is inside.
Now, I’m curious: How do YOU organize your children’s toys? Please, share in the comments below!
Con sabor latino…
Hace poco menos de un año, cuando Luka y Zoe estaban a punto de cumplir 4, decidimos que su habitación (que es compartida), necesitaban un cambio urgente. Su cuarto había evolucionado de forma desordenada desde su nacimiento y, lo que en algun momento había sido una dulce habitación de bebé, se había transformado en un caos medianamente manejable.
El mayor problema que teníamos era lo que yo había dado en llamar “la situación jugueteril”. Y ojo, no es que Luka y Zoe tuvieran taaantos juguetes, sino que los que tenían no contaban con un espacio propio donde ser guardados. Teníamos un par de canastos grandes en el todos los juguetes eran colocados, sin orden alguno, al final del día y, aunque esto pueda parecerles una forma facil de limpiar dejenme decirles lo siguiente: es lo opuesto.Esos mismos juguetes que tirabamos a los apurones por la noche, eran aquellos con los que los niños querían jugar por la mañana y, al no encontrar rápidamente aquél que buscaban, terminaban tirando todo al suelo nuevamente ni bien se despertaban. La casa era un caos permanente, con juguetes alfombrando el piso del living (nuestra area de juegos, ya que las habitaciones son pequeñas), Luka y Zoe estaban frustrados porque no encontraban lo que buscaban, y yo estaba frustrada por el lío descomunal. Así que decidimos cambiar esta situación y comenzamos a planificar la reforma del cuarto.
Comenzamos pintando las paredes de blanco, y compramos muebles del mismo color, para agrandar un poco el espacio, que de por sí es pequeño. Compramos camas de niño, transformamos su viejo mueble cambiador en mini biblioteca para sus libritos y sus rompecabezas y, luego de medir, volver a medir y medir una vez más, elegimos el sistema de almacenamiento de juguetes de Ikea llamado TROFAST, del que estamos enamorados. Los juguetes grandes y los peluches, fueron colocados en cajas debajo de las camas, y los juguetes medianos y pequeños, organizados en los recipientes de plastico del sistema TROFAST (que tienen hasta tapa para que no se llenen de polvo!). Dentro de este sistema, elegimos recipientes chicos, que nos obligaran a clasificar los juguetes lo más posible y, cuando optamos por recipientes más grandes, clasificamos de diferentes maneras lo que colocamos dentro (por ejemplo, los puzzles que perdieron su caja original están colocados dentro de uno de los recipientes rosas de Zoe, pero separados dentro de bolsas de freezer de Ikea, para que no se mezclen las piezas). Juguetes grandes, medianos y pequeños, estaban en su lugar, yay! Luka y Zoe amaron el nuevo orden instantaneamente y se adaptaron al mismo en un santiamén.
Pero aún teniamos un problema: los juguetitos diminutos…ustedes me entienden, los mini broches de madera que ahora están en todas partes, los mini puzzles y, si tienen niñas, los millones de gomitas y prensitas para el cabello que terminan en todos los rincones. Las cajitas que encontraba por allí eran o demasiado grandes, o feas, sin tapa o carísimas, y dejar los juguetitos en los estantes no era una opción porque ésto dificulta muchisimo la limpieza….necesitábamos otra solución, y la encontramos!
A qué me refiero? A cajitas de origami!
Material necesario? Solo papel! Además son tán faciles de hacer que puedan hacerlas en cantidad, de diferentes colores y hasta decorarlas como más les guste por casi nada de dinero. Ni siquiera hace falta que usen papel de arroz, una simple hoja que tengan a man basta, y si tienen niños más grande, pueden hacerlas con ellos y luego divertirse decorandolas con papel, cintas, glitter, restos de scrap, washi tape,botones, o lo que se les ocurra.
Para cada cajita necesitarán dos hojas de papel. Si tienen ese instrumento llamado bone folder que se ve en las fotos, es super usarlo para afirmar los pliegues, pero si no tienen uno, no se hagan problemas, que las uñas sirven igual! El papel que utilicen tiene que ser cuadrado, asi que si estan adaptando una hoja de papel A4, cortenla cuadradita antes de comenzar.
Aquí están las instrucciones que acompañan las fotos:
1)Si su papel tiene diseño solo de un lado, coloquenlo con el mismo sobre la mesa y la parte blanca mirandolos a ustedes. Doblen el papel por la mitad horizontalmente.Luego, abran el papel y vuelvan a doblar, pero verticalmente. Presionen sobre los pliegues con el bone folder o los dedos, y vuelvan a abrir el papel.
2) Al abrir el papel notarán que los pliegues previos han dejado marcas en el mismo (una cruz). Estas marcas guiarán los proximos pliegues. A continuación, doblen cada una de las puntas del papel hacia el centro del mismo (que toquen el centro). Fijense en la foto de la derecha que están sobre el punto numero 2 para ver cómo tiene que quedar el papel luego de los pliegues.
3) Doblen la parte inferior del papel por la mitad, haciendola llegar hasta el centro. A continuación doblen la parte superior de la misma manera. La foto de la derecha correspondiente al numero 3 les mostrará cómo debe quedar el papel liego de estos pliegues.
4) Desdoblen el papel hasta que les quede como al terminar el punto 2. Vamos a repetir los dobleces del punto 3, pero en lugar de hacerlo con las partes superior e inferior del papel, lo haremos con los lados, izquierdo y derecho.
5) Deshagan casi todos los dobleces, hasta que el papel les quede como en la foto de la izquierda (arriba del numero 5).
6) Tomando el papel con sus manos, levanten los costados del papel y presionen levemente sobre la parte superior para generar lo que se conoce como “doblez invertido” (las marcas del papel guiarán la forma, no se preocupen).
7) Presionen el doblez invertido con los dedos (como en la foto), levanten la parte superior de cajita y cierren la pestaña. Su cajita tendrá listas ya 3 paredes.
8) Repitan el doblez invertido en la parte inferior de la misma, levanten la parte superior y cierren la pestaña como en los pasos anteriores…y su cajita estará lista!
Para hacer la tapa de la cajita, deberán seguir casi los mismos pasos, con una sola variación, como les explico a continuación:
1) Tomen su hoja de papel y realicen los mismos pliegues que en los puntos 1 y 2.
2) Cuando lleguen al punto 3 y 4, deberán hacer una pequeña cosa diferente: en lugar de doblar los costados por la mitad,para que lleguen al centro, dejen un espacio entre el centro y el borde. Esta simple diferencia hará que la tapa sea ligeramente más grande que la cajita y les permitirá cerrarla! Observen la foto correspondiente para darse una idea de cómo hacerlo.
3) Repitan los pasos 5 a 8 tal y como están explicados para hacer el cuerpo de la caja.
Y listo! Ahora su cajita estará lista para ser llenada con esas pequeñas cositas que puedan andar dando vuelta por las habitaciones de los niños, o aun en su escritorio, porque son ideales para guardar clips, broches, alfileres, y tutti cuanti, y así mantener los cajones organizados. Pueden, incluso, hacer varias de diferentes colores para identificar más facilmente lo que haya dentro!
Ahora tengo curiosidad, cuentenme ¿cómo organizan ustedes los juguetes de sus niños?


