by Marcela M. | Aug 3, 2011 | Blog, Mousses and ice cream, Recipe Box, Recipes, Sweets, Uncategorized
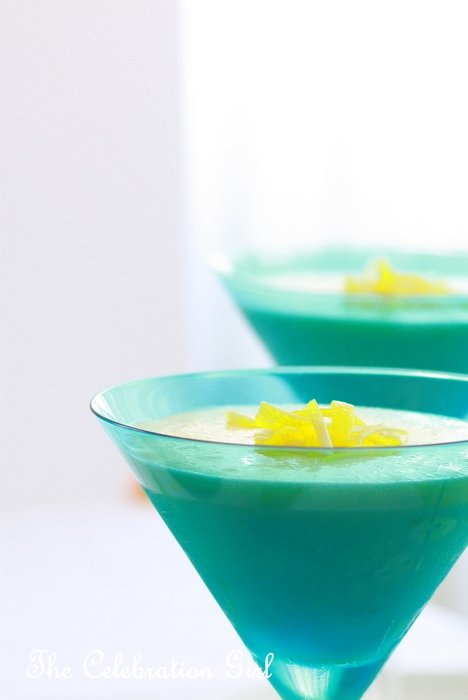
Happy Wednesday everyone! How are you today? How is this week going, so far? I hope you are all enjoying the warmth of Summer or the chilly days of winter, wherever you may be.
I had originally planned to bring you the recipes for the rest of the salads and dips that we had for our simple summer lunch, last week, but I received so many requests for the Lemon Coconut Mousse one that I decided to leave the salads for the next post. I guess my readers have a sweet tooth! 😉
This Lemon Coconut mousse was adapted from a recipe by Ina Garten and it’s easy to do even though it does take some time. Basically, I make my own lemon curd (with a recipe I had completely forgotten I had and I rediscovered when going through an old recipe notebook!) and I replace the sweetened whipped cream of her original recipe, by coconut cream (I find that the mousse is already sweet enough, and I like the addition of the subtle coconut flavor). I also doubled the amount of lemon zest because I like it very lemony.
In order to make this mousse you will need:
Ingredients:
For the Lemon Curd (serves two and half cups):
1 egg
2 egg yolks
zest and juice of 2 lemons
40 grs of butter
150 grs of sugar
2 tablespoons of cornstarch
250 ml of water
For the Lemon Custard:
3 XL whole eggs
3 XL egg yolks
1 cup of sugar
1/2 cup of lemon juice
4 teaspoons of lemon zest
a dash of salt
Additionally, to turn the custard into mousse:
3 egg whites, whipped into a firm meringue together with 2 tablespoons of sugar
1 cup coconut cream.
You can find coconut cream in the Asian food aisle of your supermarket, or you can simply put a can of unopened coconut milk in the fridge overnight. When you open the can, cream will have formed on top. Scoop it and add it to the rest of the preparation, it’s that easy!
1) The first thing to do when making this mousse is to prepare the Lemon Curd. I like to do this the day before, to make my life easier, but you can also do everything on the same day.
In order to make the lemon curd, put all ingredients in a pan and cook until it thickens, stirring constantly so that the cream doesn’t burn/sticks to the bottom of the pan. It will take about 6/7 minutes. Let it cool for about 15 minutes and then let it rest on the fridge.
2) The second step is to make the Lemon Custard. I know the original recipe says that the whole recipe takes a total 15 minutes preparation but, in my experience it takes double as much time just to get the custard ready. But from then on, it’s only a few extra minutes!
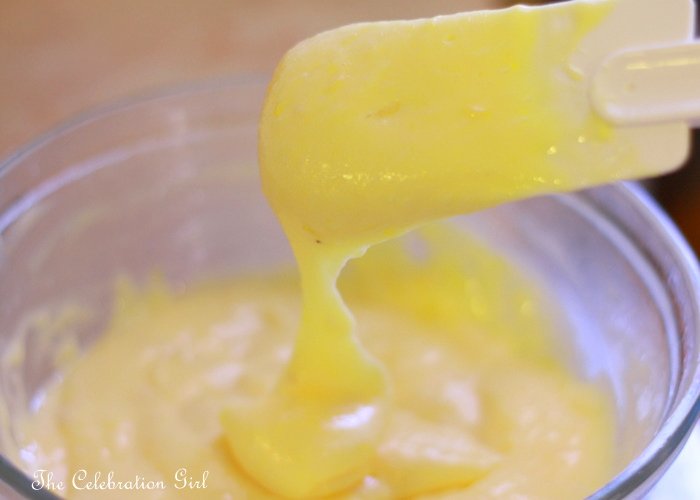
In order to make the custard, put all ingredients in a heat-proof bowl and put this one on top of a pan with simmering water. Let it cook, beating constantly with a whisk. After about 10 minutes it will start to thicken. Continue beating until it reaches pudding consistency (Argentinian friends: tiene que tener la textura de un postrecito). When it does, take the bowl off the heat and let it cool for about 15 minutes. Then, cover with plastic wrap and put in the fridge for 1-2 hours. When I make this mousse for a special occasion, I generally prepare both the Lemon Curd and the Lemon Custard the day before and let them sit in the fridge overnight.
After taking the custard out of the fridge it should look like this:
3) When the custard is ready, whip the egg whites until firm. Add the two tablespoons of sugar, one at a time, and continue beating until the meringue becomes glossy and firm.
4) Fold the egg whites carefully into the lemon custard with a spatula.
5) Add the coconut cream, making sure it incorporates evenly into the preparation.
6) Add 1 cup of Lemon Curd. Incorporate.
7) Put the Lemon Mousse in the fridge and chill for several hours. Serve and enjoy!
If you like lemony desserts, I am sure you will love this mousse: it is sweet and it has a wonderful, luscious texture.
In order to decorate it, I used just a few thin slices of lemon zest.

Would you like to have some?
I wish you a wonderful rest of the week and weekend. See you in a few days with a new post!
by Marcela M. | Jul 27, 2011 | Blog, Crafts and DIY, Parties, Recipe Box, Recipes, Salads and dips, Uncategorized
Summer in Cyprus is hot. Very. Hot. But this year it feels hotter due to the energy crisis caused by the destruction of the island’s main power plant. Things, however, are what they are and, I believe, it is for each of us to approach them with a positive attitude and make the best out of them. In my case, this means trying to add a little beauty to everyday life, and taking advantage of what we have.
We live in a apartment, so there is no garden or swimming pool where to spend our afternoons. What we do have is a small balcony which we have surrounded by a straw fence to keep the strong sun at bay, and where we can sit and relax, enjoying the sweet summer breeze when the sun is not too high. And, when weather permits it, we have lunch or dinner there too.
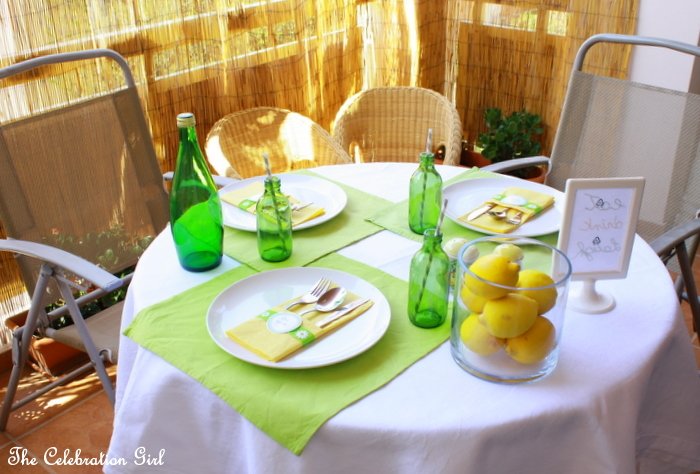
Last Monday, we did just that. It was not too hot (by our standards, anyway ;), so I set up a happy summery table setting and served a quick early lunch in the balcony.
I put a white tablecloth on the table, and used lime green napkins under the plates to add a little bit of colour.

I put lemmons on a glass vase to serve as centerpiece, and used a set of salt and pepper shakers that we had bought when we lived in Ivory Coast and that matched the table’s colour palette.
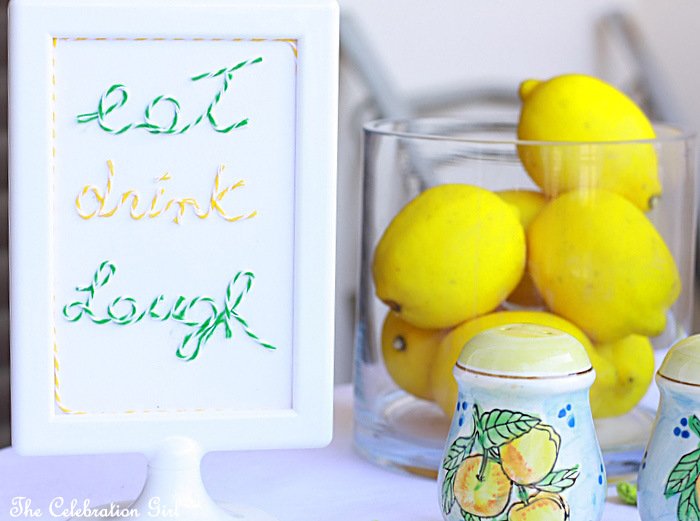
I served lemonade in small green bottles (that originally contained German beer!) and added grey paper straws to them for the babies. And also for me, because I like them 😉

Using baker’s twine (in Peapod and Lemondrop, from the Twinery), I wrote “eat, drink, laugh” on a piece of paper and put it on a small frame, next to the lemons, to serve as motto for the meal.
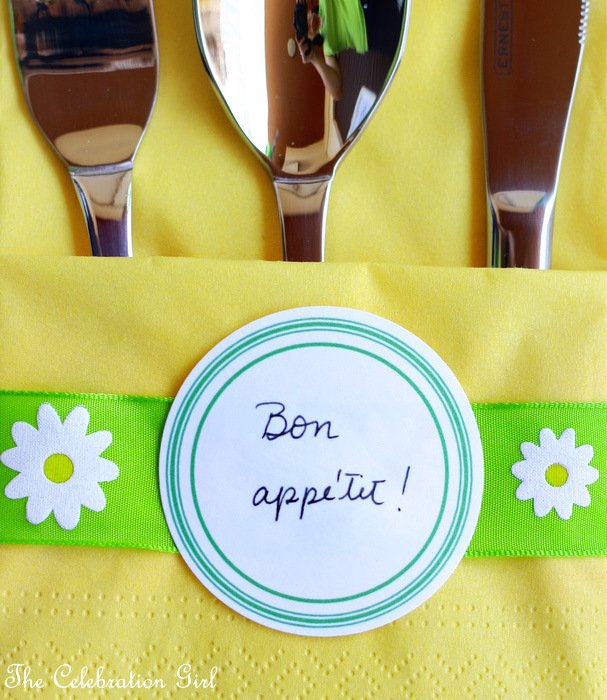
Finally, I folded yellow paper napkins on a pouch, added some ribbon and a paper circle (with Bon Appétit written in it) to dress it up a little, and placed the cutlery inside . You can download these and other tags for free from the Twinery’s blog here. All you have to do then is to print them in cardboard paper and cut them using a 2″ circle punch or just a pair of scissors)
The menu consisted of different salads, dips and a delicious lemon coconut mousse. The following recipe corresponds to one of these salads, called Tzaziki, which is traditional here in Cyprus and which, with some variations, is also very common in Serbia (where I actually discovered it and where it is called Tarator ). It is very refreshing, simple to make, and it tastes great with meat or simply with some pitta bread. At home we call it “cucumber salad”. I’ll share all other recipes in my next post!
In order to make Tarator/Tzaziki you will need: 1 cucumber, 1 clove of garlic, greek yogurt and a little bit of parsley.

The procedure couldn’t be simpler: Cut the cucumber into thin slices, and then chop them finely. Place it in a bowl. Chop a clove of garlic (or half, if you are not a very garlicky person 😉 and add it to the cucumber. Add greek yogurt (500 ml) and mix well. Chop a few parsley leaves to garnish.

This is the way I learnt to do it from my husband’s family, in Serbia. I should note, however, that here in Cyprus I learnt a different way which is equally delicious but a little bit different. In the Cypriot version they double the amount of cucumbers, garlic is optional, they generally add 2 tablespoons of olive oil and they replace parsley for dried mint. My recommendation: try both!
What’s the weather like these days where you live? How do you cope with it?
Have a lovely Wednesday and see you next week!
by Marcela M. | Jul 19, 2011 | Blog, cookies, Recipe Box, Recipes, Sweets, Uncategorized
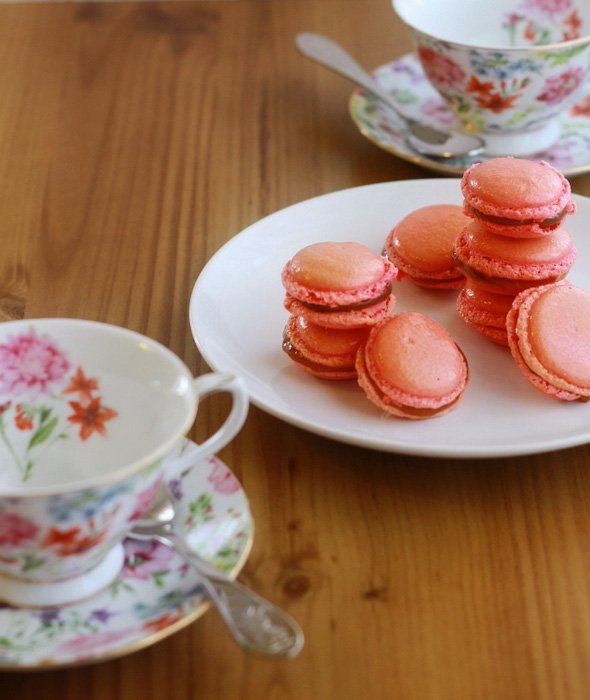
Good morning dear friends! How are you today? I hope you had a fantastic weekend.
I had planned to write this post before but, as you may know, there was an explosion in a munition deposit in Cyprus, that resulted in the destruction of the island’s main power plant. As a consequence of this, and considering that we are in the middle of a torrid summer, power rationing measures have been put in place (no AC, among others), and we are experiencing daily (sometimes twice daily) power cuts. So I guess the macarons that are the object of this post will be the last baking I will be doing for a while – at least until the situation regularizes a little bit- and I will have to reduce my blog posting to one post per week (on Mondays).
I had wanted to make macarons for a long time but, I must confess, I was terrified by the little cookie. I am not a professional baker and macarons are, as a friend put it, the royalty of baking, so I wondered whether I was going to be up to the task. I read countless recipes and instructions on the internet, and there always seemed to be so many steps that one needed to attend to with extreme care and attention, so many things that could go wrong, so many chances that for some unexplainable equation things would in fact go wrong, that I wondered whether making macarons was reserved for some elite of extremely apt bakers while me, a mere muggle of the craft, could never aspire to having these cute and delicious cookies coming out of my oven.
My favorite recipe was the one Linda (from fabulous blog Call me cupcake) shared on Cake Journal. After I read it, I started thinking that maybe I should try. The instructions were detailed, there were plenty of pictures and the commenters kept mentioning how they had been able to make macarons with it. I was encouraged! I bookmarked the recipe and, for several months, I would go back to it every now and then, not daring to actually try it.
It wasn’t until I read the article “Macaron Mythbusters” in Brave Tart that I actually started thinking “I can do this!” If you haven’t read it, please go now, you can continue reading my post later. I just love the humour with which it is written and, being the nerd that I am, its scientific approach to macaron making fascinates me. When I read that “We’re talking about a cookie here, not the Heisenberg uncertainty principle.” I started laughing hard at myself for having been scared of, yes, a cookie and I decided it was time to give macarons a try. The worst thing that could happen, after all, was wasting a few egg whites, almond powder and sugar…and I could always turn a failure into a different kind of success (as I did here). And if I was going to give them a try, what day could possibly be better than July 14th, Bastille day? I am a Francophile, after all 😉
Stella‘s recipe, though, calls for a very stiff and dry meringue, which I was not sure I could achieve with my Moulinex food processor’s whisk attachment (see photos in this post) . Since one of Stella’s Ten Commandments of Macaron making recommends making meringue as instructed by each recipe, I decided to try Linda‘s recipe first (which calls for a stiff meringue, but not necessarily that stiff), while following Stella’s commandments at the same time. I also tested each step according to both their tips, and contrasted textures with Linda’s pictures and with these ones as well. And I am happy to report that it worked! I still have to work on my piping technique, I have to get to know my oven better (I have now bought an oven thermometer for that purpose, yay!) and I have to work on colouring too, but at least I can happily say that my macarons looked like macarons and-most importantly-tasted like macarons!
In case you are interested in giving them a try- and I encourage you to do so, because they delicious!- here is what I did, with pictures to show you every step :
1- I bought ground almonds but, as both Linda and Stella recommend grinding them even more, this is the first thing I did. I put 200 grams of ground almonds (the whole pack) in my food processor and pulsed 5 times.

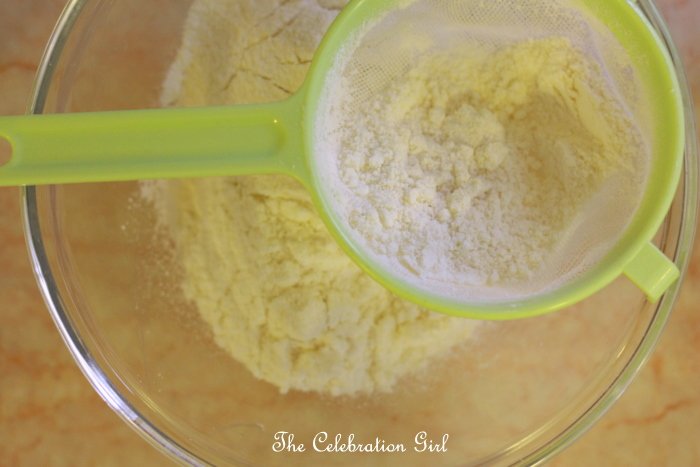
2- I sifted the processed almonds (with a colander, as I don’t own a baking sifter) and this is what I ended up with:
3- Using a kitchen scale, I measured 100 grs of ground almonds (what the recipe requires) and saved the rest for some other time in an airtight container. I put the measured almonds in the food processor again, and measured (also with the scale) the required amount of powdered sugar. I added it to the almonds and processed everything for 1 minute. This allows for them to be properly mixed together, and also to break any big lumps there may be (which is necessary for good macarons).

4- I then sifted the dry ingredients twice, and set them aside.
Now it was time to make the meringue! Stella explains that a good macaron requires a stiff meringue so that, once the dry ingredients are added to it, they will have time to be incorporated without the meringue deflating too fast and therefore losing the necessary consistency for macarons to keep their shape. If the meringue is not stiff enough, there is a risk of overmixing the macarons. It is for this same reason that she recommends adding food colouring while making the meringue and not when adding the dry ingredients: this guarantees that the colour will be fully incorporated without compromising the batter’s consistency. So this is what I did.
According to Stella’s mythbusters article, there is no need to age the egg whites for making a good macaron. Linda, however, recommends aging them for 24 hs and, since I was following the latter’s recipe, I did (in case you don’t know what aging an egg white means, I should clarify that what is required is for you to separate the egg whites, to keep them covered with a paper towel in the fridge for 24 hours, and to take them out of the fridge a few hours before using them. You can also keep them at room temperature, if your weather conditions so permit without them getting spoiled).
5- I washed my food processor and made sure that there was no grease in it by cleaning it with a little bit of lemon juice and a paper towel. I then added my aged egg whites and started beating at medium speed.

6- When the egg whites started foaming, I added the ground sugar, one tablespoon at a time.
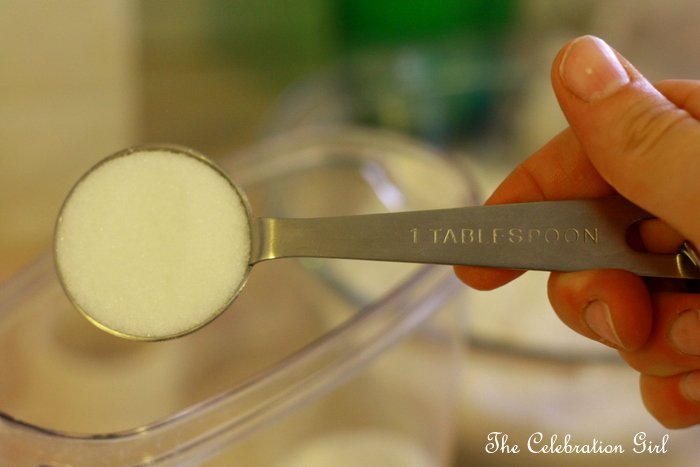
7- Linda’s recipe asks for a glossy and stiff meringue that won’t slide from the bowl if we put it upside down. I tested the consistency with a spatula (as you can see from the picture below, it doesn’t move)

8- I added gel food colouring with a toothpick, and I continued beating for 2 more minutes, until all colour was evenly incorporated. I was looking for a soft shade of pink – I will have to add less the next time!
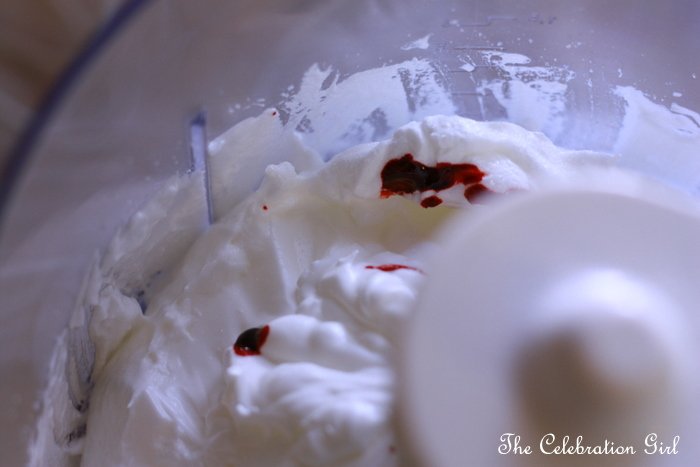
9- To my surprise, I ended with a stiffer meringue than I expected (yay! Go, Moulinex, go!). This is what it looked like when I put it into the mixing bowl:

10- I added the dry ingredients all at once, and started folding using a spatula. This is called macaronage, and most recipes I have read mention that it takes around 40 strokes to achieve appropriate macaron consistency. They all agree too in that a slightly under-mixed batter is better that an over-mixed one, so I made sure that I tested the consistency every 3 strokes to make sure I did not over do it. Stella recommends making sure that one scrapes the bowl from all sides several times , so I did this too (see the reasons for this here). I counted the strokes and it took me 44 (ah OCD ;))

11-I tested whether the batter had reached appropriate consistency by checking whether the mixture flowed like a ribbon when holding the spatula over the bowl (as Linda recommends, and as seen below). I also used Stella’s method of spooning some batter out and putting it back into the mix and checking whether it incorporates into it within a few seconds.

12- I filled my pastry bag with the help of a tall glass and started piping the macarons on a baking sheet covered with baking paper.

Now, this is where I made the mistake of piping them too close to each other because I had no idea how much they were going to spread. So, bear in mind that they do spread a bit and that , even if they look nothing like beautiful circles at first, they will look better once they finish spreading (just a few minutes). So give them some room to get a nice round shape, so that once they are in the oven they can grow nicely and so that you don’t have to separate them with a knife once cooked (ouch!). Also, try making them about the same size because you will have to pair them afterwards!
The second sheet I piped turned out better than this one, but I am adding the picture of the first one so that you can learn from my mistakes and see what NOT to do:

13- I tapped the baking sheet against the counter (as Stella recommends) and then let them sit for 2 hours (as Linda’s recipe requires). This was easy to do because we had a power cut just then and I couldn’t put them in the oven immediately even if I wanted to 😉
When the power came back, I turned my oven to 150 degrees celsius (or so I thought) and put the first sheet inside. I said “so I thought” because it took me much longer to cook the macarons than the recipe called for. This could also have been because of the addition of food colouring but, in order to be sure the next time, I have now bought an oven thermometer and I am planning to calibrate my oven before making them again.

In order to know whether they are ready or not, try separating them from the baking sheet. If when you try to take one, the top comes off and the bottom remains attached to the sheet…well, they are not ready. Also, their interior should not be gooey.
This is what they looked like when I took them out of the oven, while they were cooling down.

14- After they cooled down completely, I assembled them. I must confess I used what I had in the fridge as a filling: home made dulce de leche and chocolate ganache. I let them rippen for 24 hours in an airtight container in the fridge before eating them (except for one, for testing purposes and for the sake of science only ;)). They do taste much better after 24 hours, so don’t eat them right away (not all of them at least!)

Now that I have made them once, I can’t wait to make them again and to experiment with new flavours and colours!
Would you like to make them?
Have a nice week and see you again next Monday!
by Marcela M. | Jul 12, 2011 | Blog, Cooking basics and tutorials, Marmalades and jams, Recipe Box, Recipes, South America, Sweets, Travel, Uncategorized
Happy Tuesday dear Friends! I hope you had a wonderful start of the week.
In this past post I talked to you about dulce de leche, and I mentioned that this milk jam is the traditional filling for cornstarch cookies or alfajores de maizena. After the post, a few friends asked me how they could make dulce de leche, because they don’t live in countries where one can simply go and buy one jar at the supermarket.
So here I am, showing you three easy ways of making your own, the Argentinian way. Why the Argentinian way? Because you can find different versions of the same product pretty much all around Latin America, but if you read the components you will notice slight differences in the ingredients. For example, while in Argentina dulce de leche is made 100% with cow’s milk, traditional mexican dulce de cajeta is made with goat’s milk; and in Uruguay it generally includes cornstarch (which makes it thicker). It is also possible to find it outside of Latin America, for example in France (where it is called confiture de lait), in Israel (ribat jalav) and, I am told, even in India.
So how can one make dulce de leche, when it is not readily available for purchase?
There are three ways I know of, but only two of which I have tried:
I- By submerging a can of sweetened condensed milk in a pan full of water, and letting it boil for about 3 hours (in a normal pan) or 45 minutes (in a pressure cooker). If you use this method, you should remember that:
a) The can has to be completely covered in water at all times, otherwise any part that remains uncovered will not mutate into dulce de leche (as in the picture below)

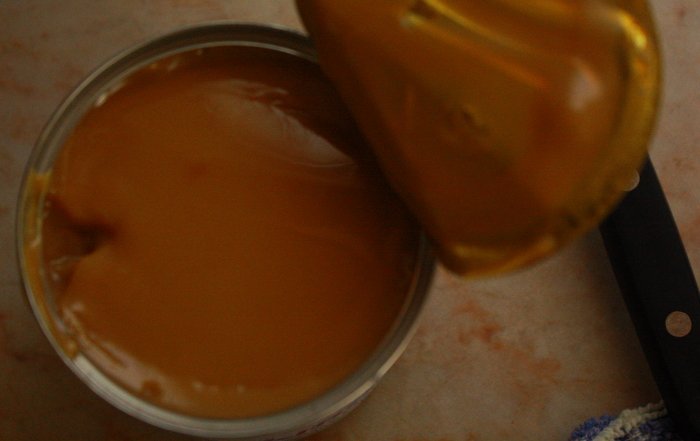
b) Once the 3 hours have passed, make sure that the can is COMPLETELY cooled before opening it. If you open it when it’s still hot, the content will burst and there is a serious risk that you may burn yourself. So wait. Put in the fridge for faster cooling if necessary. But do not open it immediately!
This is what will be waiting for you when you open the can:
II- If the possibility of burning yourself scares you a lot, you can try Chef David Lebovitz’s method, which consists of baking sweetened condensed milk au bain marie, covered in aluminum foil. I haven’t tried it, but it does look like a safer option, and it takes less time than the original can version.
III- Make dulce de leche from scratch. It is not difficult to do so, and, though it is a bit time consuming because you need to watch it carefully, it is worth it. I must admit that, when I lived in Argentina, I didn’t do it very often, because there are so many good brands available that I didn’t see the point. But one day, when I was 21 years old, my father (who loved to cook) suggested that we tried, so we asked around for a recipe and we made our first batch of dulce de leche. This is the recipe I will share with you today.
To make 1 kilo of dulce de leche, you will need
– 5 litres of milk
– 1 kilo of sugar
– 1 vanilla pod (if you don’t have vanilla pods, you can use 1 tablespoon of vanilla extract)
– 1 tablespoon of bicarbonate of soda
– 1 big pan
– 1 wooden spoon
The preparation is very simple.
1- Put the milk in the pan. Make sure the size of the pan is twice as big as the amount of milk, because the preparation will rise once you add the bicarbonate of soda and, if it is too small, you run the risk of it overflowing the pan and making a big mess. In order to prevent this, I am told that one should put in the pan a few small glass balls (like the ones children play with), because this will prevent the preparation from rising too much.
2- Add sugar, all at once.
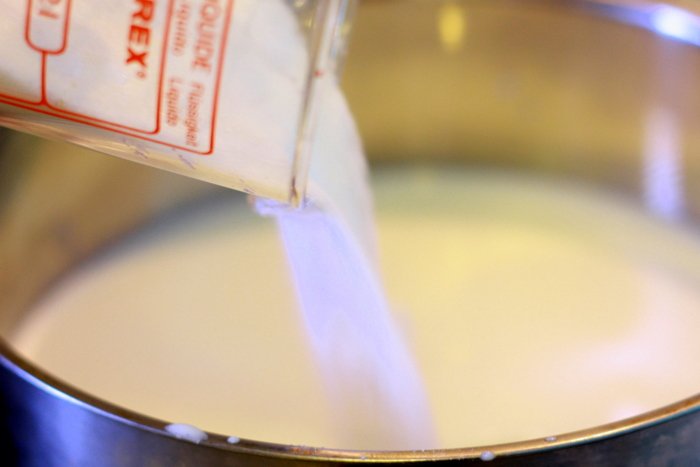
3- Stir the preparation and bring to the boil. Let it boil for 5 minutes, stirring constantly
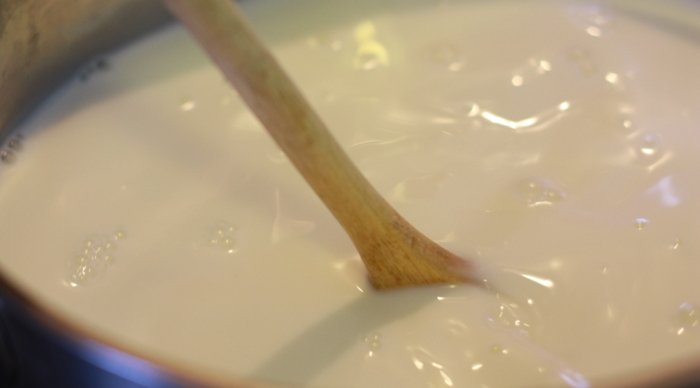
4- Bring heat to the minimum, and add the vanilla pod and the bicarbonate of soda (I added 1 teaspoon because I was making half the preparation only)

5- Let the preparation boil at minimum heat, stirring every 10-15 minutes. It should look as in the picture below:

6- After about 1 hour, the milk will start to brown, and will look like this:
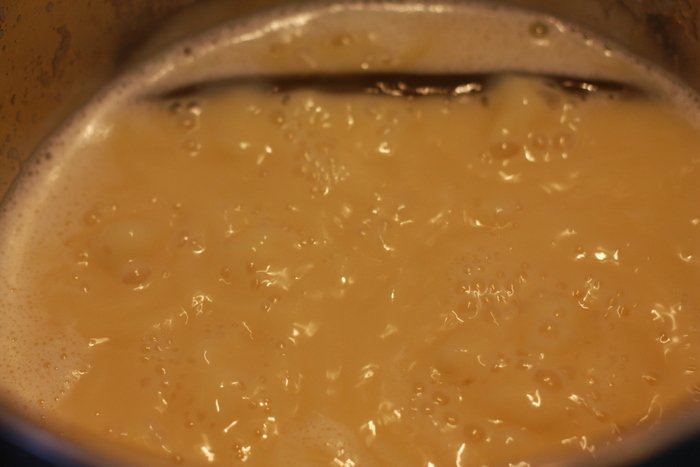
7-After another hour, it will become even darker, like this:

8- After around 1/2 hour, it will be thicker and darker and it will have considerably reduced. When it reaches this point, start stirring constantly for about 15 minutes.
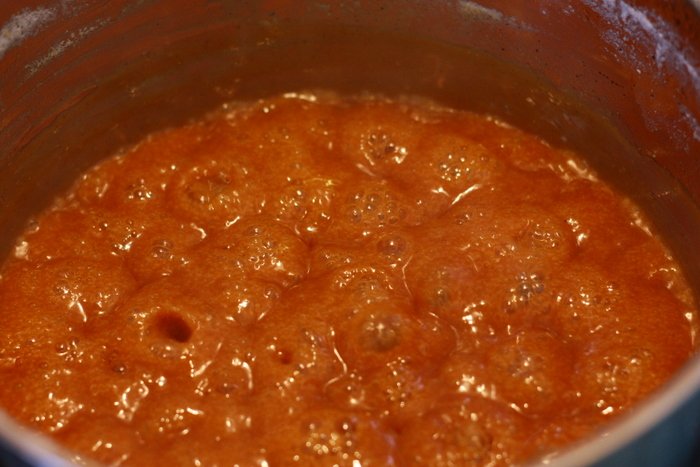
This is the consistency it had at that point. It doesn’t look like it’s ready but, trust me, it almost is.
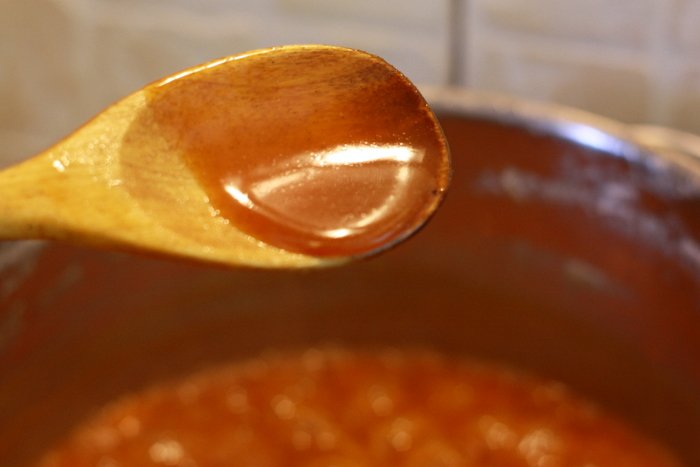
9- After 15 minutes, turn off the heat and continue stirring for another 5-10 minutes. What I like to do then is to transfer it to another pan (it cools faster). This is how it looked right after I transferred it:
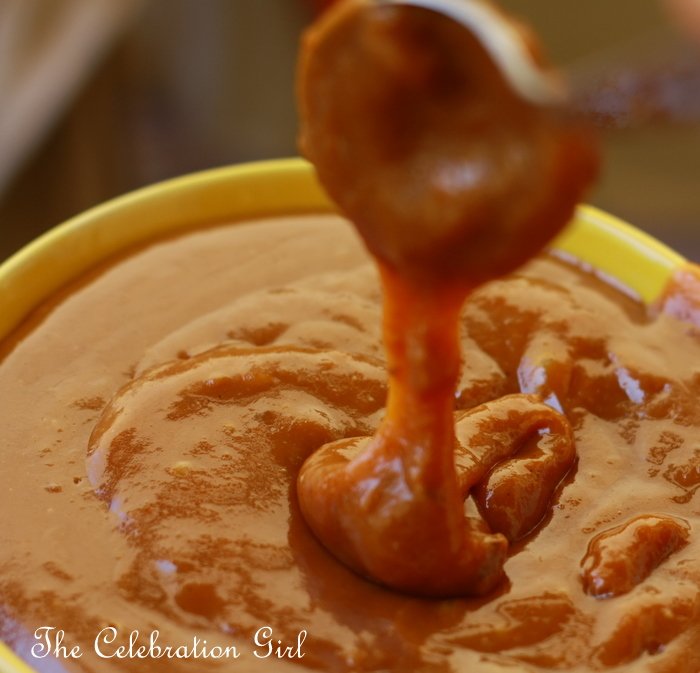
As you can see, it still looks quite liquid, like a caramel sauce.

But all it needs is to cool down completely to reach the appropriate consistency.

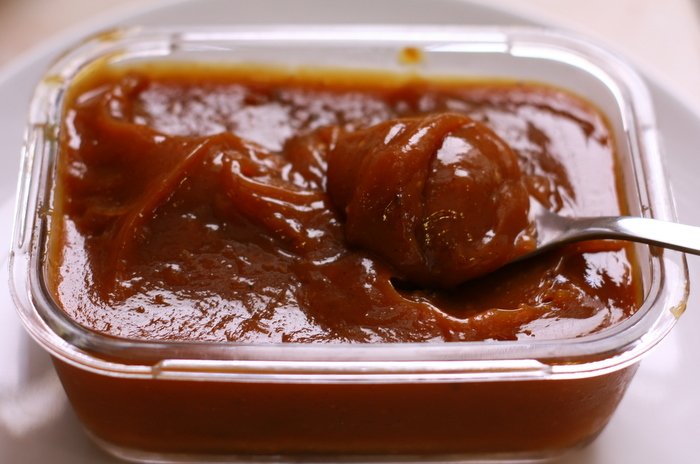
10-Once it has cooled down, transfer it to a glass container and keep it in the fridge. This is how it will look after 3 hours in it:

Ready to eat and to add to preparations such as cookies, cakes, brownies, ice-creams, puddings, and so many more!
I hope that you will like it if you decide to make it.
Have a wonderful week!
If you want to know how to make dulce de leche repostero (baking dulce de leche), check this post
by Marcela M. | Jul 5, 2011 | Blog, cookies, Crafts and DIY, Recipe Box, Recipes, South America, Sweets, Travel, Uncategorized
Good morning friends!
How was your weekend? I hope you had a great time!
July is a month full of celebrations in my home country, Argentina, and it all starts during the first week of the month: From 1st until 7th of July, Argentina celebrates “Sweetness week”. During this week, argentinians exchange a sweet (chocolate, candy, etc) for a kiss.
The tradition originated as part of a promotion campaign to increase the sale of sweets, especially of ARCOR’s bon-o-bon, but it was quickly embraced by the population. Sweetness week is now a time, not only to give away chocolates and candies, but also to be nice to those around us.
Would you like to join in the celebrations, wherever you are?
If you do, Delicious Tea has some adorable free printables that can be printed on sticker paper and attached to individual sweets, or printed on cardboard paper and attached to a gift box. If you would like to use them, all you have to do is “like” their facebook page, “like” their album, leave your email address in the comment below the pictures, and they will send them to you!

If you also want to offer your loved ones some traditionally argentinian home-made sweets, here is my recipe for alfajores de maizena, or conrstarch cookies (which are the ones you can see in the picture at the beginning of this post):
Ingredients:
For the cookies:
800 grs cornstarch
300 grs all-purpose flour
350 grs sugar
3 teaspoons baking powder
4 eggs + 3 egg yolks
1 tablespoon vanilla extract
1/2 kg butter
For the filling:
Dulce de leche
Shredded coconut
Preparation:
1-Mix butter and sugar until creamy.
2- Add eggs, egg yolks and vanilla. Mix well, but not too much- just until all ingredients are incorporated.
3- In a different bowl, mix the dry ingredients.
4- Gradually add the dry ingredients to the butter mixture. Mix thoroughly until you have a workable dough (it should have the texture, more or less, of a pâte sablée)
5- Roll the dough on a floured surface and cut with a round cookie cutter, about 1/2 cm thick.
6- Place on a baking tray covered with baking paper or greased, and put in the oven at 150º C/305 F for about 10 minutes.
Very important: the cookies SHOULD NOT get brown or they will be hard and crumby. Watch them very carefully while they are cooking!
7- Once they are cooked, remove from the oven and let them cool for half an hour.
Assembly:
1- Put shredded coconut in a bowl.
2- Put a layer of dulce de leche on the inside of one cookie, and then place another cookie on top (like a dulce de leche sandwich).
3- Put dulce de leche on the sides of the cookie sandwich with a spatula/knife, and then roll it in shredded coconut (the coconut will then attach to the sides of the cookie).
NOTE: The recipe above is for traditional alfajores de maizena. You can see a picture of wonderfully executed ones, made by Amy,The Sugar Fairy (using this recipe) here. The ones I made for my birthday were coloured to match my dessert table, and filled with buttercream and lemon curd, instead of dulce de leche. This is the beauty of these cookies: they are easy to make and very versatile! If you want to colour the dough, just add a few drops of food colouring at the end of the preparation. This dough can be stored in the freezer.
Have a wonderful Tuesday!
by Marcela M. | Jun 30, 2011 | Blog, cookies, Crafts and DIY, Recipe Box, Recipes, Sweets, Uncategorized

Hello there!
This post was supposed to be published yesterday evening but my internet connection was up and down, so it is only now that I can do it.
I am writing this post because, while cake-pops have been widely popular in the US for quite some time already, they are a novelty in other parts of the world (namely, Cyprus and Argentina!). Consequently, a few readers and friends have asked me after seeing my pictures, what they are and how they are done. And when I have referred them to other websites, they have asked me what candy melts are, whether there are alternatives to them, because they are hard to get, or they do not exist where they live.
Basically, cake-pops are cake, mixed with frosting, covered in chocolate. The procedure for making them is fairly easy: 1- bake a cake 2- let the cake cool for 24 hours 3- crumble the cake 4- Mix with frosting 5- shape the cake-balls 6- attach lollipop stick 7- Dip the cake balls into candy melts/chocolate 8- Add sprinkles or any other decoration. There are also other versions that work with cookies instead of crumbled cake…but technically speaking those would be cookie-pops* 😉
They look simple, right? However, they are not always that simple. In my experience, two things need to be taken into consideration:
1) The mixture of crumbled cake and frosting should not be too moist or the cake-pops will not remain attached to the lollipop stick, they will fall (Argentinian friends: this is why I find that dulce de leche doesn’t work, and that buttercream is better. You may try, but I warned you ;). Therefore, when you start adding frosting after crumbling the cake, it is better to do it little by little and to test consistency. You want to add just enough frosting to be able to shape the balls, not more. After the balls are shaped, keep them in the freezer for 15/20 minutes. If you don’t own a freezer, keep them in the fridge for several hours.
2) The consistency of the candy melts/chocolate is key to achieve a smooth finish. The problem is that candy melts are not always easy to work with, because they harden much faster than regular chocolate. I do not own a microwave, so I melt them in a double boiler and, when they are starting to melt, I take the bowl out of the stove, and start beating the candy melts until they are liquid enough to dip the cake-pops in them. Also, the more candy melts you use the better, because, in order to get a smooth finish, you need to completely submerge the cake-balls in them.
For a very helpful, full of photographs tutorial of Bakerella herself making cake-balls and cake-pops, check these Instructions on how to make cake-pops from The Pioneer Woman’s blog. And check Bakerella’s blog to see and assortment of wonderfully creative ideas on how to make these sweets that drive children crazy at parties!
Two more tips:
1) When I don’t want to make a lot of cake-pops, I bake cupcakes instead of a cake, crumble as many as I need, and freeze the rest. Or I prepare all cake-balls and freeze the ones I don’t need in an airtight container (without dipping them in chocolate).
2) If you cannot find candy melts where you live, you can use chocolate for making truffles or for frosting cakes , which hardens faster (in Spanish: chocolate cobertura). This is necessary for the cake-pops not to drip all chocolate covering down the lollipop stick when you turn them after dipping.
An easy way of decorating the lollipop sticks is with ribbon flags. The ones above are the ones I made for my birthday party and, as you will see, they are really easy.
In order to make them you will need:
1) Ribbon
2) Lollipop sticks
3) glue
4) A pair of scissors
5) self-adhesive scrapbooking gems
6) Tweezers
Here is how to do it:
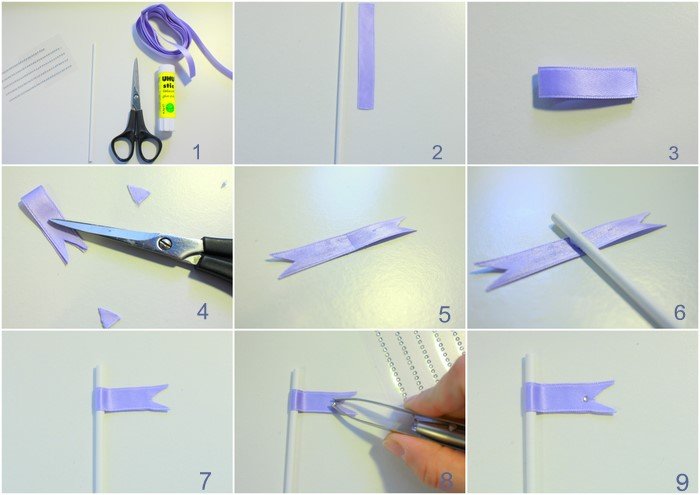
1- Cut ribbon, approximately half the size of the lollipop stick you will be using for your cake pops.
2- Fold the ribbon in half
3- Cut a triangle with your scissors and detach it, as in picture 4 above
4- Open the ribbon and put glue generously in it
5- Place the lollipop stick in the middle of the ribbon flag
6- Fold the flag, leaving the stick in the middle and press both sides against each other for a few seconds so that they are properly glued together
7- With the help of tweezers, take one self-adhesive gem and place it on the flag, as shown in picture 8.
8- Press the gem against the flag for a few seconds so that it is well attached. Picture 9 shows how it will look after it is finished.
And here are all the ones I made, ready for their cake-pops.

It is almost as if they were saying “We want cake-pops! We want cake-pops!“, isn’t it? 😉
Have you made cake-pops before? Do you have any tips and tricks to share with other readers? If you do, please leave a comment!
Have a wonderful weekend!
*If you want to make cookie pops, you can find recipes, tips and tricks here (in English), and here (in Spanish)


