Hello there!
This post was supposed to be published yesterday evening but my internet connection was up and down, so it is only now that I can do it.
I am writing this post because, while cake-pops have been widely popular in the US for quite some time already, they are a novelty in other parts of the world (namely, Cyprus and Argentina!). Consequently, a few readers and friends have asked me after seeing my pictures, what they are and how they are done. And when I have referred them to other websites, they have asked me what candy melts are, whether there are alternatives to them, because they are hard to get, or they do not exist where they live.
Basically, cake-pops are cake, mixed with frosting, covered in chocolate. The procedure for making them is fairly easy: 1- bake a cake 2- let the cake cool for 24 hours 3- crumble the cake 4- Mix with frosting 5- shape the cake-balls 6- attach lollipop stick 7- Dip the cake balls into candy melts/chocolate 8- Add sprinkles or any other decoration. There are also other versions that work with cookies instead of crumbled cake…but technically speaking those would be cookie-pops* 😉
They look simple, right? However, they are not always that simple. In my experience, two things need to be taken into consideration:
1) The mixture of crumbled cake and frosting should not be too moist or the cake-pops will not remain attached to the lollipop stick, they will fall (Argentinian friends: this is why I find that dulce de leche doesn’t work, and that buttercream is better. You may try, but I warned you ;). Therefore, when you start adding frosting after crumbling the cake, it is better to do it little by little and to test consistency. You want to add just enough frosting to be able to shape the balls, not more. After the balls are shaped, keep them in the freezer for 15/20 minutes. If you don’t own a freezer, keep them in the fridge for several hours.
2) The consistency of the candy melts/chocolate is key to achieve a smooth finish. The problem is that candy melts are not always easy to work with, because they harden much faster than regular chocolate. I do not own a microwave, so I melt them in a double boiler and, when they are starting to melt, I take the bowl out of the stove, and start beating the candy melts until they are liquid enough to dip the cake-pops in them. Also, the more candy melts you use the better, because, in order to get a smooth finish, you need to completely submerge the cake-balls in them.
For a very helpful, full of photographs tutorial of Bakerella herself making cake-balls and cake-pops, check these Instructions on how to make cake-pops from The Pioneer Woman’s blog. And check Bakerella’s blog to see and assortment of wonderfully creative ideas on how to make these sweets that drive children crazy at parties!
Two more tips:
1) When I don’t want to make a lot of cake-pops, I bake cupcakes instead of a cake, crumble as many as I need, and freeze the rest. Or I prepare all cake-balls and freeze the ones I don’t need in an airtight container (without dipping them in chocolate).
2) If you cannot find candy melts where you live, you can use chocolate for making truffles or for frosting cakes , which hardens faster (in Spanish: chocolate cobertura). This is necessary for the cake-pops not to drip all chocolate covering down the lollipop stick when you turn them after dipping.
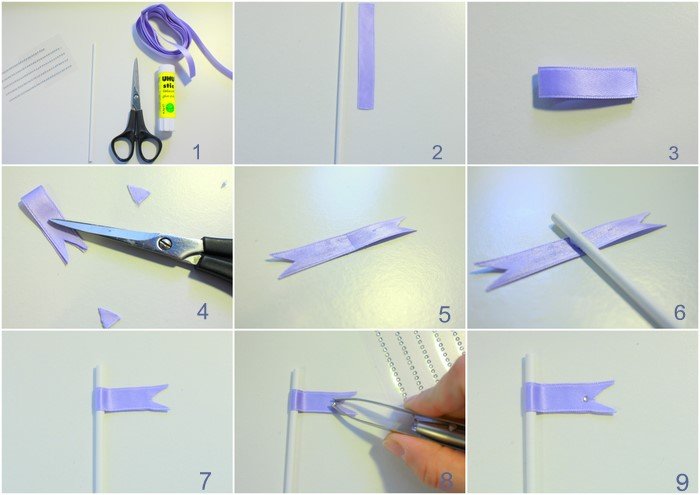
An easy way of decorating the lollipop sticks is with ribbon flags. The ones above are the ones I made for my birthday party and, as you will see, they are really easy.
In order to make them you will need:
1) Ribbon
2) Lollipop sticks
3) glue
4) A pair of scissors
5) self-adhesive scrapbooking gems
6) Tweezers
Here is how to do it:
1- Cut ribbon, approximately half the size of the lollipop stick you will be using for your cake pops.
2- Fold the ribbon in half
3- Cut a triangle with your scissors and detach it, as in picture 4 above
4- Open the ribbon and put glue generously in it
5- Place the lollipop stick in the middle of the ribbon flag
6- Fold the flag, leaving the stick in the middle and press both sides against each other for a few seconds so that they are properly glued together
7- With the help of tweezers, take one self-adhesive gem and place it on the flag, as shown in picture 8.
8- Press the gem against the flag for a few seconds so that it is well attached. Picture 9 shows how it will look after it is finished.
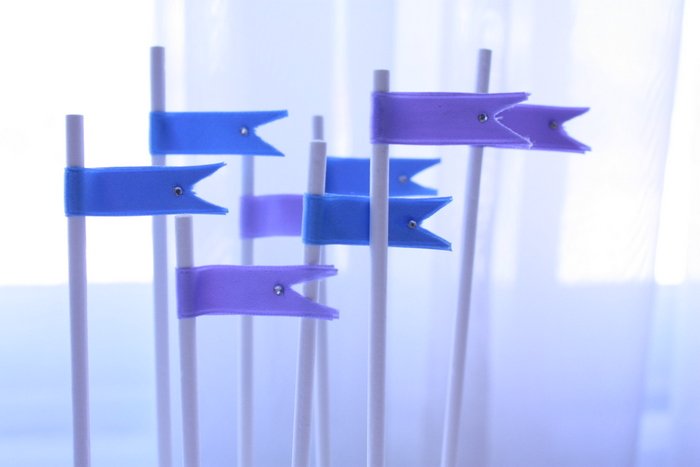
And here are all the ones I made, ready for their cake-pops.
It is almost as if they were saying “We want cake-pops! We want cake-pops!“, isn’t it? 😉
Have you made cake-pops before? Do you have any tips and tricks to share with other readers? If you do, please leave a comment!
Have a wonderful weekend!
*If you want to make cookie pops, you can find recipes, tips and tricks here (in English), and here (in Spanish)


These cake-top are so pretty, they look yummy. I really want to try making them and I love the ribbon flags.
We are a group of volunteers and starting a brand new scheme in our community. Your website provided us with useful information to paintings on. You have performed an impressive job and our entire group will be thankful to you.