by Marcela M. | Oct 22, 2011 | Blog, Holidays, Parties, Uncategorized
Good morning dear friends! I hope you are having a lovely weekend!
Halloween is almost here and, in the past month, the web has been full of wonderful ideas for crafts, decorations, recipes and parties, so I thought I could compile my favourites here and share them with you, for inspiration.
Here they are:
Parties:
Halloween Boofast, by Sheek Shindings
Beautiful Halloween Parties, featured by Kara’s Party Ideas
Halloween-Thanksgiving party, featured by Kara’s Party Ideas
Classic Rustic Halloween Party, featured by Hostess with the Mostess
Deathly Hallows Dinner Party (for Harry Potter fans, such as myself!), featured by Hostess with the Mostess
Food:
Halloween Ghost cupcakes, by Jenny Steffens
Halloween dead finger cookies, by Cake Journal
Vegan Finger witches cookies, by Chef Chloe
Halloween treats, by Cake Journal
Creative Halloween Treats, by The TomKat Studio
Cookie and marshmallow skeletons, by Party Pinching
Halloween Treats, by Delish
Spider topper, by My Cake School
Vegan Spooky eyeballs mini cupcakes, By Vegnews
A selection of Halloween Treat and dessert ideas, by Catch my Party
Decorations:
Halloween décor on a budget, by Oink!
Love Potion Number 9 Witches cauldron, by Icing Designs
Halloween Bats, by Party Frosting
Spider placecards, by The Sweetest Occasion
Fabric and Paper Owls, by Design Sponge
Papier Maché pumpkin, by Made by Joel
Halloween Crafts, by Country Living
DIY Halloween decorations, by Country Living
Halloween activities, by Tip Junkie
Halloween mummies, by Craftaphile
Halloween Wreath, by Dollar Store Crafts
Free Printables:
Spells Potions Printables, Candy Jar and Candy Labels,Ghostly Treat Display and Spell bound sweets by Hostess with the Mostess
Halloween Printable Collection, by Celebrations at home
Spooky Halloween sign, by The TomKat Studio
Halloween Boo sign, by The TomKat Studio
Halloween Printables, by Kara’s Party Ideas
Free Halloween Graphics (to use in your decorations!) by The Pixelista
Free Halloween Printable, by I heart Naptime
Free printable tag, by Anders Ruff Design
I hope that this will help you with your party planning! Have a wonderful week!
by Marcela M. | Jul 27, 2011 | Blog, Crafts and DIY, Parties, Recipe Box, Recipes, Salads and dips, Uncategorized
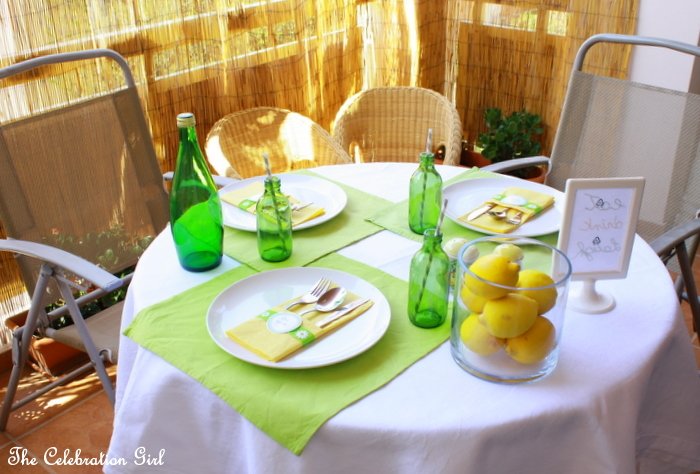
Summer in Cyprus is hot. Very. Hot. But this year it feels hotter due to the energy crisis caused by the destruction of the island’s main power plant. Things, however, are what they are and, I believe, it is for each of us to approach them with a positive attitude and make the best out of them. In my case, this means trying to add a little beauty to everyday life, and taking advantage of what we have.
We live in a apartment, so there is no garden or swimming pool where to spend our afternoons. What we do have is a small balcony which we have surrounded by a straw fence to keep the strong sun at bay, and where we can sit and relax, enjoying the sweet summer breeze when the sun is not too high. And, when weather permits it, we have lunch or dinner there too.
Last Monday, we did just that. It was not too hot (by our standards, anyway ;), so I set up a happy summery table setting and served a quick early lunch in the balcony.
I put a white tablecloth on the table, and used lime green napkins under the plates to add a little bit of colour.

I put lemmons on a glass vase to serve as centerpiece, and used a set of salt and pepper shakers that we had bought when we lived in Ivory Coast and that matched the table’s colour palette.
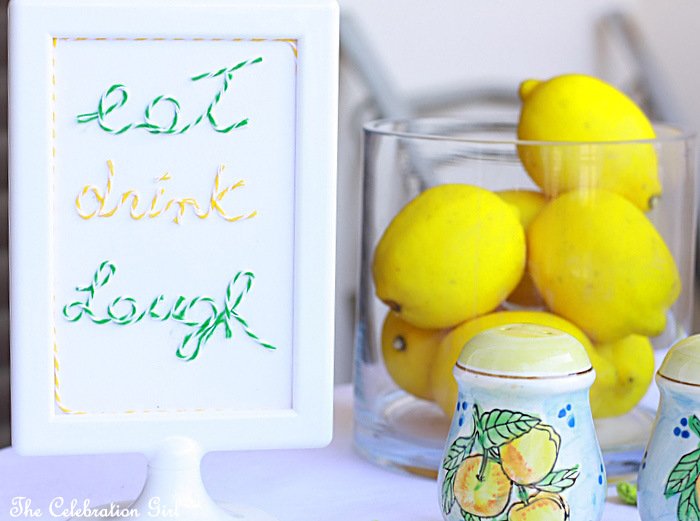
I served lemonade in small green bottles (that originally contained German beer!) and added grey paper straws to them for the babies. And also for me, because I like them 😉

Using baker’s twine (in Peapod and Lemondrop, from the Twinery), I wrote “eat, drink, laugh” on a piece of paper and put it on a small frame, next to the lemons, to serve as motto for the meal.
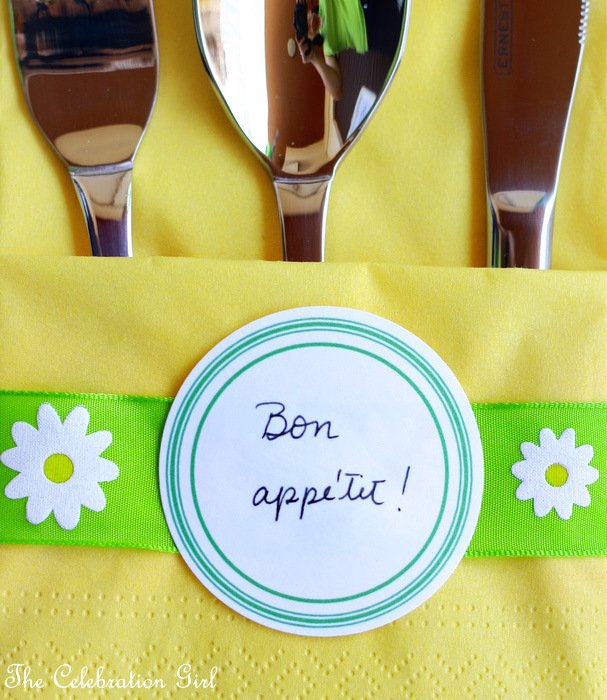
Finally, I folded yellow paper napkins on a pouch, added some ribbon and a paper circle (with Bon Appétit written in it) to dress it up a little, and placed the cutlery inside . You can download these and other tags for free from the Twinery’s blog here. All you have to do then is to print them in cardboard paper and cut them using a 2″ circle punch or just a pair of scissors)
The menu consisted of different salads, dips and a delicious lemon coconut mousse. The following recipe corresponds to one of these salads, called Tzaziki, which is traditional here in Cyprus and which, with some variations, is also very common in Serbia (where I actually discovered it and where it is called Tarator ). It is very refreshing, simple to make, and it tastes great with meat or simply with some pitta bread. At home we call it “cucumber salad”. I’ll share all other recipes in my next post!
In order to make Tarator/Tzaziki you will need: 1 cucumber, 1 clove of garlic, greek yogurt and a little bit of parsley.

The procedure couldn’t be simpler: Cut the cucumber into thin slices, and then chop them finely. Place it in a bowl. Chop a clove of garlic (or half, if you are not a very garlicky person 😉 and add it to the cucumber. Add greek yogurt (500 ml) and mix well. Chop a few parsley leaves to garnish.

This is the way I learnt to do it from my husband’s family, in Serbia. I should note, however, that here in Cyprus I learnt a different way which is equally delicious but a little bit different. In the Cypriot version they double the amount of cucumbers, garlic is optional, they generally add 2 tablespoons of olive oil and they replace parsley for dried mint. My recommendation: try both!
What’s the weather like these days where you live? How do you cope with it?
Have a lovely Wednesday and see you next week!
by Marcela M. | Jul 5, 2011 | Blog, cookies, Crafts and DIY, Recipe Box, Recipes, South America, Sweets, Travel, Uncategorized
Good morning friends!
How was your weekend? I hope you had a great time!
July is a month full of celebrations in my home country, Argentina, and it all starts during the first week of the month: From 1st until 7th of July, Argentina celebrates “Sweetness week”. During this week, argentinians exchange a sweet (chocolate, candy, etc) for a kiss.
The tradition originated as part of a promotion campaign to increase the sale of sweets, especially of ARCOR’s bon-o-bon, but it was quickly embraced by the population. Sweetness week is now a time, not only to give away chocolates and candies, but also to be nice to those around us.
Would you like to join in the celebrations, wherever you are?
If you do, Delicious Tea has some adorable free printables that can be printed on sticker paper and attached to individual sweets, or printed on cardboard paper and attached to a gift box. If you would like to use them, all you have to do is “like” their facebook page, “like” their album, leave your email address in the comment below the pictures, and they will send them to you!

If you also want to offer your loved ones some traditionally argentinian home-made sweets, here is my recipe for alfajores de maizena, or conrstarch cookies (which are the ones you can see in the picture at the beginning of this post):
Ingredients:
For the cookies:
800 grs cornstarch
300 grs all-purpose flour
350 grs sugar
3 teaspoons baking powder
4 eggs + 3 egg yolks
1 tablespoon vanilla extract
1/2 kg butter
For the filling:
Dulce de leche
Shredded coconut
Preparation:
1-Mix butter and sugar until creamy.
2- Add eggs, egg yolks and vanilla. Mix well, but not too much- just until all ingredients are incorporated.
3- In a different bowl, mix the dry ingredients.
4- Gradually add the dry ingredients to the butter mixture. Mix thoroughly until you have a workable dough (it should have the texture, more or less, of a pâte sablée)
5- Roll the dough on a floured surface and cut with a round cookie cutter, about 1/2 cm thick.
6- Place on a baking tray covered with baking paper or greased, and put in the oven at 150º C/305 F for about 10 minutes.
Very important: the cookies SHOULD NOT get brown or they will be hard and crumby. Watch them very carefully while they are cooking!
7- Once they are cooked, remove from the oven and let them cool for half an hour.
Assembly:
1- Put shredded coconut in a bowl.
2- Put a layer of dulce de leche on the inside of one cookie, and then place another cookie on top (like a dulce de leche sandwich).
3- Put dulce de leche on the sides of the cookie sandwich with a spatula/knife, and then roll it in shredded coconut (the coconut will then attach to the sides of the cookie).
NOTE: The recipe above is for traditional alfajores de maizena. You can see a picture of wonderfully executed ones, made by Amy,The Sugar Fairy (using this recipe) here. The ones I made for my birthday were coloured to match my dessert table, and filled with buttercream and lemon curd, instead of dulce de leche. This is the beauty of these cookies: they are easy to make and very versatile! If you want to colour the dough, just add a few drops of food colouring at the end of the preparation. This dough can be stored in the freezer.
Have a wonderful Tuesday!
by Marcela M. | Jun 30, 2011 | Blog, cookies, Crafts and DIY, Recipe Box, Recipes, Sweets, Uncategorized

Hello there!
This post was supposed to be published yesterday evening but my internet connection was up and down, so it is only now that I can do it.
I am writing this post because, while cake-pops have been widely popular in the US for quite some time already, they are a novelty in other parts of the world (namely, Cyprus and Argentina!). Consequently, a few readers and friends have asked me after seeing my pictures, what they are and how they are done. And when I have referred them to other websites, they have asked me what candy melts are, whether there are alternatives to them, because they are hard to get, or they do not exist where they live.
Basically, cake-pops are cake, mixed with frosting, covered in chocolate. The procedure for making them is fairly easy: 1- bake a cake 2- let the cake cool for 24 hours 3- crumble the cake 4- Mix with frosting 5- shape the cake-balls 6- attach lollipop stick 7- Dip the cake balls into candy melts/chocolate 8- Add sprinkles or any other decoration. There are also other versions that work with cookies instead of crumbled cake…but technically speaking those would be cookie-pops* 😉
They look simple, right? However, they are not always that simple. In my experience, two things need to be taken into consideration:
1) The mixture of crumbled cake and frosting should not be too moist or the cake-pops will not remain attached to the lollipop stick, they will fall (Argentinian friends: this is why I find that dulce de leche doesn’t work, and that buttercream is better. You may try, but I warned you ;). Therefore, when you start adding frosting after crumbling the cake, it is better to do it little by little and to test consistency. You want to add just enough frosting to be able to shape the balls, not more. After the balls are shaped, keep them in the freezer for 15/20 minutes. If you don’t own a freezer, keep them in the fridge for several hours.
2) The consistency of the candy melts/chocolate is key to achieve a smooth finish. The problem is that candy melts are not always easy to work with, because they harden much faster than regular chocolate. I do not own a microwave, so I melt them in a double boiler and, when they are starting to melt, I take the bowl out of the stove, and start beating the candy melts until they are liquid enough to dip the cake-pops in them. Also, the more candy melts you use the better, because, in order to get a smooth finish, you need to completely submerge the cake-balls in them.
For a very helpful, full of photographs tutorial of Bakerella herself making cake-balls and cake-pops, check these Instructions on how to make cake-pops from The Pioneer Woman’s blog. And check Bakerella’s blog to see and assortment of wonderfully creative ideas on how to make these sweets that drive children crazy at parties!
Two more tips:
1) When I don’t want to make a lot of cake-pops, I bake cupcakes instead of a cake, crumble as many as I need, and freeze the rest. Or I prepare all cake-balls and freeze the ones I don’t need in an airtight container (without dipping them in chocolate).
2) If you cannot find candy melts where you live, you can use chocolate for making truffles or for frosting cakes , which hardens faster (in Spanish: chocolate cobertura). This is necessary for the cake-pops not to drip all chocolate covering down the lollipop stick when you turn them after dipping.
An easy way of decorating the lollipop sticks is with ribbon flags. The ones above are the ones I made for my birthday party and, as you will see, they are really easy.
In order to make them you will need:
1) Ribbon
2) Lollipop sticks
3) glue
4) A pair of scissors
5) self-adhesive scrapbooking gems
6) Tweezers
Here is how to do it:
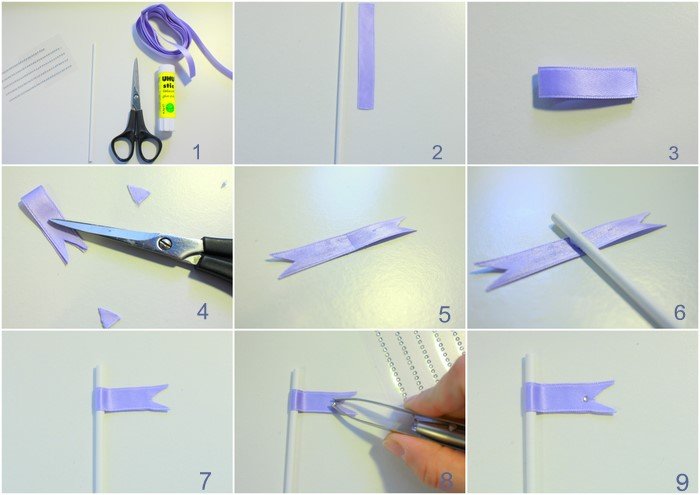
1- Cut ribbon, approximately half the size of the lollipop stick you will be using for your cake pops.
2- Fold the ribbon in half
3- Cut a triangle with your scissors and detach it, as in picture 4 above
4- Open the ribbon and put glue generously in it
5- Place the lollipop stick in the middle of the ribbon flag
6- Fold the flag, leaving the stick in the middle and press both sides against each other for a few seconds so that they are properly glued together
7- With the help of tweezers, take one self-adhesive gem and place it on the flag, as shown in picture 8.
8- Press the gem against the flag for a few seconds so that it is well attached. Picture 9 shows how it will look after it is finished.
And here are all the ones I made, ready for their cake-pops.
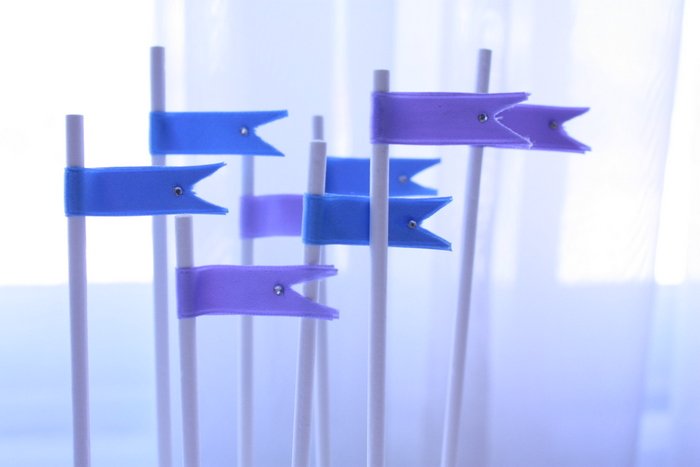
It is almost as if they were saying “We want cake-pops! We want cake-pops!“, isn’t it? 😉
Have you made cake-pops before? Do you have any tips and tricks to share with other readers? If you do, please leave a comment!
Have a wonderful weekend!
*If you want to make cookie pops, you can find recipes, tips and tricks here (in English), and here (in Spanish)
by Marcela M. | Jun 24, 2011 | Blog, Crafts and DIY, Uncategorized

Hello everyone!
Today I’m bringing you a very easy DIY for making food labels for a party. Why add food labels at all? Well, in my opinion adding printables in general (food labels, cupcake toppers, cupcake wrappers, etc) helps give a table a more polished look. These ones that I will show you how to do today are super easy and fun to make, and can be tailored to many celebrations.
A few weeks before my birthday I had ordered The Twinery’s Sample Pack which contains 8 gorgeous, vibrant colors of baker’s twine. When I ordered them I had in mind a craft I am planning for my kids’ birthday, but when I saw the colors Caribbean and lilac, I wanted to include them in my own birthday celebration as well.
I browsed the internet and went to my local craft store for inspiration and decided to design very simple food labels, to which I could add the twine. So, using only Microsoft Publisher (I’m not confident in Corel, Photoshop or any other design software) and inspired by my blog’s logo, I designed a very simple aqua, lavender and grey bounty flag and wrote the names of the food I was planning to serve in French Script. Designing the flag was simply a matter of making a row of triangles, adjusting their size and filling them with colors. Easy enough for me! I then printed the labels on pale ivory textured cardboard paper (It took me only an A4 size page) and got ready to embellish them!
This is what I used to do it:

– 1 glue pen
– Baker’s twine in Caribbean (As I previously said, I purchased mine from The Twinery, and I am mentioning this because not all shops ship their products to Europe, and because I am very satisfied with how fast the pack arrived and with how beautiful the colors are.*)
– A pair of scissors
– Scrapbooking gems
– Tweezers
– Food labels
And here is what I did:
1) I put a dot of glue on the left hand corner of the food label’s bounty flag

2) Using tweezers, I added the scrapbooking gem, and pressed for a few seconds in order to make sure it had adhered properly.

This is how it looked like when added:

3) I then repeated steps 1 and 2 on the other corner. The label was looking like this by then:

3) I drew a line of glue all along the upper part of the bounty flag

5) After that, I immediately attached the twine. I tried both Caribbean and lilac and preferred the former for these cards, but both colors are gorgeous.

6) I pressed the twine unto the card for a few seconds and, when I was confident that it was properly attached, I cut the excess from the border, just above the gem located on the right-hand corner. This is how the label looked by then:

6) I finally folded the label just above the upper portion of the flag and it was finished!

This is how they looked in daylight

I find them simple, yet girlie and pretty, and I believe the design to be versatile. One could use the same idea for a circus/parade party, for a 4th of July celebration, etc, by simply changing the flag’s colours and the twine used and avoiding the use of gems.
Have you ever handcrafted your own food labels/invitations or other printables using different materials? If you have, please share! I would love to see what you have done!
Have a lovely weekend and see you next week with more recipes and ideas!
* NOTE: I receive no compensation of any kind for the recommendations I make in this blog. I simply mention what works for me, and provide the corresponding links so that readers have all necessary information. If you purchase something I recommend by clicking on the amazon widget, I will get a commission within their sales’s associate program, but you are free not to do it that way. My only aim is to provide my readers with accurate information on what products I find good and reliable.


