by Marcela M. | Dec 6, 2012 | Blog, Christmas and NYE, cookies, Cooking basics and tutorials, Holidays, Recipe Box, Recipes, Sweets
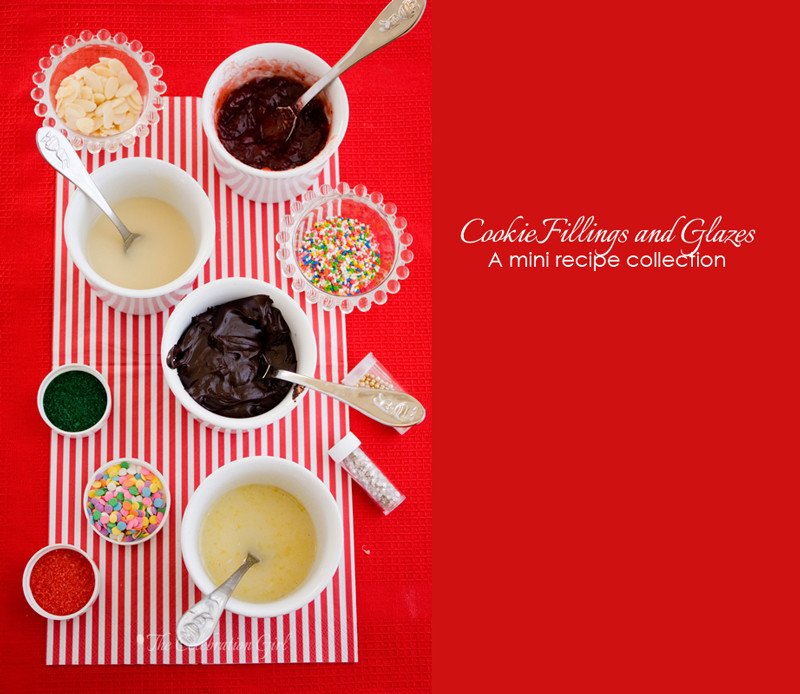
Good morning dear friends! Day 6 of the advent, almost 1 week into the season already and the weekend is almost here!
Today’s post is, in fact, the first part of a longer post that will be completed tomorrow, when we continue playing with the cookies we made before . These are some of the recipes I will be using and, for brevity sake and not to make one post super long, I thought it better to divide it in two. So, here are some of my favorite glazes and fillings to go with the cookie doughs I shared with you on Day 3.
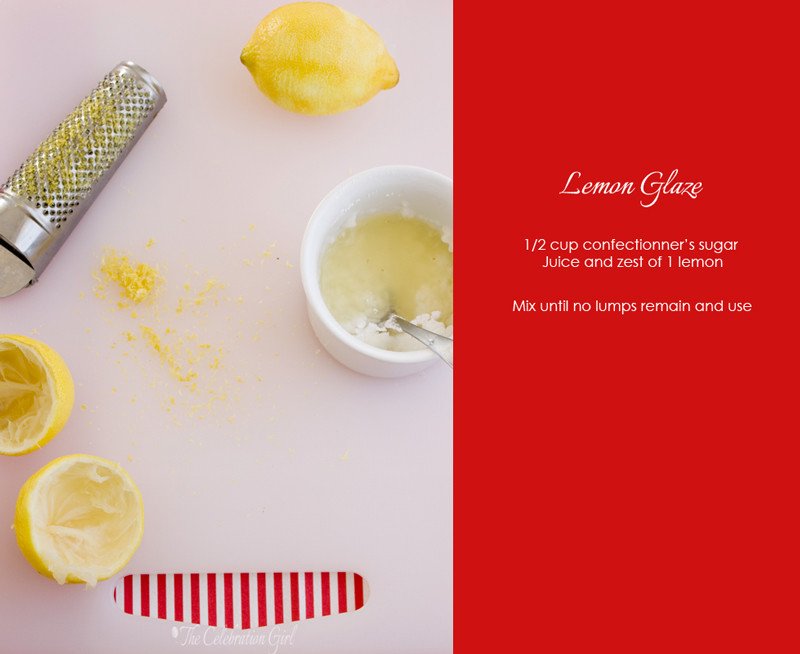
I also like to glaze my cookies with an orange glaze. In order to make it, use juice and zest of an orange instead of that of a lemon, in the same quantities and in the recipe above.
When I want to make a more traditional unflavored sugar Sugar glaze, I mix 1/2 cup confectioner’s sugar, 1 tablespoon warm water, 1 teaspoon of golden syrup and 1 teaspoon vegetable oil until no lumps remain. Traditionally this glaze uses melted butter but, as I have mentioned before, I prefer to skip using dairy as much as possible due to my son’s mild intolerance.
This a great filling, especially for almond or hazelnut shortbread cookies. There is something about pairing nuts and chocolate that is just heavenly perfect. I use coconut cream when I want to make a dairy free version, keeping the quantities stable.
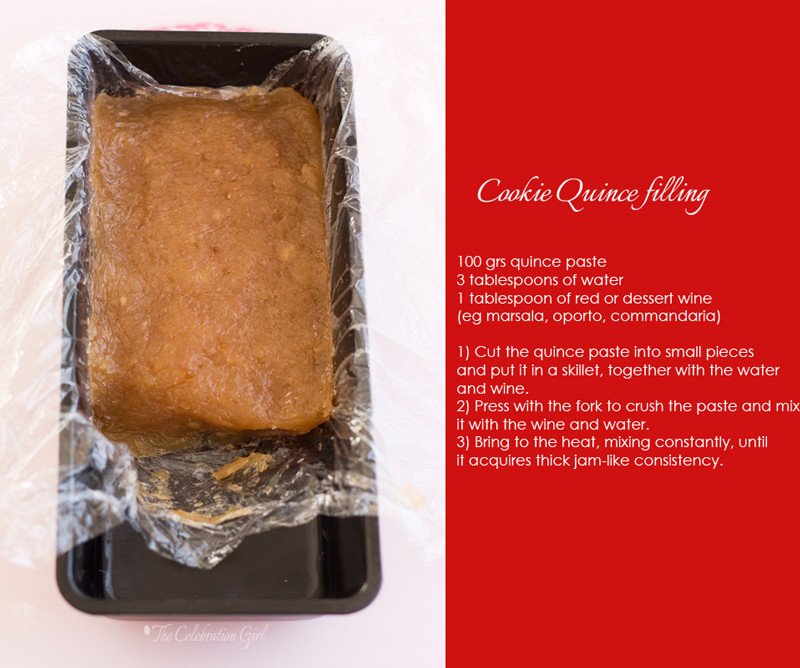
Quince paste or “Dulce de Membrillo”, as we call it back home, is a staple food in most Argentinian homes (or at least it was in mine when I was growing up), but outside of Argentina it isn’t that easy to find. A friend of my mother’s recently shared with me this wonderful recipe and I put it in use, taking advantage of quince season, with the idea of making the famous pastafrola. However, when I thought about fillings for the advent’s cookies, I realized that quince paste would make a wonderful one. I gave it the necessary jam-like consistency using the same method I use for making pastafrola’s filling (quantities vary, though). Here you have it:

So, get those fillings and glazes ready, because we will be using them tomorrow!
What are your favourite sugar cookie fillings and glazes?
Con sabor latino…
Buenos días queridos amigos! Es el 6to día del adviento, ya ha transcurrido casi una semana de la temporada festiva y el fin de semana nos pisa los talones.
El post de hoy es, en realidad, la primera parte de un post más largo que completaré mañana, cuando continuaremos jugando con las galletitas que horneamos anteriormente. Estas recetas son algunas de las que usaré mañana, así que para no hacer un solo post larguísimo, decidí dividirlo en dos. Aquí tienen, entonces, algunos de mis rellenos y baños favoritos para las galletas que compartí con ustedes el 3er día del adviento:
1) Glaseado de limón: Mezclar 1/2 taza de azucar impalpable con el jugo y la ralladura de 1 limón, revolviendo bien hasta que no queden grumos.
2) Glaseado de naranja: Mezclar 1/2 taza de azucar impalplable con el jugo y la ralladura de una naranja. Revolver bien hasta que no queden grumos.
3) Glaseado de azucar: Mezclar 1/2 taza de azucar impalplable con 1 cucharada de agua caliente, 1 cucharadita de golden syrup (azucar invertido) o syrup de maiz y una cucharadita de aceite vegetal, revolviendo hasta que no quede ningun grumo. Tradicionalmente, esta receta lleva manteca pero yo uso aceite a causa de la leve intolerancia a los lacteos de mi hijo.
4) Relleno de crema de chocolate: Colocar 60 grs de chocolate amargo en un bowl. Llevar 1/3 de taza de crema de leche al fuego, retirar cuando rompa el hervor y verter sobre el chocolate, dejando que éste se disuelva. Una vez casi completamente disuelto, batir vigorosamente hasta obtener una crema. Agregar 2/3 tazas de azucar impalpable y mezclar bien, hasta que no queden grumos. Si quieren hacerla sin lacteos, reemplacen la crema de leche por crema de coco.
5) Dulce de membrillo casero: Lavar y cepillar 2 membrillos y colocarlos en una olla con agua hirviendo durante 10 minutos. Retirar, dejar enfriar, pelar y procesar. Pesar la pasta resultante, que tiene que dar aproximadamente 500 grs. Agregar 400 gramos de azucar granulada comun (si es menos o mas, ajustar la cantidad proporcionalmente), cubrir con papel film y dejar reposar toda la noche. Al día siguiente, colocar en una olla de hierro, tipo Le creuset o essen, y llevar a fuego revolviendo constantemente con cuchara de madera hasta que la pasta se desprenda del fondo y de los bordes. Cubrir un molde de budin con papel film, verter dentro la pasta de membrillo, apretando con una cuchara para que quede compacta. Cubrir la pasta con papel film, bien al ras y asegurandose que no queden burbujas de aire. Dejar reposar en la heladera.
6) Pasta jalea de membrillo (para rellenar galletitas): Cortar 100 grs de membrillo en trozos y colocar en una sarten, junto con 3 cucharadas de agua y 1 cucharada de vino tinto o de postre. Pisar con tenedor para ablandar la pasta e integrarla con los líquidos. LLevar a fuego, pisando y revolviendo constantemente, hasta que adopte una consistencia de mermelada bien espesa.
Ya lo saben: vayan preparando estos rellenos y glaseados, que mañana comenzaremos a usarlos!
Y de paso, cuentenme, cuales son sus preferidos?
by Marcela M. | Dec 4, 2012 | Blog, Christmas and NYE, cookies, Holidays, Recipe Box, Recipes, Sweets

Good morning friends! It’s day 4 of the advent, and it’s only 20 days until Christmas eve, can you believe it? I know it’s a real cliché, but I have no idea where time went this year. Let’s make the most of this last month, shall we?
I hope you have your cookie doughs ready because we are going to put them to good use today. So, take them out of the freezer or refrigerator and gather your cookie cutters, a few sugar pearls and nonpareils because we will start making pretty cookies for your assorted cookie box.
We will start by the simpler cookies and, in following posts, I will show you other techniques and ideas and we will increase difficulty as we go. As I have mentioned before, I want to encourage you to bake with your children and, for this reason, I decided to include easy cookies that you can make even with toddlers. When baking with small children, though, I would recommend you to bear in mind two things: 1) Forget about the mess and about the end result. You can always bake perfect cookies later. Baking with children is more about having fun and letting them be creative in the kitchen, letting them familiarize themselves with the tools of the craft and about sharing special moments, building memories. 2) Make extra dough, because they will soon discover that unbaked cookie dough tastes delicious!
I used a few of the cookie cutters I had, just to give you an idea but, as you will soon discover, many more combinations are possible. You could also dye some of the dough in red or green or whatever color you are using for your party and thereby increase the possibilities. Also, for the cookies to keep their shape, refrigerate, refrigerate, refrigerate! Do not skip this step!
Here are some ideas:
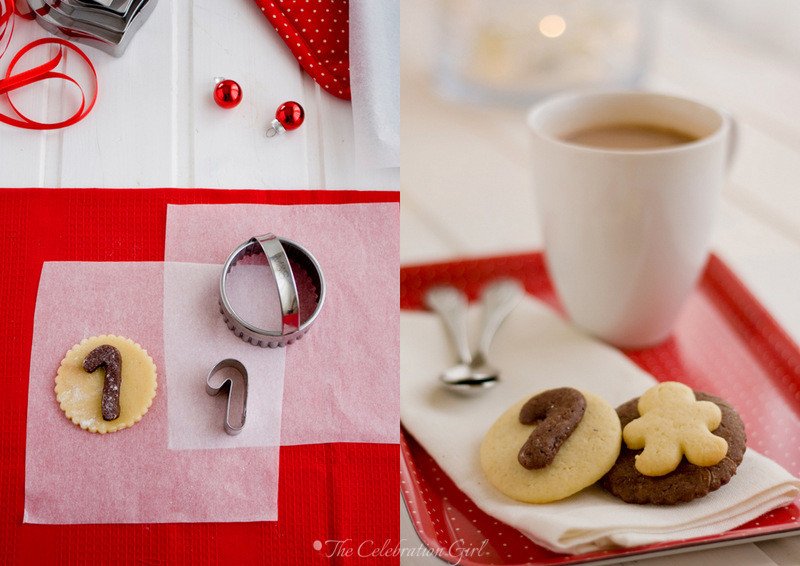
1) Candy cane cookies: There are no pictures of the finished product because my children ate them before I could take pictures (ahem) but they look the same as the one you see already shaped in the picture above. I used vanilla and chocolate sugar cookie doughs, but you could use other combinations, for eg: gingerbread and vanilla, orange and chocolate, plain vanilla and red dyed dough, etc. Making them is very easy: take a small piece of each dough between you hands and shape them as cilinders.Place them next to each other and braid them. Roll the resulting bi-color cilinder a couple of times, to integrate it, and then twist down the upper part, forming a cane. Cut the ends to keep them even. Put in the freezer for 20 minutes and bake.
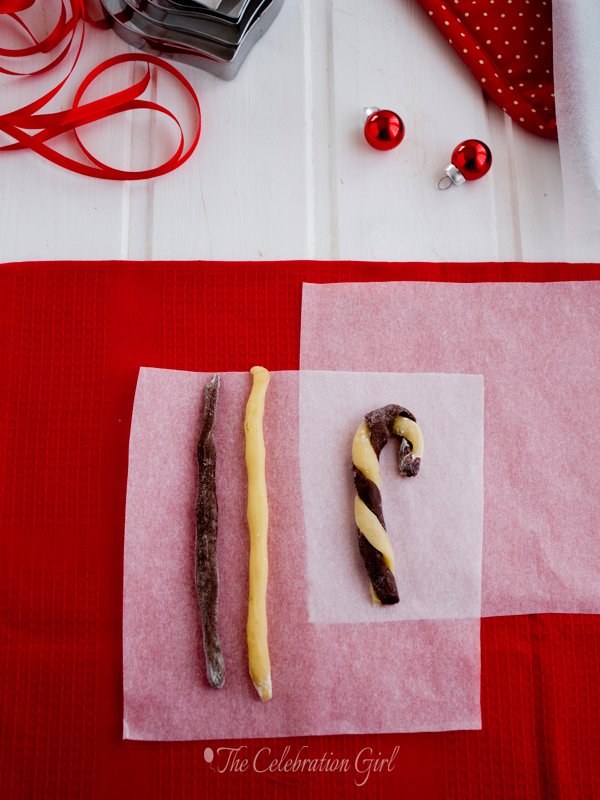
2) Marbled cookies: Take two pieces of dough of different colours, join them by the side and twist a few times. Don’t overdo it or they will merge and you will a have dough in a lighter version of the darker color, not a marbled one. Roll, cut, refrigerate and bake.
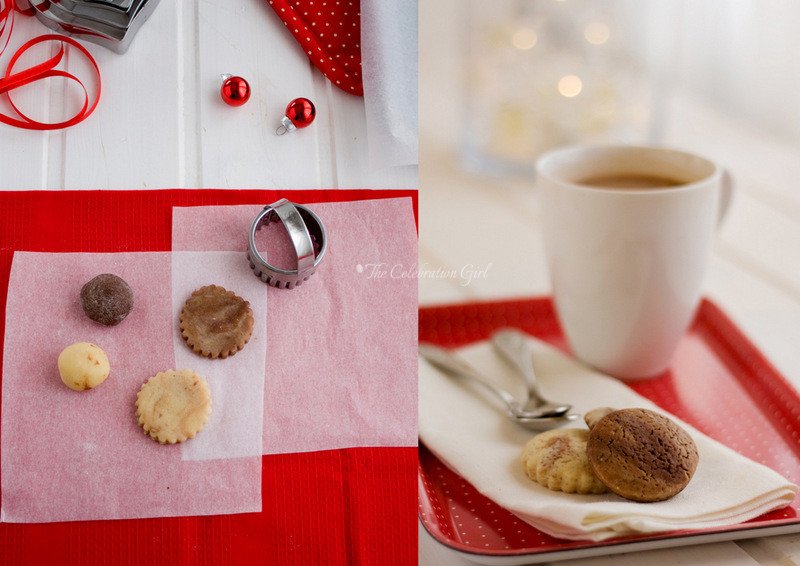
3) Cut out cookie combinations: To make these cookies you will need 2 cookie cutters of the same shape, but different sizes. Roll your cookie doughs and cut a shape with the bigger cutter. Place it in the baking tray and, once there, cut a smaller shape from the same cookie, leaving a “hole” inside. You need to do this when the big cookie is already in the baking tray or it may break or lose shape when transferred. Cut a big cookie of a different color, and repeat the process. Then mix and match the insides. They will merge in the oven and attach to the bigger cookie. Another option that I didn’t have the time to photograph but looks really pretty is to insert crushed hard candy in the hole, to get a vitreau effect. Note: If you don’t have cookie cutters, you can use other utensils. In the past I have used the lid of a marmalade jar to trace a big circle and the lid of a vanilla extract jar to trace the small one.
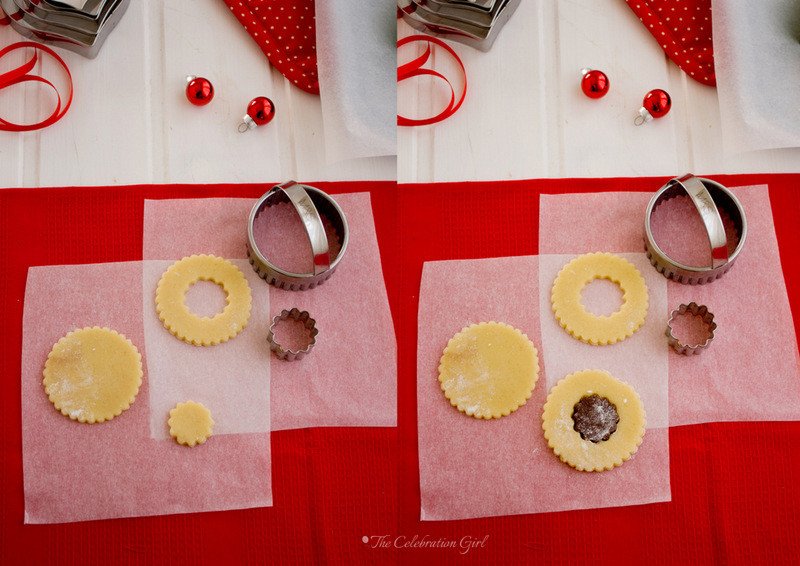

4)3D shape cookies: Cut a small shape in a different color than that of the main cookie, brush it with water and place it on top of the big cookie before baking. They will get attached once baked.
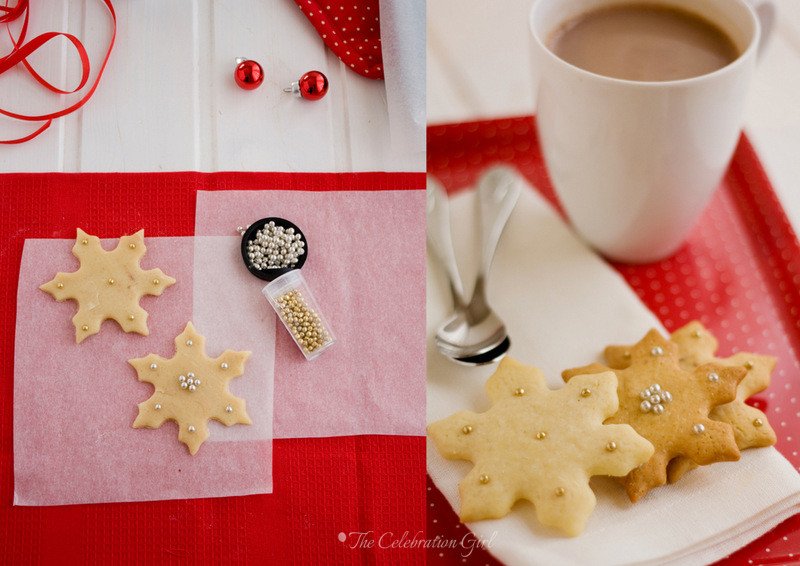
5)Sugar pearls decorated cookies: Did you know that sugar pearls can be added without glaze or icing? They can! Just play with the design and attach them before baking by pressing them lightly into the dough.
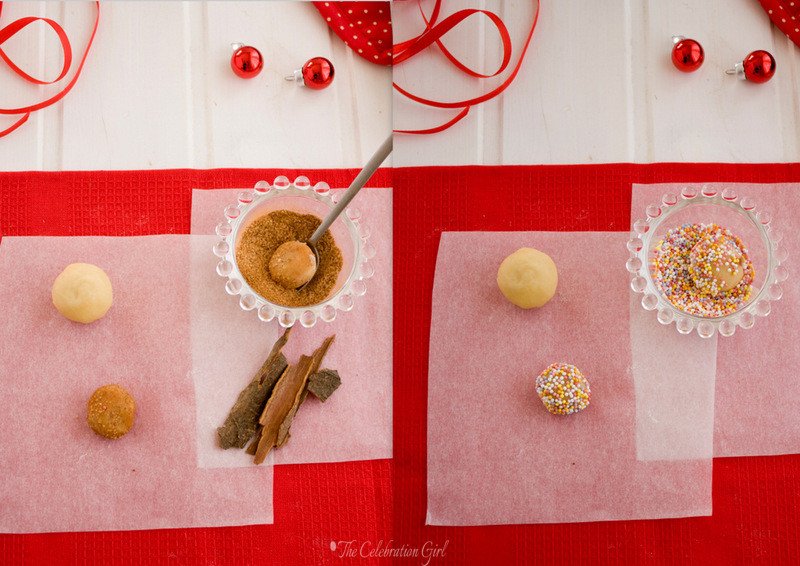
6) Cookie “Truffles”: No, they are not truffles, but they look like them before baking, don’t they? In order to make these cookies, make small balls of dough and roll them in non pareils, sugar pearls, or a combination of 1 tablespooon of sugar, 1/4 teaspoon of cinnamon and a pinch of cardamom before baking. They will expand in the oven,but the colder they are when you start baking them, the more they will keep their shape.
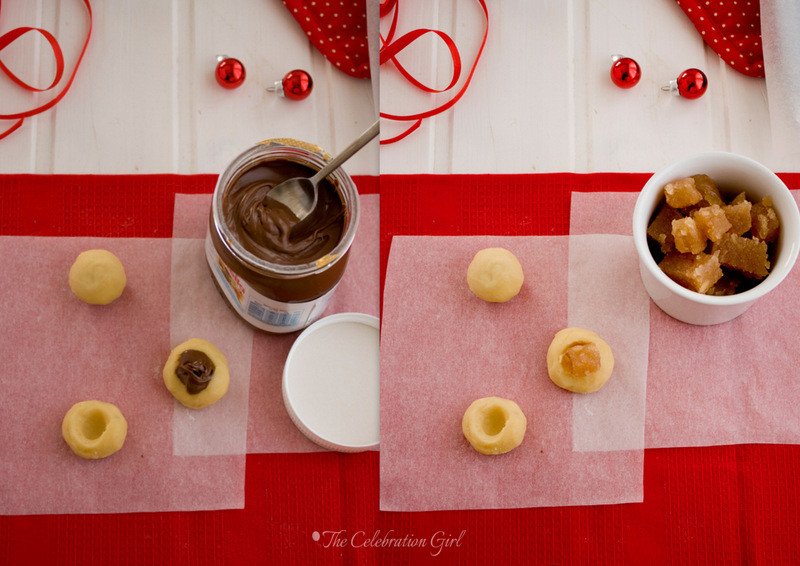
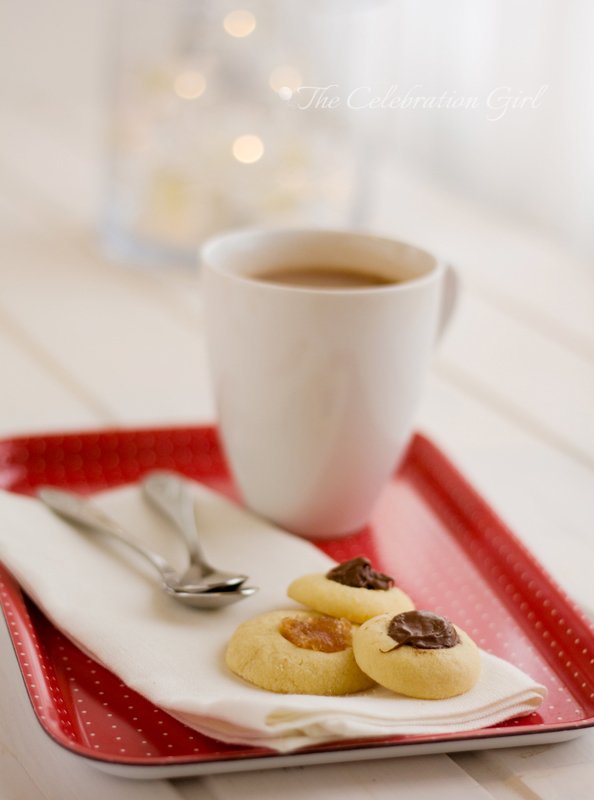
7) Thumbprint cookies or “Pepas”: Pepas is how we call these type of cookies in Argentina and they are normally filled with a square of quince paste, which is a staple food in many Argentinian households (mine is home made, recipe coming soon!). I prefer to make them using the almond shortbread dough, and I like to vary the fillings, using nutella or caramel as well as quince. To make them, roll a ball of dough and press with your thumb (hence the name) or index finger to create a well in the middle. Fill the well with the jam or sweet paste of your choice and bake.
Are you ready to start baking?
Con sabor latino…
Buenos días queridos amigos! Hoy es el 4to día del adviento y faltan sólo 20 días para la nochebuena ¿Pueden creerlo? Sé que lo que voy a decir es un cliché, pero realmente no sé en qué momento pasó el año. Seamos conscientes de la velocidad a la que pasa el tiempo y aprovechemos al máximo este último mes de 2012, si?
Espero que tengan listas las masas de galletitas que compartí con ustedes ayer, porque hoy vamos a usarlas. Así que saquenlas del freezer o heladera y junten sus cortantes, granas, perlas y azucar decorativo porque vamos a comenzar a hacer lindas galletitas surtidas para sus cajitas navideñas.
Hoy vamos a comenzar con las galletitas más fáciles y, en posts sucesivos, les voy a ir mostrando otras maneras de decorarlas, en orden de complejidad creciente. El motivo por el que incluí estas galletitas tan sencillas es porque quiero incentivarlos a cocinar con niños, y estas pueden hacerse aún con los más chiquitos. Ahora bien, al cocinar con niños pequeños, es bueno tener dos cosas en mente: 1) Olvidense del orden y del resultado final. Dejenlos crear. Si queremos galletitas perfectas, podemos hacerlas nosotros solos cuando ellos duermen. Dejemos que cocinar con niños sea un acto creativo, orientado a pasar un momento divertido juntos, a que se familiaricen con los instrumentos de cocina, a que le “agarren el gusto”a cocinar, a construir recuerdos familiares hermosos. 2) Hagan masa extra, porque los chicos son vivísimos y se dan cuenta MUY pronto que la masa de galletitas cruda es deliciosa!
En este post yo usé algunos cortantes que tenía en casa, a modo de ejemplo, pero como verán son posibles muchísimas combinaciones más. Tambien pueden, por ejemplo, teñir parte de la masa de vainilla de otro color, como rojo o verde o cualquier otro que vayan a usar en la decoración, aumentando así las posibilidades creativas. Recuerden, eso sí, que para que las galletitas mantengan su forma es fundamental refrigerarlas, refrigerarlas, refrigerarlas! No omitan este paso!
Ahora sí, vamos a las ideas:
1) Galletas “baston”: No tengo fotos del producto combinado porque mis hijos se las comieron antes que pudiera sacarlas (ejem), pero se ven iguales a la foto del bastoncito armado antes de hornear. Yo usé masas de vainilla y chocolate, pero tambien podrian usar otras combinaciones, como vainilla y gengibre, chocolate y naranja o teñir parte de la masa de rojo y combinarla como un baston de caramelo tradicional. Para hacerlas, tomen una poco de masa de cada color y denle forma de cilindro. Coloquen los dos cilindros, uno al lado de otro, unanlos en la parte de arriba y comiencen a trenzarlos hacia la derecha, pasando la masa de la izquierda por encima de la de la derecha. Una vez trenzados, haganlos rodar un par de veces para que no queden junturas y doblen la parte superior hacia abajo. Corten los bordes para que queden parejos, coloquen en una placa, refrigeren y horneen.
2) Galletas marmoladas:Tomen dos pedacitos de masa de diferentes colores, unanlos por el costado y retuerzanlos un par de veces. No retuerzan mucho o en lugar de galletitas marmoladas tendrán simplemente una masa de color más claro que la oscura. Estiren con palote, corten, coloquen en una placa, refrigeren y horneen.
3) Galletas combinadas: Para hacer estas galletitas necesitarán dos cortantes de igual forma pero de distinto tamaño. Hacerlos es muy sencillo: estiren una de las masas con palote y corten galletitas con el cortante más grande. Coloquen las galletitas en la placa y, una vez allí, usen el cortante pequeño para sacar una galletita mas pequeña del centro de la más grande. Les sugiero hacerlo una vez que la galletita grande ya esté en la placa porque, de lo contrario, ésta puede romperse o perder la forma al transferirla ya cortada. Luego, repitan el proceso con la masa del otro color e inviertan los centros. Las dos partes se unirán al hornear, dejandoles una galletita divertida de dos sabores y colores. Otra opción muy linda que no tuve tiempo de fotografiar es colocar caramelo duro picado (destrozado con mortero) en el hueco, para lograr un efecto vitreau. Nota: si no tienen cortantes de galletitas, pueden usar otros instrumentos de cocina. En el pasado yo he hecho estas galletitas usando la tapa de un frasco de mermelada para el circulo grande y la tapa de un frasco de esencia de vainilla para el más pequeño.
4) Galletas con formas en 3D: Sencillísimas, sólo hay que cortar una formita en un color de masa diferente al de la galleta principal, y pegarla con agua a la más grande antes de hornear ( Se unirán en el horno)
5) Galletas decoradas con perlas de azucar: ¿Sabían que no hace falta glasa ni glacé para pegar perlas de azucar? Pues así es! Solo tienen que colocarlas sobre la masa cruda, conforme el diseño que prefieran, y presionar apenas con el dedo sobre las mismas para insertarlas en la masa. Luego refrigeren, horneen y listo.
6) “Trufas”de galletita: No, no son verdaderas trufas pero lo parecen antes de ser horneadas, no? Para hacerlas, hagan una bolita de masa, y ruedenla en granas, nonpareils, perlas de azucar o en una combinación de 1 cucharada de azucar, 1 cuarto de cucharadita de canela molida y 1/8 de cucharadita de cardamomo. Se expandirán en el horno, pero tienden a conservar mejor la forma cuanto más fría está la masa.
7) Pepas: Estas galletitas son muy comunes en Argentina, rellenas con un cuadradito de dulce de membrillo (que es un clásico de nuestra gastronomía). Mi dulce de membrillo es casero y la receta será publicada pronto! Yo prefiero hacer estas galletitas con la receta de las galletitas mantecosas de almendra, que compartí con ustedes ayer, combinando distintos sabores para el relleno. El clásico membrillo, nutella o salsa de caramelo quedan deliciosos. Para hacerlas, hagan una bolita de masa y, luego, presionen con el pulgar o el índice para ahuecar la masa en el centro, y rellenen el mismo con el dulce o mermelada deseado. Refrigeren, horneen, y listo!
Estan listos para empezar a hornear?
by Marcela M. | Dec 3, 2012 | Blog, Christmas and NYE, cookies, Cooking basics and tutorials, Holidays, Recipe Box, Recipes, Sweets
Good morning friends! I hope you had a lovely weekend!
Today’s post participates in Whole Kitchen’s 2012 Advent calendar . A few days ago, Silvia contacted me to offer me to participate in it and I, of course, accepted! So today, get your aprons ready because we start baking! (Amigos hispanoparlantes, el texto en español está al final del post!)
I thought it was best to begin the holiday baking season with the basics: 3 simple cookie recipes and a few explanations on how to adapt they are adapted. I wanted to give you my staple recipes, the ones that are simple enough to make in whim, yet delicious, reliable and versatile to allow multiple modifications. In following posts, I will show you a few ideas for combining and decorating them, with varying degrees of difficulty, so that you can make a box of assorted cookies without spending days in the kitchen.
Let’s get started!
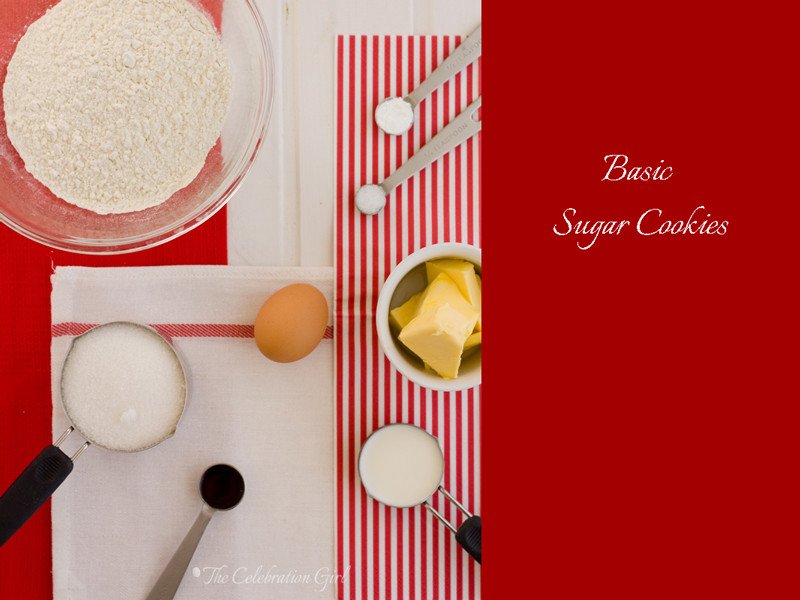
The first recipe is for the all time classic Sugar Cookie. The first time I made them was just a few years ago, inspired by some of my favorite bloggers and following to the letter the recipe for Martha Stewart’s Ideal Sugar Cookies. As time went by, I introduced a few little modifications: I normally double the amount of vanilla and, if baking with my children, who love to spread flour everywhere, I add more milk than usual to prevent the cookies from becoming too hard once baked. Also, since my son doesn’t tolerate dairy products too well, I frequently use margarine instead of butter, and vegetable milk instead of cow’s milk. The texture is different when baking with margarine, but the recipes turn out delicious nonetheless. One important note, though, is that margarine should not be beaten extensively or the final product becomes oily (and we don’t want that!). So, if that’s what you are using, cream it with sugar for a maximum of 3 minutes.
Take this as your basic recipe, and then start playing with it. You could use it as a basis for making sugar orange or lemon cookies, for example, by simply adding a teaspoon of orange or lemon zest and replacing the milk for lemon or orange juice, or you could make coffee flavored cookies by replacing 1 teaspoon of the milk for espresso. The possibilities are really endless. Just make sure that you maintain the balance between liquid and dry ingredients and that your replacements respect the original ratios.
Here’s the basic recipe (adapted from Martha Stewart):
Ingredients: 2 cups all purpose flour, 1/4 tsp salt, 1/2 tsp baking powder, 113 grs butter (1/2 cup) or margarine , 1 cup sugar, 1 beaten egg, 4 tbp milk or 1/4 cup milk ( this is the amount I use when I bake with my children because I know they will add too much flour when rolling and cutting. Please note that Martha’s original recipe calls for 2 tablespoons only), 1 teaspoon vanilla extract.
Preparation: 1) Pre heat the oven to 175 C. 2)Cream butter and sugar until the butter becomes almost white. Note that if you are using margarine, you should cream it for a maximum of 3 minutes 2) Add milk, vanilla and the beaten egg. Incorporate. 3) Whisk or sift together the dry ingredients: flour, salt and baking powder and add them to the batter, making sure not to overmix. 4) Extend plastic wrap on the kitchen’s counter, pour the dough in it, wrap it and refrigerate for a couple of hours. If you are baking this cookies in the summer and you live in very hot climates, I recommend putting it in the freezer for 1 hour instead. 5) When you are ready to bake the cookies, flour the kitchen counter, and roll using a rolling pin, considering that thicker cookies are moister and chewier, and thinner cookies are crispier. Cut the cookies using a cookie cutter or a knife, place on a baking sheet covered in baking paper and refrigerate. Do not skip the refrigerating step or your cookies will lose shape in the oven! I normally place them in the freezer for 20 minutes before baking. 6) Bake for 10-15 minutes. Do not let them brown.Let cool on a wire rack and eat or decorate.

Now let’s say you want to make chocolate sugar cookies instead, how do you adapt the basic recipe? It’s also very simple. As you can see from the pictures above, most ingredients remain the same, and a few new ones are added, namely cocoa, brown sugar and an extra egg to make up for the added dryness. Remember, it is a matter of ratios and balance between the different ingredients. Cocoa is a dry ingredient, so it counts as if we had increased the amount of flour. Brown Sugar gives the recipe a darker color, a stronger flavour (because it contains molasses) and, as sugar in general, acts as a binding agent. Having added these two ingredients, the recipe would be too dry if you didn’t add an extra egg, but if you prefer to keep the quantities intact and you don’t want to add an extra egg, you could do so by reducing 20% of the flour and replacing it by cocoa, and replacing 1/3 of the granulated sugar and replacing it with brown sugar. That is really all it takes.
Here’s the recipe (as I normally do it)
Ingredients: 2 cups flour, 1/2 cup cocoa, 1/2 tsp baking powder, 1/4 tsp salt, 113 grs butter or margarine, 1 cup granulated sugar, 1/3 cup brown sugar, 2 beaten eggs, 2 teaspoons milk, 1 teaspoon vanilla.
Preparation: 1) Pre heat the oven to 175 C. 2)Cream butter and the two sugars until light and fluffy. Note that, if you are using margarine, you should cream it for a maximum of 3 minutes 2) Add milk, vanilla and the beaten eggs. Incorporate. 3) Whisk or sift together the dry ingredients: flour, cocoa,salt and baking powder and add them to the batter, making sure not to overmix. 4) Extend plastic wrap on the kitchen’s counter, pour the dough in it, wrap it and refrigerate for a couple of hours. If you are baking this cookies in the summer and you live in very hot climates, I recommend putting it in the freezer for 1 hour instead. 5) When you are ready to bake the cookies, pour cocoa powder on the kitchen counter. I prefer to use cocoa instead of flour when making chocolate cookies because this prevents them from getting a white coat and accentuates the flavor 6) Roll using a rolling pin, considering that thicker cookies are moister and chewier, and thinner cookies are crispier. 7) Cut the cookies using a cookie cutter or a knife, place on a baking sheet covered in baking paper and refrigerate. Do not skip the refrigerating step or your cookies will lose shape in the oven! I normally place them in the freezer for 20 minutes before baking. 8) Bake for 10-15 minutes. Do not let them brown.Let cool on a wire rack and eat or decorate.
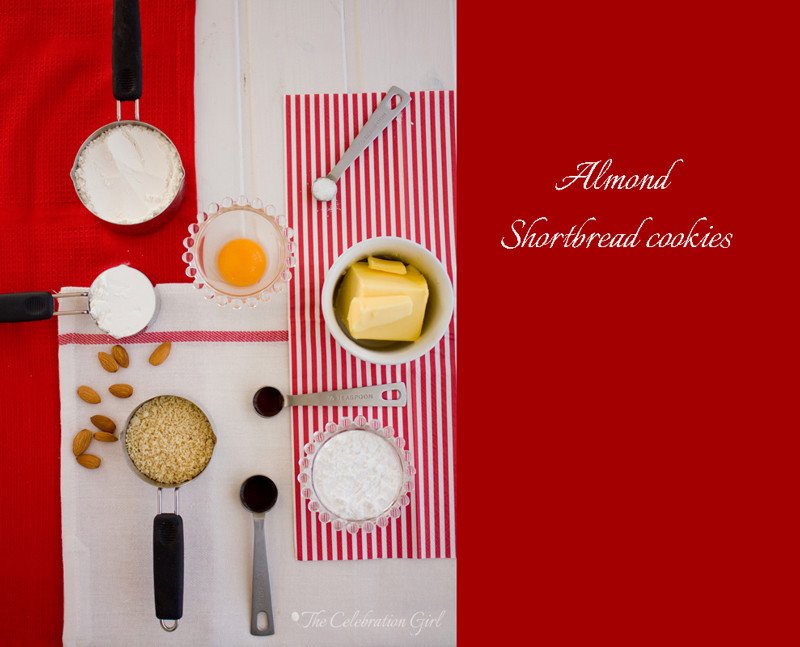
Today’s final recipe is another holiday classic, shortbread cookies, that I have adapted by including finely ground almonds in it. The main difference between sugar and shortbread cookies lies in the proportion between butter and sugar: Sugar cookies use double the amount of sugar than that of butter, and in shortbread cookies this ratio is reversed. Notice also that, in this recipe we also reduce 1/8 of the amount of dry ingredients (almonds count as dry ingredients and so does cornstarch) and that there’s a correlative reduction in the wet ingredients: instead of one egg, we use only an egg yolk and we omit the milk altogether. These cookies don’t require baking powder either, so they won’t rise. The result is a richer cookie, with a softer flavor, ideal for combining with fillings and chocolate.
As I mentioned before, I have modified this recipe by using almonds and almond extract, but you could omit them and use only flour, or replace these with other nuts (hazelnuts are also delicious).
Here’s my recipe for Almond shortbread cookies:
Ingredients: 1 cup flour, 1/2 cup finely ground almonds, 1/2 cup icing sugar, 1/4 cup cornstarch, 1/4 tsp salt, 113 grs butter, 1 egg yolk, 1/2 teaspoon vanilla, 1/2 teaspoon almond extract
Preparation: 1) Put the finely ground almonds, flour, cornstarch, salt and icing sugar in the food processor and pulse until combined. 2) Add the wet ingredients and pulse until the dough separates from the bowl 3) Remove the dough from the food processor and knead it on the counter. 4) Cover in plastic wrap and refrigerate for two hours. 5) Pre heat the oven to 175 C. Remove the dough from the refrigerator, roll on a floured surface and cut in the desired shapes. Place the cookies on a baking sheet lined with baking paper and bake for 10-15 minutes. Let cool on a wire rack and eat or decorate.
Tomorrow I’ll start showing you some ways in which you can play with these recipes!
Now, please tell me: Do you bake cookies for the holidays? What are your favorite recipes? Do you like to decorate them and, if so, how do you do it?
Have a lovely Monday!
Con sabor latino…
Buenos días queridos amigos y bienvenidos sean todos aquellos nuevos lectores que llegan desde Whole Kitchen! Espero que hayan pasado un hermosísimo fin de semana.
El post de hoy participa en el Calendario de Adviento 2012 de Whole Kitchen . Hace unos días, Silvia me contactó para preguntarme si quería participar en el mismo y yo, por supuesto, acepté! Así que preparen sus delantales, porque hoy vamos a hornear!
Para inaugurar la temporada de cocina de la época navideña, pensé que sería mejor empezar por la base: 3 recetas simples y un par de explicaciones acerca de cómo introducir variaciones a las mismas. Quise compartir con ustedes aquellas recetas a las que vuelvo una y otra vez, aquellas que son lo suficientemente simples como para hacer en menos que canta un gallo, a la vez que confiables, deliciosas y versátiles como para permitir que cada uno deje volar su creatividad. En posts sucesivos voy a mostrarles ideas de cómo combinarlas y cómo decorarlas con distintos grados de dificultad, para que estas fiestas puedan tener una caja de galletitas variadas sin necesidad de pasar horas y horas en la cocina.
Comencemos!
La primera receta que quiero compartir con ustedes es la de las clásicas galletitas de azucar. La primera vez que la hice fue apenas unos años, y en esa ocasión y muchas otras, seguí al pie de la letra ESTA receta de la inigualable Martha Stewart. A medida que el tiempo pasó, fui introduciendo algunas modificaciones, por ejemplo suelo duplicar la cantidad de vainilla y, si preparo la receta con mis hijos, suelo duplicar la cantidad de leche porque tienden a agregar mucha harina cuando estiran la masa y me ha ocurrido que si sigo la receta al pie, quedan un poco duras. Tambien suelo hacerlas con margarina y leche vegetal porque mi hijo, sin llegar a ser alergico, nunca a tolerado muy bien que digamos los lacteos. Debo aclarar que la textura resultante es un poco diferente cuando uno trabaja con margarina, pero creanme que son deliciosas de todas maneras. Una advertencia importante, sin embargo, es que la margarina no debe batirse mucho tiempo con el azucar, como hacemos con la manteca, porque si no las galletas resultaran oleosas. Si usan este ingrediente, recuerden no batirla más de 3 minutos.
Les sugiero tomar esta receta como base y luego experimentar con otros sabores. Por ejemplo, si quieren hacer galletitas de limon o de naranja, pueden agregar una cucharadita de té de ralladura de limón o naranja, y reemplaza la leche por jugo de limón o naranja. Si quieren hacer galletitas de café, pueden reemplazar una cucharada de leche por una de café espresso…y así sucesivamente. Las posibilidades son enormes! Sólo tengan en cuenta que, para que la receta resulte bien, es necesario mantener el equilibrio entre los ingredientes secos y líquidos, y que los reemplazos mantengan las raciones originales.
Esta es la receta para las galletitas de azucar básica (adaptada de Martha Stewart)
Ingredientes:2 tazas de harina todo uso, 1/4 cucharadita de sal, 1/2 cucharadita de levadura química (Polvo de hornear Royal), 113 grs de manteca o margarina vegetal, 1 taza de azucar blanca, 1 huevo batido, 4 cucharadas o 1/4 taza de leche (puede ser vegetal. Tengan en cuenta que la receta original sólo requiere dos cucharadas y que yo sólo la duplico porque mis hijos tienden a agregar demasiada harina luego. Si no cocinan con niños o si sus niños son disciplinados al agregar harina, es mejor mantener la cantidad original), 1 cucharadita de vainilla.
Preparación: 1) Bata la manteca pomada con el azucar hasta que la preparación resulte en una crema blancuzca y esponjosa 2) Agregue leche, vainilla, y el huevo batido e incorpore 3) Mezcla con batidor de alambre o cierna los ingredientes secos: harina, sal y levadura química, y agreguelos en dos veces. Mezcle sólo hasta que todos los ingredientes estén incorporados. 4) Envuelva la masa en papel film y lleve al refrigerador por al menos dos horas. Si están haciendo esta receta en verano o en climas muy cálidos, yo prefiero poner la masa una hora en el freezer. Es más facil trabajarla luego! 5) Cuando quiera hornear las galletas, retire la masa del freezer y estirela con palote sobre una superficie lisa. Tenga en cuenta que si la estira levemente gruesa las galletitas resultaran mas humedas, y si la estira finita, resultaran crocantes. 6) Corte las galletitas usando un cortante especial o cuchillo, colóquelas sobre una placa para horno cubierta con papel de hornear y refrigere. Es muy importante que no omita este paso! Si las galletitas no son refrigeradas pierden la forma en el horno! Yo suelo colocar la placa en el freezer durante 20 minutos para obtener mejores resultados. 7) Hornee a 175 C durante 10/15 minutos. No deje que tomen color (eso las vuelve duras). Deje enfriar sobre una rejilla y coma o decore.
Ahora bien, digamos que queremos hacer galletitas de chocolate ¿cómo transformamos la receta original? Es de verdad muy sencillo. Como pueden ver si comparan las dos primeras fotos, la mayor parte de los ingredientes se mantienen constantes y sólo se agregan tres: cacao, azucar morena, y un huevo más para compensar por las nuevas adiciones. Recuerden que modificar recetas es una cuestión de mantener proporciones y equilibrio entre los diferentes ingredientes. Como el cacao es un ingrediente seco, su adición cuenta como si hubieramos agregado harina. El azucar moreno cambia el sabor de la receta (porque contiene melaza), contribuye a que las galletitas tengan un color más oscuro y, como todo azucar en general, ayuda a que los ingredientes “liguen”. Habiendo agregado estos ingredientes, es necesario entonces sumar un huevo más para que la masa no resulte seca. Ahora bien, si prefieren usar uno solo (cuantas veces nos hemos encontrado con un solo huevo en la cocina, verdad? Yo,muchas!), modifiquen las cantidades de harina y de azucar blanca: reduzcan 20% la cantidad de harina y reemplacenla por cacao, y reduzcan 1/3 de la cantida de azucar blanca y reemplacenla por azucar moreno. Es tan sencillo como eso!
Esta es mi receta para galletitas de chocolate
Ingredientes:2 tazas de harina todo uso, 1/2 taza de cacao amargo, 1/4 cucharadita de sal, 1/2 cucharadita de levadura química (Polvo de hornear Royal), 113 grs de manteca o margarina vegetal, 1 taza de azucar blanca, 1/3 taza de azucar morena, 2 huevos batidos, 2 cucharadas de leche (puede ser vegetal), 1 cucharadita de vainilla.
Preparación: 1) Bata la manteca pomada con los dos azucares hasta que la preparación resulte esponjosa. Recuerden no batir más de 3 minutos si usan margarina 2) Agregue leche, vainilla, y los huevos batidos e incorpore 3) Mezcla con batidor de alambre o cierna los ingredientes secos: harina, cacao, sal y levadura química, y agreguelos en dos veces. Mezcle sólo hasta que todos los ingredientes estén incorporados. 4) Envuelva la masa en papel film y llevela al refrigerador por al menos dos horas. Si están haciendo esta receta en verano o en climas muy cálidos, yo prefiero poner la masa una hora en el freezer. Es más facil trabajarla luego! 5) Cuando quiera hornear las galletas, retire la masa del freezer y estirela con palote sobre una superficie lisa. Tenga en cuenta que si la estira levemente gruesa las galletitas resultaran mas humedas, y si la estira finita, resultaran crocantes. 6) Corte las galletitas usando un cortante especial o cuchillo, colóquelas sobre una placa para horno cubierta con papel de hornear y refrigere. Es muy importante que no omita este paso! Si las galletitas no son refrigeradas pierden la forma en el horno! Yo suelo colocar la placa en el freezer durante 20 minutos para obtener mejores resultados. 7) Hornee a 175 C durante 10/15 minutos. No deje que tomen color (eso las vuelve duras). Deje enfriar sobre una rejilla y coma o decore.
La última receta que les traigo hoy es la de otro clásico de está epoca: las galletitas de manteca o shortbread cookies, la que yo he modificado para transformarla en galletitas mantecosas de almendras. La diferencia principal entre las galletitas de azucar y las de manteca radica en la proporción entre estos dos ingredientes: las galletitas de azucar usan el doble de azucar que de manteca, y en las de galletitas de manteca esta proporción se invierte. Noten tambien que en estas galletitas reducimos 1/8 la cantidad de ingredientes secos, y teniendo en cuenta todo lo anterior (menos ingredientes secos y menos azucar), debemos reducir tambien los ingredientes líquidos, por lo que en lugar de un huevo entero usaremos sólo una yema, y omitiremos la leche. Las galletitas resultantes son más densas y de un sabor más neutro, no tan dulces,por lo que son ideales para combinar con rellenos y chocolate.
Como mencioné antes, yo he modificado la receta incluyendo almendras molidas en la misma. Si prefieren no hacerlo, pueden reemplazar la cantidad de las mismas por harina común (todo uso), bien pueden experimentar con otras nueces (yo las hecho tambien con avellanas molidas y quedan muy bien, por ejemplo).
Aquí está mi receta para galletas de almendras y manteca:
Ingredientes: 1 taza de harina, 1/2 taza de almendras molidas bien finitas, 1/4 taza de almidon de maiz (maizena), 1/2 taza de azucar impalpable, 1/4 cucharadita de sal, 113 grs de manteca, 1 yema de huevo, 1/2 cucharadita de extracto de vainilla, 1/4 cucharadita de extracto de almendras.
Preparación: 1) Coloque almendras, harina, sal, azucar y almidón de maiz en el bowl de la procesadora y pulse hasta que estén bien combinados. 2) Agregue todos los ingredientes húmedos (manteca, huevo y extractos) y pulse hasta que la masa se separe de las paredes del bowl. 3) Retire la masa de la procesadora y trabajela sobre la mesada hasta formar un bollo. 4) Envuelva la masa en papel film y lleve al refrigerador por dos horas. 5) Espolvoree harina sobre una superficie lisa, y estire la masa con palote. Corte de la forma deseada, coloque en una placa para horno cubierta con papel de hornear y hornee a 175 C por 10-15 minutos. No deje que tomen color. Deje enfriar sobre una rejilla y coma o decore.
Mañana comenzaré a mostrarles algunas formas en que pueden jugar con estas recetas.
Ahora cuentenme: ¿hornean galletitas para las fiestas? ¿cuales son sus recetas favoritas? ¿suelen decorarlas y de qué manera?
Que tengan un hermoso día lunes!


