Good morning friends! It’s day 4 of the advent, and it’s only 20 days until Christmas eve, can you believe it? I know it’s a real cliché, but I have no idea where time went this year. Let’s make the most of this last month, shall we?
I hope you have your cookie doughs ready because we are going to put them to good use today. So, take them out of the freezer or refrigerator and gather your cookie cutters, a few sugar pearls and nonpareils because we will start making pretty cookies for your assorted cookie box.
We will start by the simpler cookies and, in following posts, I will show you other techniques and ideas and we will increase difficulty as we go. As I have mentioned before, I want to encourage you to bake with your children and, for this reason, I decided to include easy cookies that you can make even with toddlers. When baking with small children, though, I would recommend you to bear in mind two things: 1) Forget about the mess and about the end result. You can always bake perfect cookies later. Baking with children is more about having fun and letting them be creative in the kitchen, letting them familiarize themselves with the tools of the craft and about sharing special moments, building memories. 2) Make extra dough, because they will soon discover that unbaked cookie dough tastes delicious!
I used a few of the cookie cutters I had, just to give you an idea but, as you will soon discover, many more combinations are possible. You could also dye some of the dough in red or green or whatever color you are using for your party and thereby increase the possibilities. Also, for the cookies to keep their shape, refrigerate, refrigerate, refrigerate! Do not skip this step!
Here are some ideas:
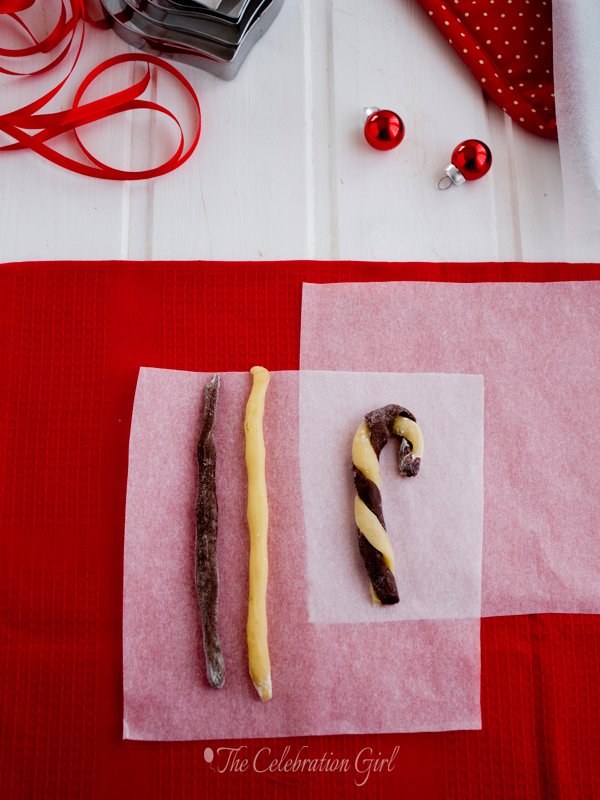
1) Candy cane cookies: There are no pictures of the finished product because my children ate them before I could take pictures (ahem) but they look the same as the one you see already shaped in the picture above. I used vanilla and chocolate sugar cookie doughs, but you could use other combinations, for eg: gingerbread and vanilla, orange and chocolate, plain vanilla and red dyed dough, etc. Making them is very easy: take a small piece of each dough between you hands and shape them as cilinders.Place them next to each other and braid them. Roll the resulting bi-color cilinder a couple of times, to integrate it, and then twist down the upper part, forming a cane. Cut the ends to keep them even. Put in the freezer for 20 minutes and bake.
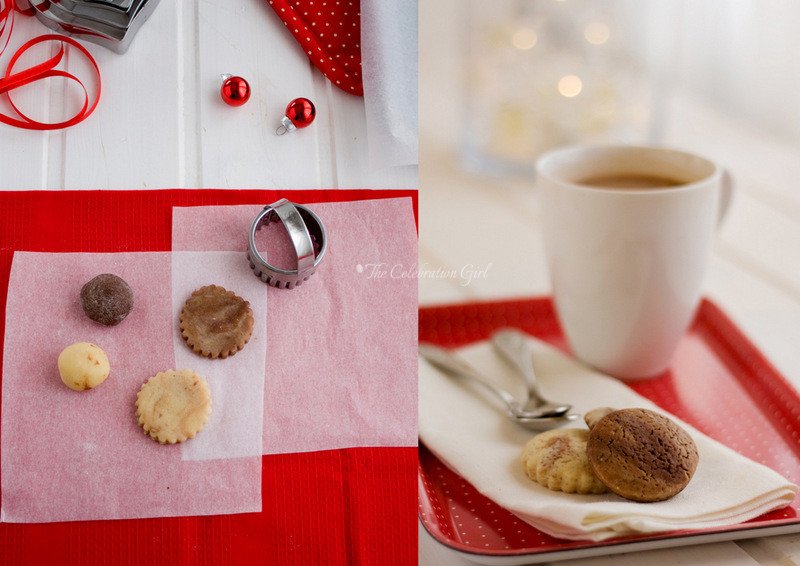
2) Marbled cookies: Take two pieces of dough of different colours, join them by the side and twist a few times. Don’t overdo it or they will merge and you will a have dough in a lighter version of the darker color, not a marbled one. Roll, cut, refrigerate and bake.
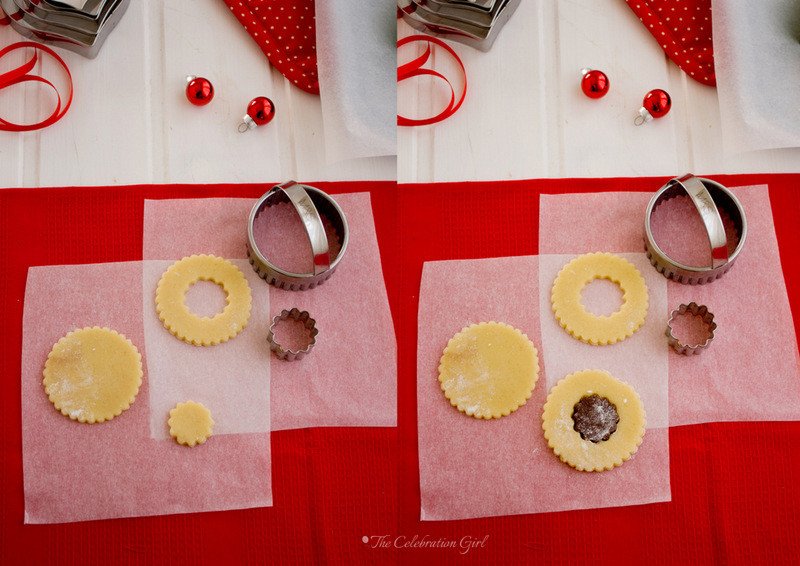
3) Cut out cookie combinations: To make these cookies you will need 2 cookie cutters of the same shape, but different sizes. Roll your cookie doughs and cut a shape with the bigger cutter. Place it in the baking tray and, once there, cut a smaller shape from the same cookie, leaving a “hole” inside. You need to do this when the big cookie is already in the baking tray or it may break or lose shape when transferred. Cut a big cookie of a different color, and repeat the process. Then mix and match the insides. They will merge in the oven and attach to the bigger cookie. Another option that I didn’t have the time to photograph but looks really pretty is to insert crushed hard candy in the hole, to get a vitreau effect. Note: If you don’t have cookie cutters, you can use other utensils. In the past I have used the lid of a marmalade jar to trace a big circle and the lid of a vanilla extract jar to trace the small one.
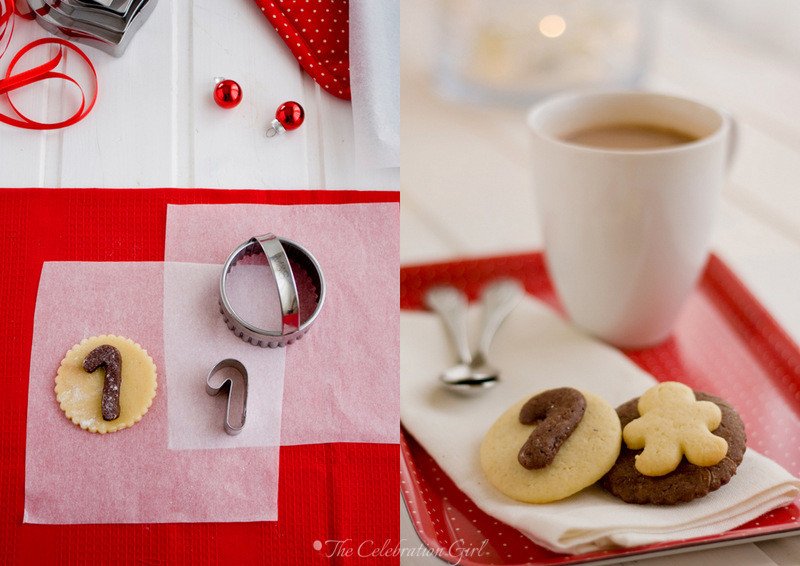
4)3D shape cookies: Cut a small shape in a different color than that of the main cookie, brush it with water and place it on top of the big cookie before baking. They will get attached once baked.
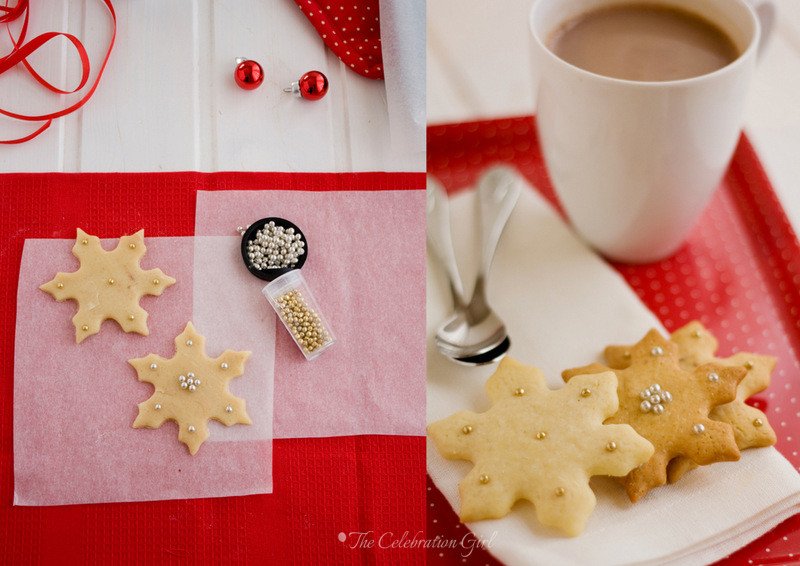
5)Sugar pearls decorated cookies: Did you know that sugar pearls can be added without glaze or icing? They can! Just play with the design and attach them before baking by pressing them lightly into the dough.
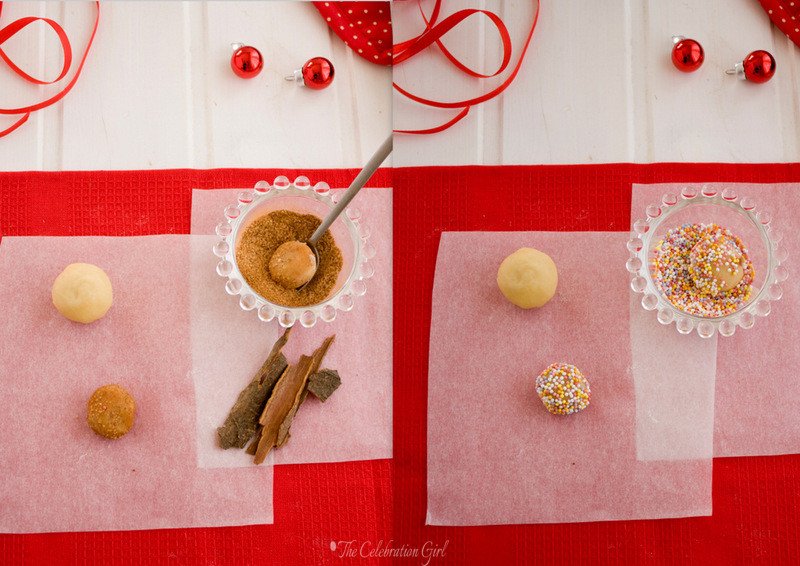
6) Cookie “Truffles”: No, they are not truffles, but they look like them before baking, don’t they? In order to make these cookies, make small balls of dough and roll them in non pareils, sugar pearls, or a combination of 1 tablespooon of sugar, 1/4 teaspoon of cinnamon and a pinch of cardamom before baking. They will expand in the oven,but the colder they are when you start baking them, the more they will keep their shape.
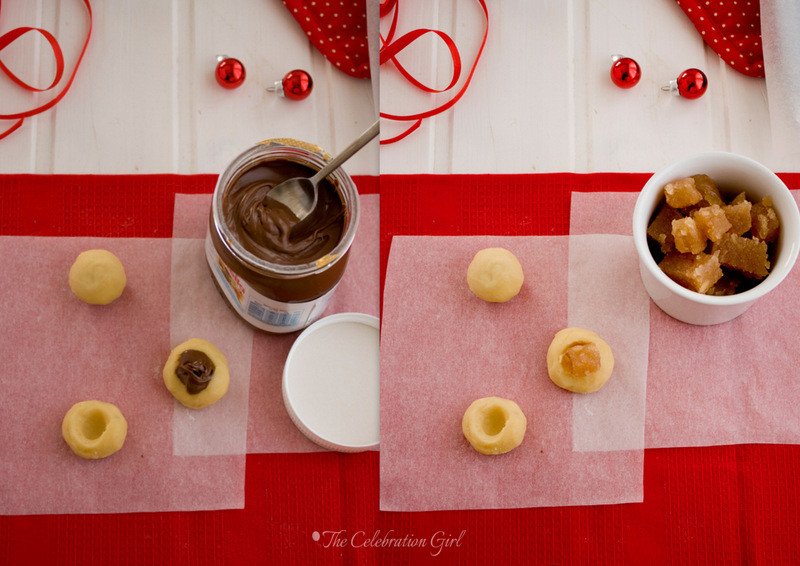
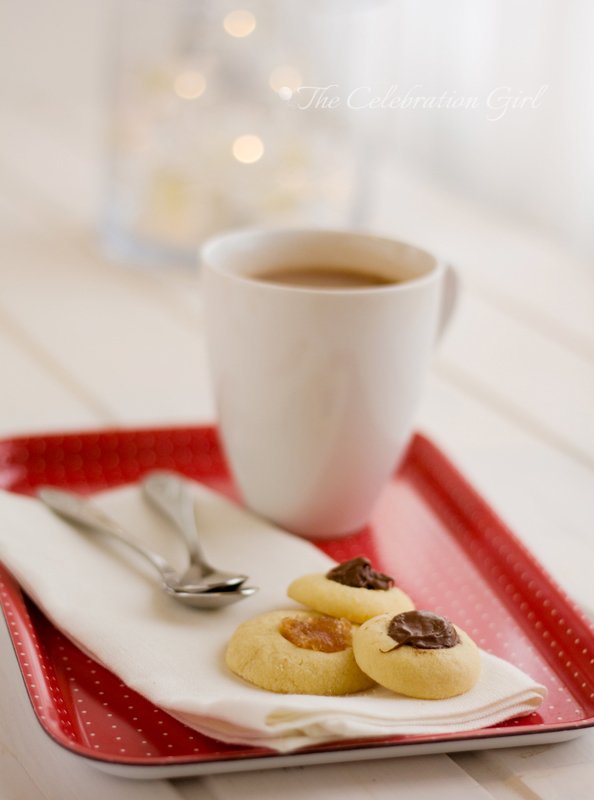
7) Thumbprint cookies or “Pepas”: Pepas is how we call these type of cookies in Argentina and they are normally filled with a square of quince paste, which is a staple food in many Argentinian households (mine is home made, recipe coming soon!). I prefer to make them using the almond shortbread dough, and I like to vary the fillings, using nutella or caramel as well as quince. To make them, roll a ball of dough and press with your thumb (hence the name) or index finger to create a well in the middle. Fill the well with the jam or sweet paste of your choice and bake.
Are you ready to start baking?
Con sabor latino…
Buenos días queridos amigos! Hoy es el 4to día del adviento y faltan sólo 20 días para la nochebuena ¿Pueden creerlo? Sé que lo que voy a decir es un cliché, pero realmente no sé en qué momento pasó el año. Seamos conscientes de la velocidad a la que pasa el tiempo y aprovechemos al máximo este último mes de 2012, si?
Espero que tengan listas las masas de galletitas que compartí con ustedes ayer, porque hoy vamos a usarlas. Así que saquenlas del freezer o heladera y junten sus cortantes, granas, perlas y azucar decorativo porque vamos a comenzar a hacer lindas galletitas surtidas para sus cajitas navideñas.
Hoy vamos a comenzar con las galletitas más fáciles y, en posts sucesivos, les voy a ir mostrando otras maneras de decorarlas, en orden de complejidad creciente. El motivo por el que incluí estas galletitas tan sencillas es porque quiero incentivarlos a cocinar con niños, y estas pueden hacerse aún con los más chiquitos. Ahora bien, al cocinar con niños pequeños, es bueno tener dos cosas en mente: 1) Olvidense del orden y del resultado final. Dejenlos crear. Si queremos galletitas perfectas, podemos hacerlas nosotros solos cuando ellos duermen. Dejemos que cocinar con niños sea un acto creativo, orientado a pasar un momento divertido juntos, a que se familiaricen con los instrumentos de cocina, a que le “agarren el gusto”a cocinar, a construir recuerdos familiares hermosos. 2) Hagan masa extra, porque los chicos son vivísimos y se dan cuenta MUY pronto que la masa de galletitas cruda es deliciosa!
En este post yo usé algunos cortantes que tenía en casa, a modo de ejemplo, pero como verán son posibles muchísimas combinaciones más. Tambien pueden, por ejemplo, teñir parte de la masa de vainilla de otro color, como rojo o verde o cualquier otro que vayan a usar en la decoración, aumentando así las posibilidades creativas. Recuerden, eso sí, que para que las galletitas mantengan su forma es fundamental refrigerarlas, refrigerarlas, refrigerarlas! No omitan este paso!
Ahora sí, vamos a las ideas:
1) Galletas “baston”: No tengo fotos del producto combinado porque mis hijos se las comieron antes que pudiera sacarlas (ejem), pero se ven iguales a la foto del bastoncito armado antes de hornear. Yo usé masas de vainilla y chocolate, pero tambien podrian usar otras combinaciones, como vainilla y gengibre, chocolate y naranja o teñir parte de la masa de rojo y combinarla como un baston de caramelo tradicional. Para hacerlas, tomen una poco de masa de cada color y denle forma de cilindro. Coloquen los dos cilindros, uno al lado de otro, unanlos en la parte de arriba y comiencen a trenzarlos hacia la derecha, pasando la masa de la izquierda por encima de la de la derecha. Una vez trenzados, haganlos rodar un par de veces para que no queden junturas y doblen la parte superior hacia abajo. Corten los bordes para que queden parejos, coloquen en una placa, refrigeren y horneen.
2) Galletas marmoladas:Tomen dos pedacitos de masa de diferentes colores, unanlos por el costado y retuerzanlos un par de veces. No retuerzan mucho o en lugar de galletitas marmoladas tendrán simplemente una masa de color más claro que la oscura. Estiren con palote, corten, coloquen en una placa, refrigeren y horneen.
3) Galletas combinadas: Para hacer estas galletitas necesitarán dos cortantes de igual forma pero de distinto tamaño. Hacerlos es muy sencillo: estiren una de las masas con palote y corten galletitas con el cortante más grande. Coloquen las galletitas en la placa y, una vez allí, usen el cortante pequeño para sacar una galletita mas pequeña del centro de la más grande. Les sugiero hacerlo una vez que la galletita grande ya esté en la placa porque, de lo contrario, ésta puede romperse o perder la forma al transferirla ya cortada. Luego, repitan el proceso con la masa del otro color e inviertan los centros. Las dos partes se unirán al hornear, dejandoles una galletita divertida de dos sabores y colores. Otra opción muy linda que no tuve tiempo de fotografiar es colocar caramelo duro picado (destrozado con mortero) en el hueco, para lograr un efecto vitreau. Nota: si no tienen cortantes de galletitas, pueden usar otros instrumentos de cocina. En el pasado yo he hecho estas galletitas usando la tapa de un frasco de mermelada para el circulo grande y la tapa de un frasco de esencia de vainilla para el más pequeño.
4) Galletas con formas en 3D: Sencillísimas, sólo hay que cortar una formita en un color de masa diferente al de la galleta principal, y pegarla con agua a la más grande antes de hornear ( Se unirán en el horno)
5) Galletas decoradas con perlas de azucar: ¿Sabían que no hace falta glasa ni glacé para pegar perlas de azucar? Pues así es! Solo tienen que colocarlas sobre la masa cruda, conforme el diseño que prefieran, y presionar apenas con el dedo sobre las mismas para insertarlas en la masa. Luego refrigeren, horneen y listo.
6) “Trufas”de galletita: No, no son verdaderas trufas pero lo parecen antes de ser horneadas, no? Para hacerlas, hagan una bolita de masa, y ruedenla en granas, nonpareils, perlas de azucar o en una combinación de 1 cucharada de azucar, 1 cuarto de cucharadita de canela molida y 1/8 de cucharadita de cardamomo. Se expandirán en el horno, pero tienden a conservar mejor la forma cuanto más fría está la masa.
7) Pepas: Estas galletitas son muy comunes en Argentina, rellenas con un cuadradito de dulce de membrillo (que es un clásico de nuestra gastronomía). Mi dulce de membrillo es casero y la receta será publicada pronto! Yo prefiero hacer estas galletitas con la receta de las galletitas mantecosas de almendra, que compartí con ustedes ayer, combinando distintos sabores para el relleno. El clásico membrillo, nutella o salsa de caramelo quedan deliciosos. Para hacerlas, hagan una bolita de masa y, luego, presionen con el pulgar o el índice para ahuecar la masa en el centro, y rellenen el mismo con el dulce o mermelada deseado. Refrigeren, horneen, y listo!
Estan listos para empezar a hornear?



Buenísimas las explicaciones y las fotos. A cocinar se ha dicho!
Me encantan los batoncitos, Marcela 🙂
No me extraña que no quedaran ni para la foto, tienen una pinta 🙂
MUAKS y remuaks!
Raquel