Select Page

Do I need to wear makeup for my branding photoshoot? [ Photoshoot Makeup Guide Part I)

Do I need to wear makeup for my branding photoshoot? [ Photoshoot Makeup Guide Part I)
MAKEUP FOR BRANDING PHOTOSHOOT

When I started photographing women entrepreneurs, three years ago, one of the main questions I’d get asked over and over again was whether my clients needed to wear makeup for their photoshoot, and if the answer was yes, how much should they wear.

Up until that time, I hadn’t realized how much the pervading imagery around what a “professional looking woman” was supposed to look like involved a whole lot of makeup. Most Pinterest images involved elaborate before and after shots where a woman would be transformed from the average mum we meet during school meetings into a diva worthy of a Vogue cover shot. The Makeup Guides I could find showed how different styles looked in 20 year old girls with a beauty worthy of a runway- even without makeup.

Needless to say, most of my clients had trouble believing me when I told them that no, they didn’t need to wear makeup for their branding photoshoot. That a branding photoshoot is more about authenticity than glamour (unless glamour is what your brand stands for, or your archetype favors elaborate looks, such as the Ruler of the Lover). That what makes you shine in images is a light, a passion, an energy that comes from within and connects to your ideal clients.

And, for those who wanted to wear makeup, they had a terribly difficult time seeing themselves in examples of perfect-looking 20 years old. So I decided to take matters into my hands, and create the resource I had fruitlessly been looking for elsewhere.

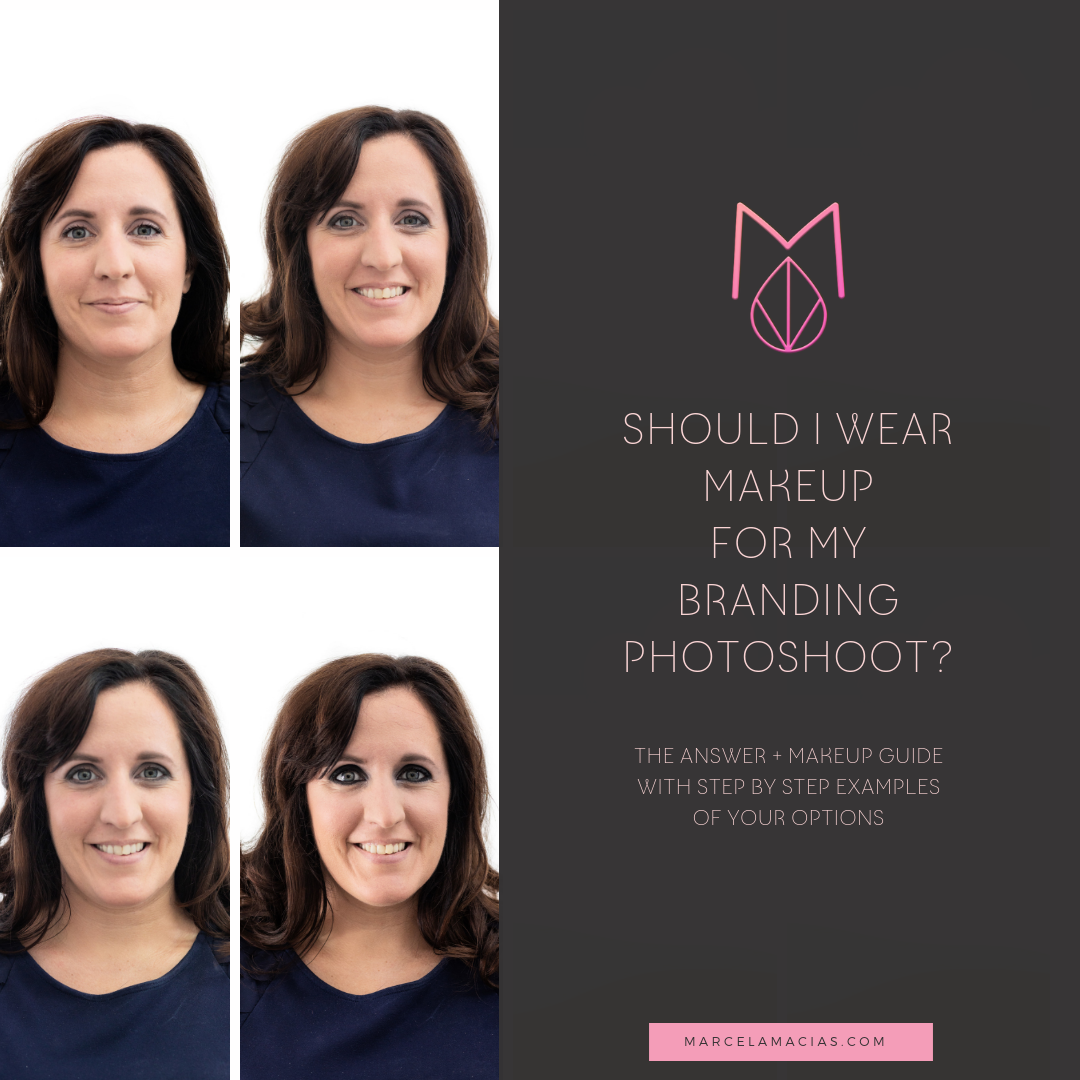
In the name of science, I used myself as lab rat and hired my favorite Cyprus makeup artist, Maria Kalogirou, to create 5 progressive looks that could help my clients, and you dear reader, decide whether you want to wear makeup for your next photoshoot, and if so, exactly how much. 

The beauty of the system is that, being progressive, you don’t need make a final decision from the beginning. You just need to start, and then see how comfortable you feel as it progresses. You can stop after each step, take a mirror and say ” I’d like to move to the next one”, or “This is it, this is the perfect look for me, I don’t want anymore than this”.

I set the camera in Maria’s salon, and left it on a tripod while she worked. Whenever she would finish each step, I’d stand up and shot an image or two, then go back to the seat for her to continue. I also took photos with my cellphone in between, which you’ll see in this post too.

The images have not been digitally retouched: You can see my face exactly as it looked without makeup, and with it in its different stages. This is important because I want you to notice the difference each product added makes. Only then can you make a decision with any degree of certainty.

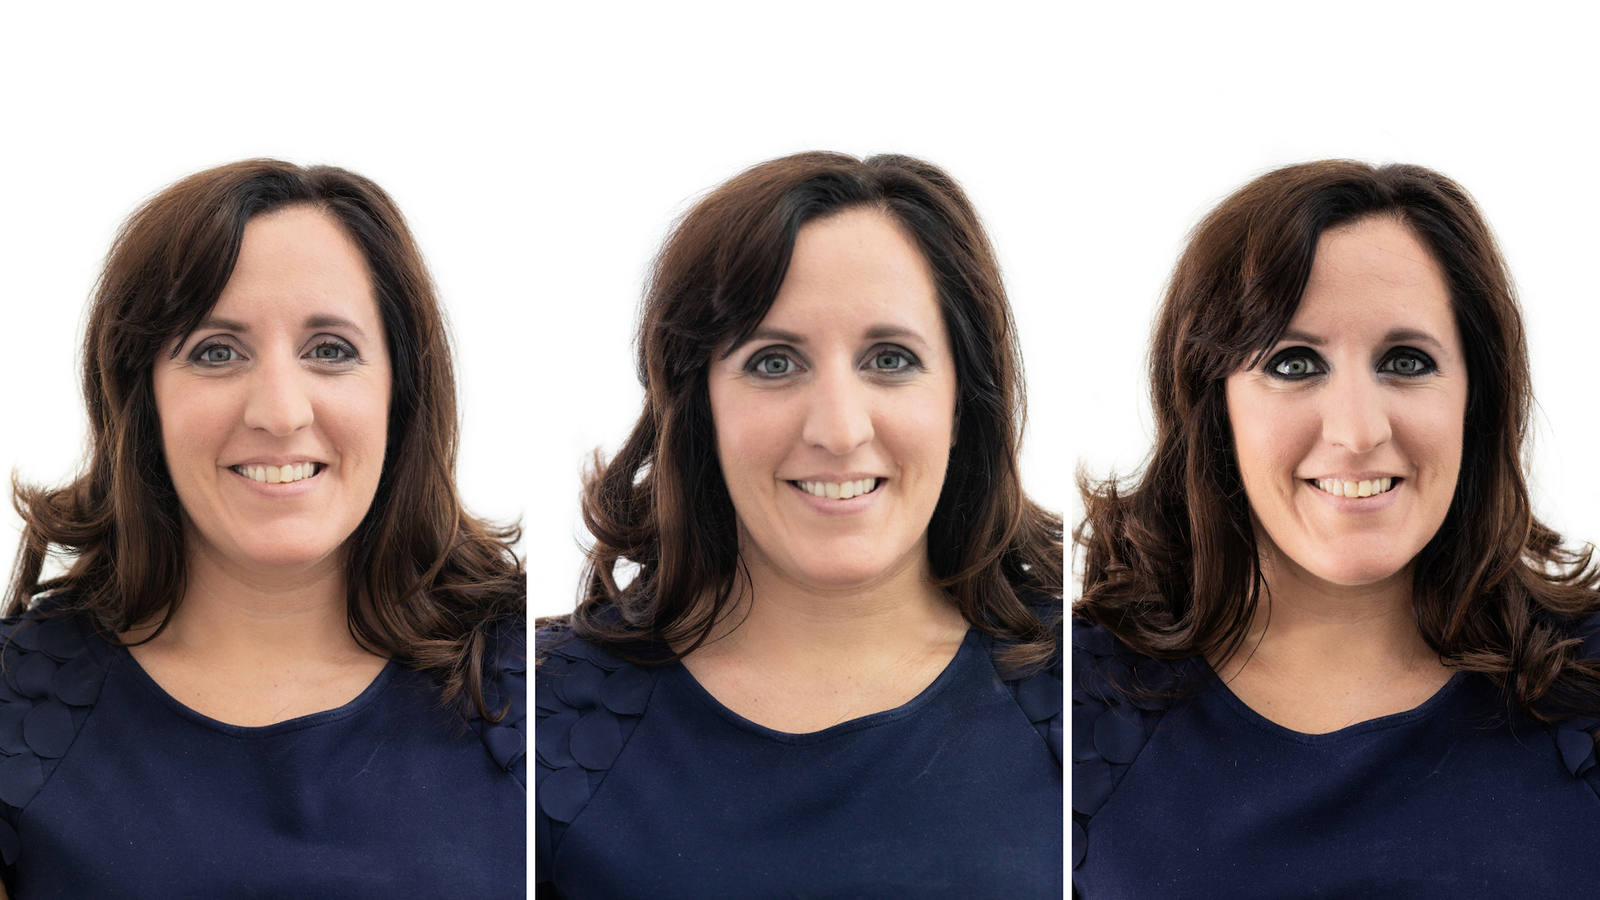
The triad below shows :

  1. My face without any makeup at all
  2. My face with a minimal look (bare minimum makeup)
  3. My face with a soft, yet a tad more sophisticated look.
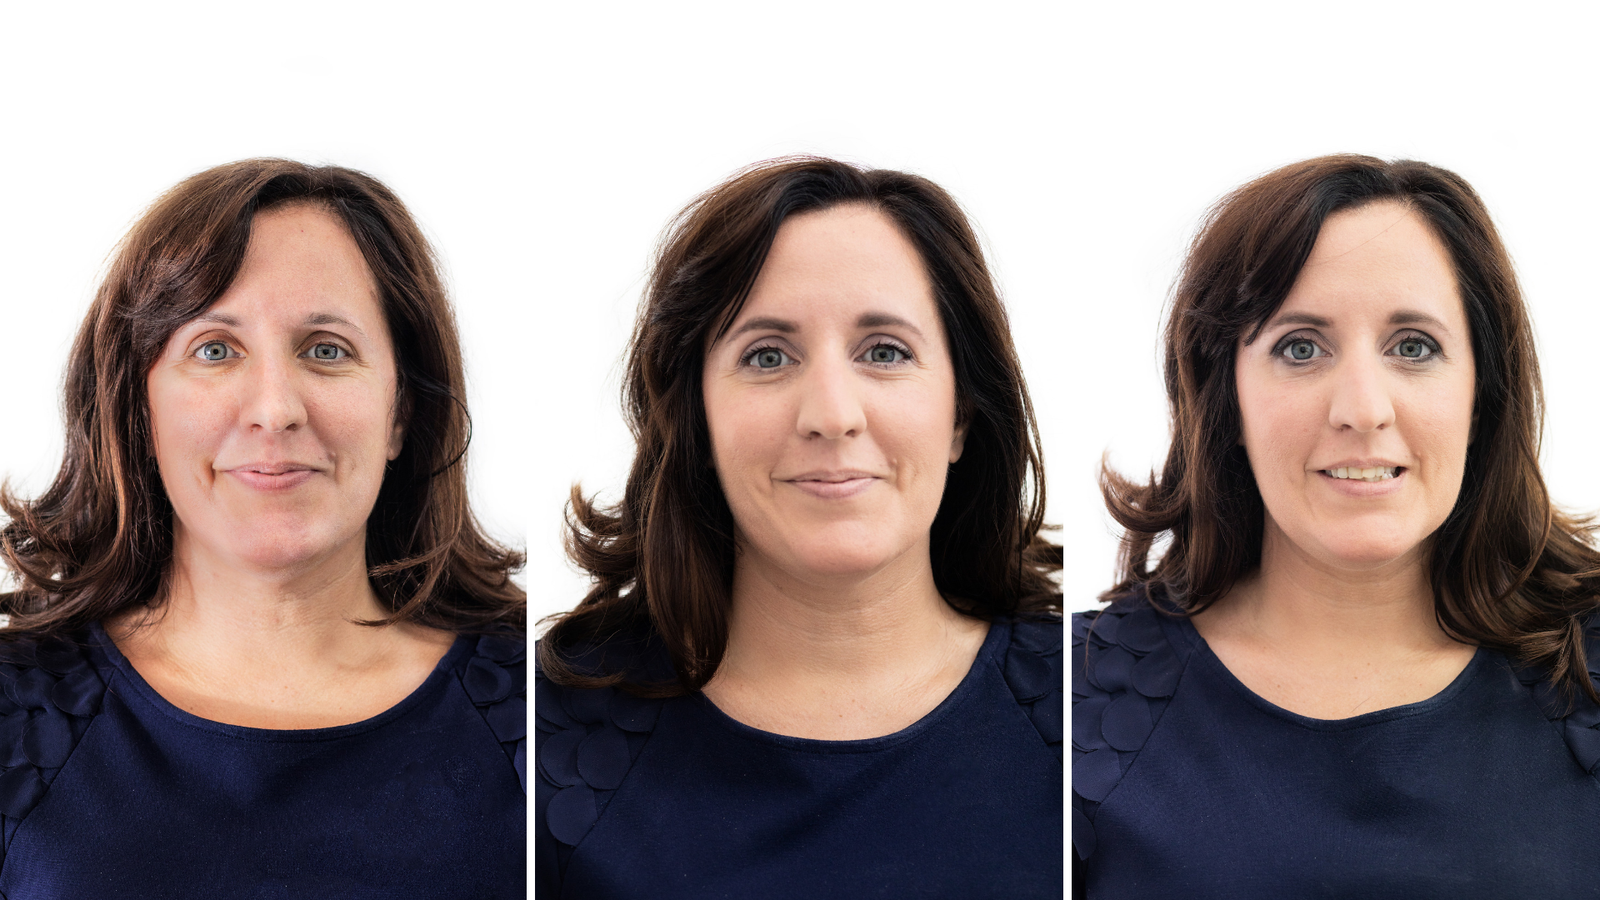
MAKEUP GUIDE 1 1

These two first looks are the ones most of my clients choose for themselves, so I wanted to show you what they involve in detail. As you can see there’s quite a difference between the photo of my bare face and the first look. The skin tone is even, there’s no redness, my eyebrows look bigger and my eyes pop.


  1. The Minimal Look

The total time it took to accomplish the first look was 20 minutes, and this is what it involved:
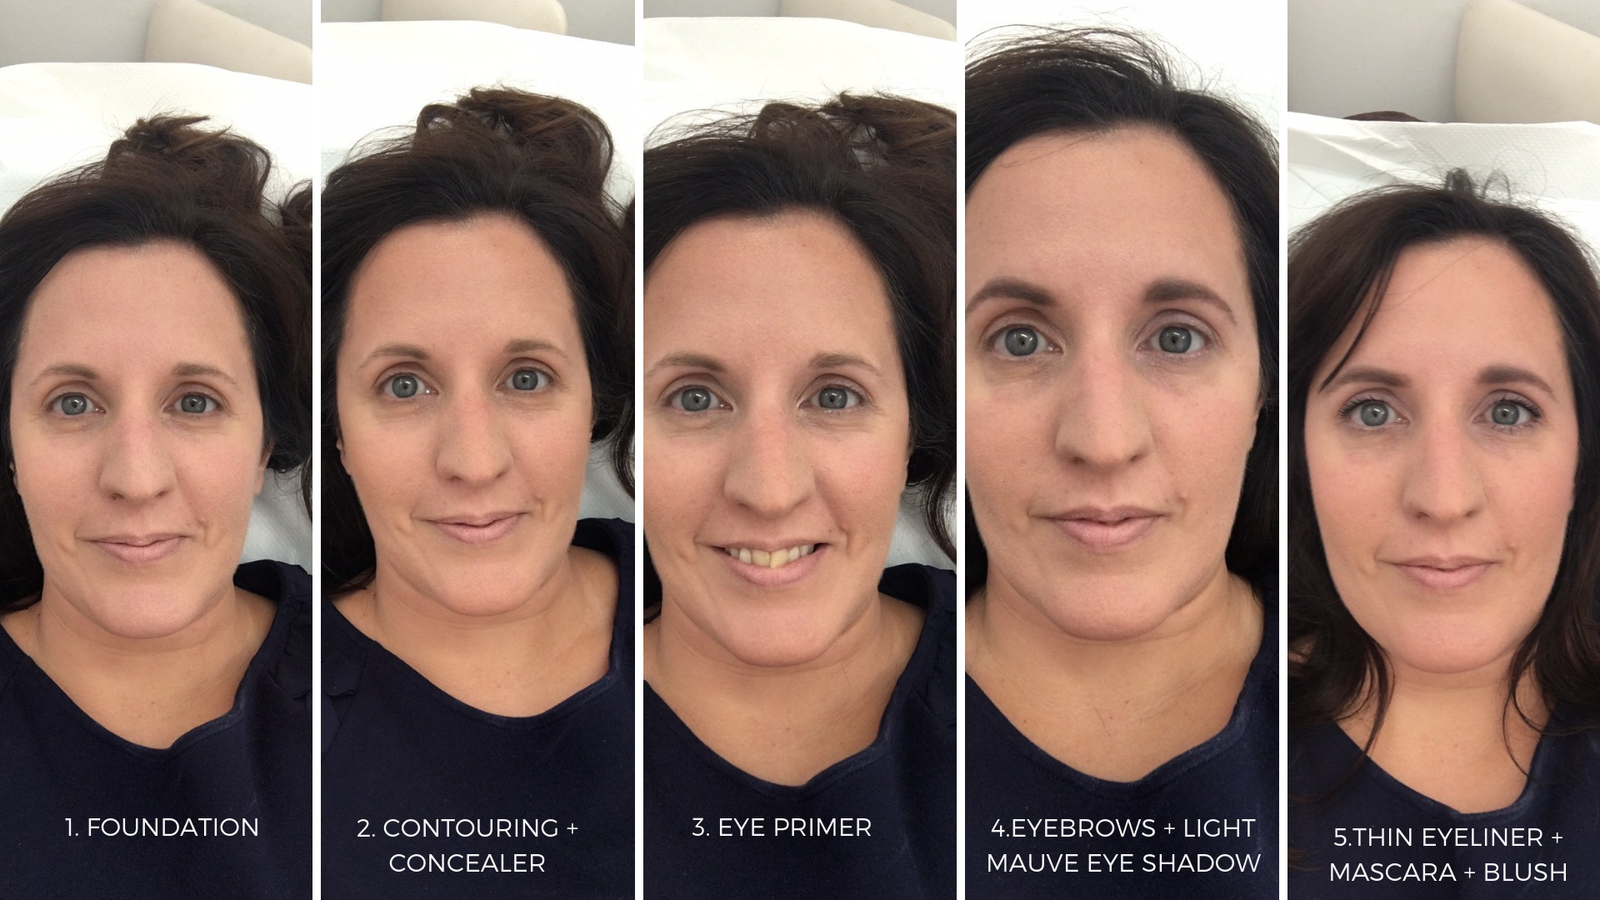
MAKEUP GUIDE 4

Maria begun by cleaning my skin and applying moisturizer. She then added liquid foundation in my skin tone, used two colors of powder for contouring (adding shadows and light to different areas of my face), and concealer to hide imperfections and the dark circles under my eyes.

The next step was adding eye primer (the eye shadow lasted perfectly 12 hours thanks to it), and then adding definition to my eyebrows.

Finally, she added a light mauve eye shadow (the one shown in the photo below, on the right), a very thin line of liquid eye liner, and one coat of black mascara. She finished it off with pink blush in my cheeks.

8

Here’s a close up of the first look and what it involved:

12

If you are not comfortable wearing too much makeup, yet want something light that can still highlight your best features, this may be the style for you. This is also a great style for those whose branding archetype tend to have more natural looks, such as Explorers, Girls next door, Caregivers, and even some Innocents and Heroines.

2. The Soft Look

22

After we shot the first look, Maria continued building on the look above by adding grey eye shadow to the outer corner of my eye lid and under my eye. She added very, very little, so much so that it took only 3 minutes to go from one look to the other, yet you can see (if you can get past my silly camera-triggered- with- remote- control face 😉  how they look quite different.

I believe this is still a day look, that can be worn comfortably with everyday clothes, and which can easily suit archetypes such as The Sage, The Ruler , The Magician, The Lover or The Creator.


Now we move to the three more dramatic looks:

3. The Day to Night Look

4. The Grey Smokey Eye look

5. The Black Smokey Eye look

In all three looks, the only thing that changed was the level and color of eye shadow used. Nothing else was touched on my face. On the final look, we could have used fake eyelashes, but I can’t stand them (they make me cry), so we didn’t. We could also have added a bit of nude lip gloss, but opted not to so as not to distract the focus from where we wanted it to be: the eyes.
MAKEUP GUIDE 4 6

3.  The Day to Night Look

For this look, Maria added a bit more grey eye shadow in the same area as in the look before, basically deepening it. The transition took, once again, no longer than 5 minutes.

This look works very well both during the day and at night. It clearly defines the eyes, yet is not so strong that cannot be worn with lipstick. This is the style I personally use when going for a party, and I complement it sometimes with my favorite red lipstick, YSL Rouge Volupté Shine number 4. This look can be worn easily by the same archetypes as the look before.

Here’s a closeup of the 3rd look, with what it involved:

32


4. The Grey Smokey Eye Look

With the 4th and 5th look, we enter into more dramatic territory.

I must confess this was the first time I tried the smokey eye look. I guess we can say I’m a bit late to the party, but I had this unfounded idea that I wouldn’t look good with them. I believed, like most of my clients, that they were “too much”, “not for me”, “too dark”, “too much like someone had punched me in the face”.

Well, I was wrong. I wouldn’t wear them everyday, nor probably for a branding photoshoot (I think looks 1 to 3 would be more brand-aligned for me personally) but for a special occasion, or a fantasy photoshoot? Yes, totally, count me in.

Soooo…Grey Smokey Eye came first, and it was a more natural transition from the look before.

In order to create it, Maria filled my upper eye lid with Dark Grey eye-shadow, blending it with a bit of black eye-shadow. She also deepened and strengthened the line under my eye and added a deeper line of eye liner on my upper lid too.

Here’s a close-up of this look:

42

And here’s a close-lid view of looks 3 and 4, so you can see the difference more clearly:

52

This look would look beautiful in fantasy shoots (think fairy tale style, like Mayi Carles’ The End of Boring) and also for those of you with branding archetypes of Creators, Magicians, Lovers, some Rulers, some Outlaws (it can scream “Rebel”with the right clothes), and some Jesters. 

Getting from look 3 to 4 took 10 minutes.

And finally…drum roll please:


5. The Black Smokey Eye

This look is as dramatic as they get. And, confession time, it was kind of scary for me, who only wear one thick line of eye-liner on my upper lid and mascara, to go. It was also the longest it took: 20 minutes to move from look 4 to 5- and a whole lot of black eye-shadow!

Here you can see the transition (I asked Maria to work on one eye at a time so I could show you the difference between both smokey eyes):

7

To move from grey smokey eye to black smokey eye, Maria blended a ton of black and dark grey eye shadow, making sure to add only grey in the area where the eyes meet the nose, to avoid the “someone punched me in the face” look, which no one wants,  amiright?  She also added two more coats of mascara and an additional coat of black eye liner.

As you can see from the photos, This look completely covers the upper lid and creates a thick line around the lower part of the eye too, completely encircling it.

This look works amazingly for fantasy shots, such as the witchy self-portraits I did for The End of Boring below. It would also work beautifully for Outlaws…imagine these eyes, ripped jeans and a black leather jacket? Lovers could also pull it off in sensual shots (with a long,  black or deep red satin dress, for example). It could even work for innocents, for as long as they were focusing on the fairy tale aspect of the brand (it wouldn’t work with every day clothes for them).
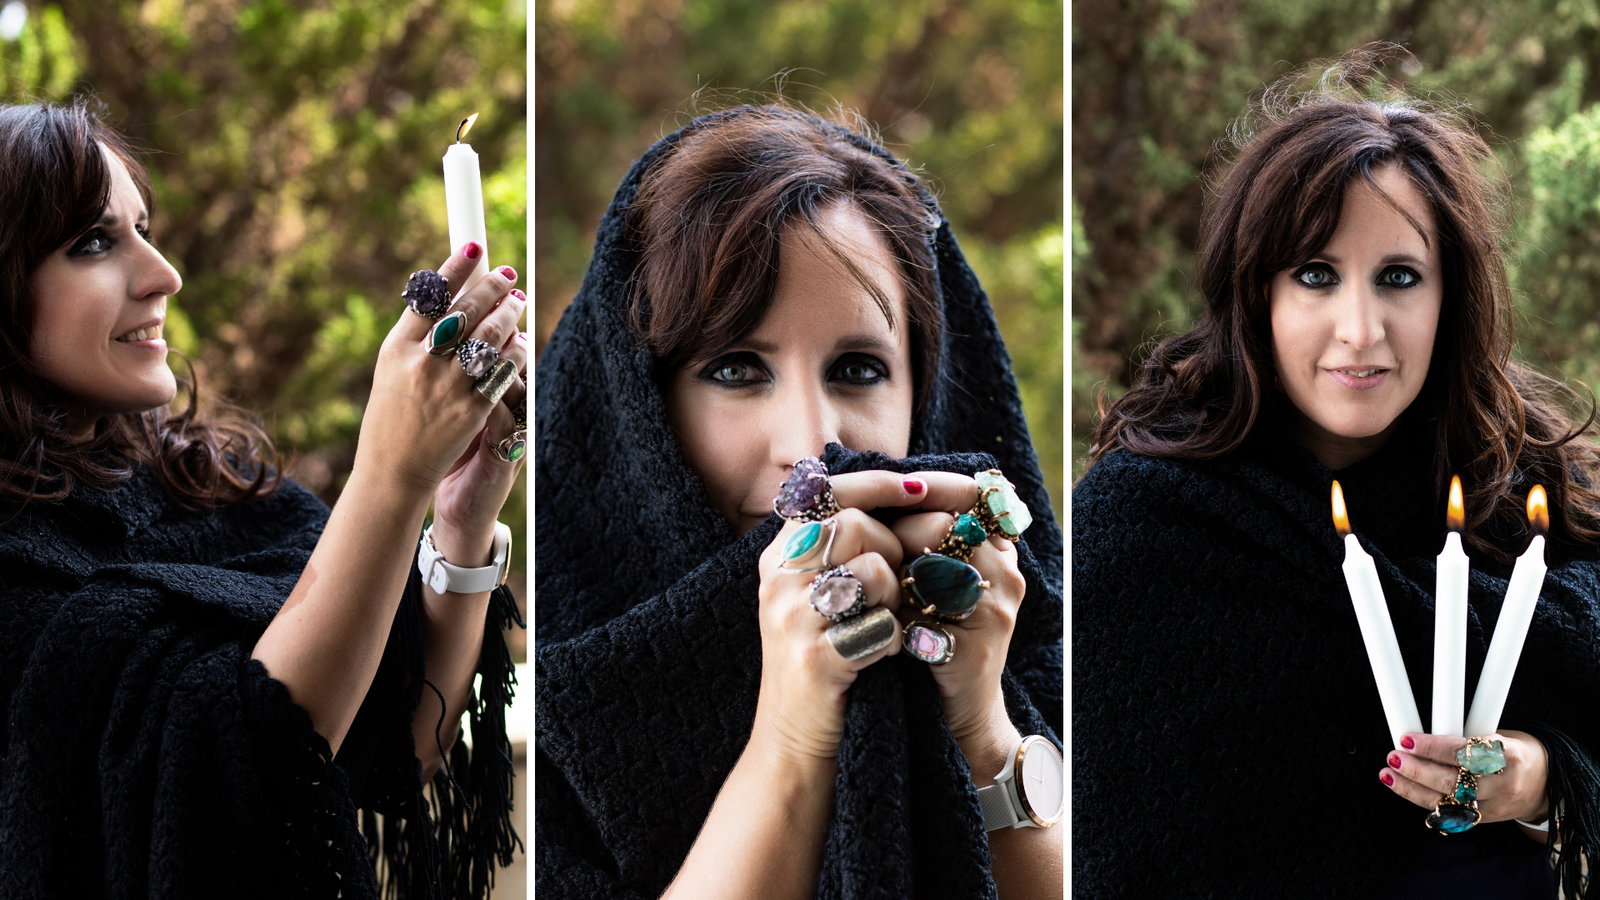
 

MAKEUP GUIDE 2

You can see a close up of this look here, with a detail of what it included:

62

Finally, here are all 5 looks side by side:
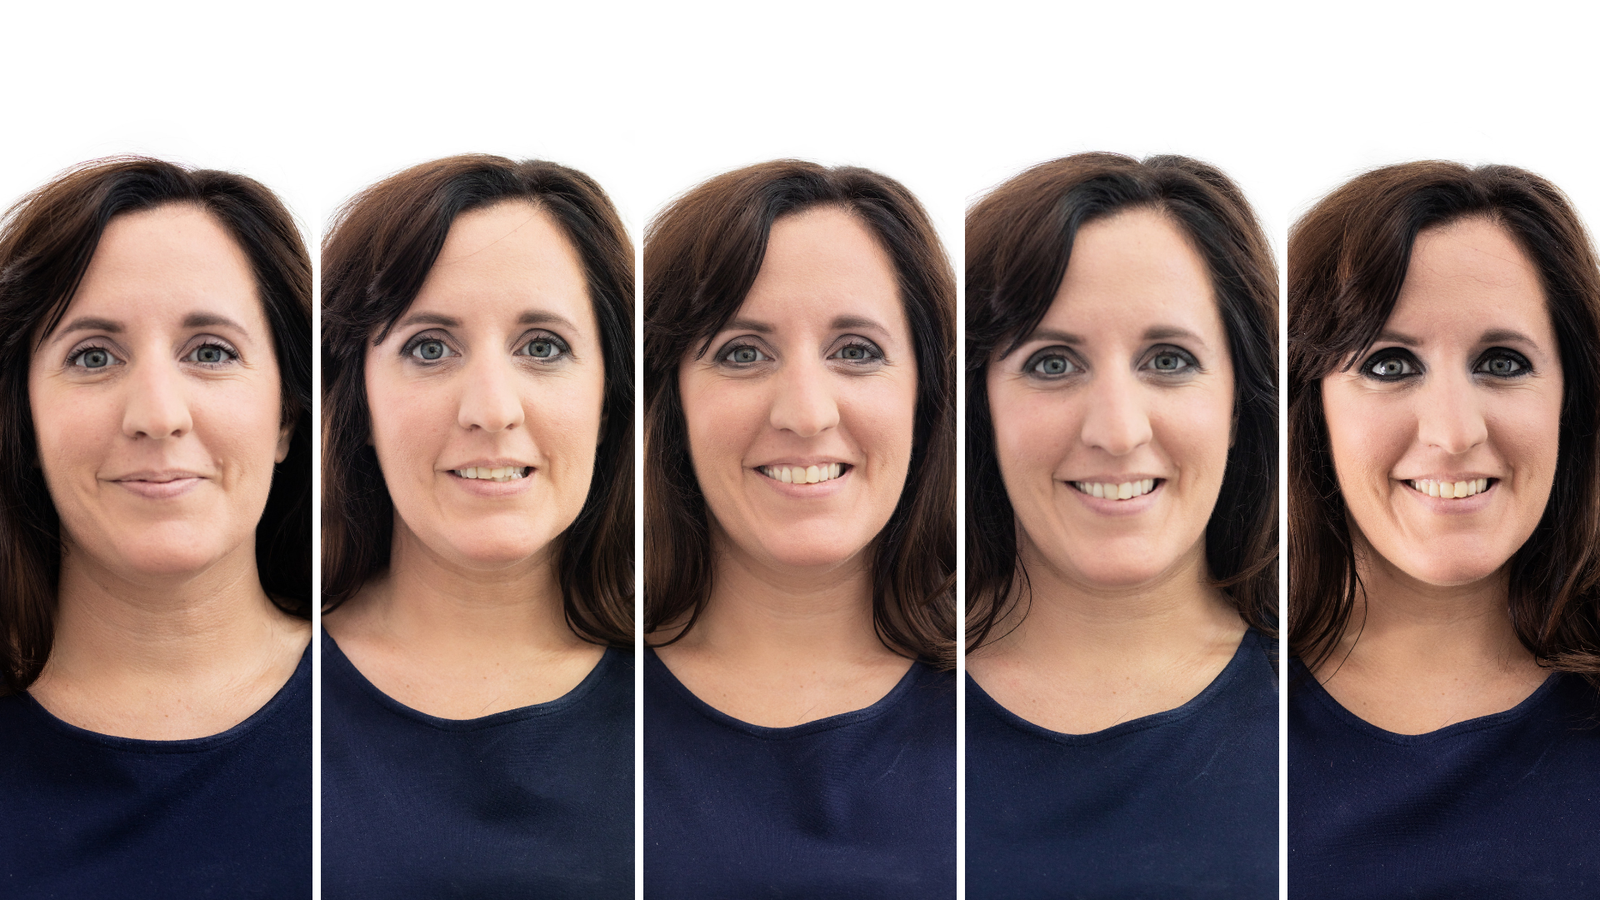
MAKEUP GUIDE 3


Which one would you choose for yourself? Which one feels more like you? 

Have you ever tried Smokey Eye? Would you try it, if you haven’t yet? 

Let me know in the comments below! And if you want to share and pin all 5 looks, here’s an image to help you do so:
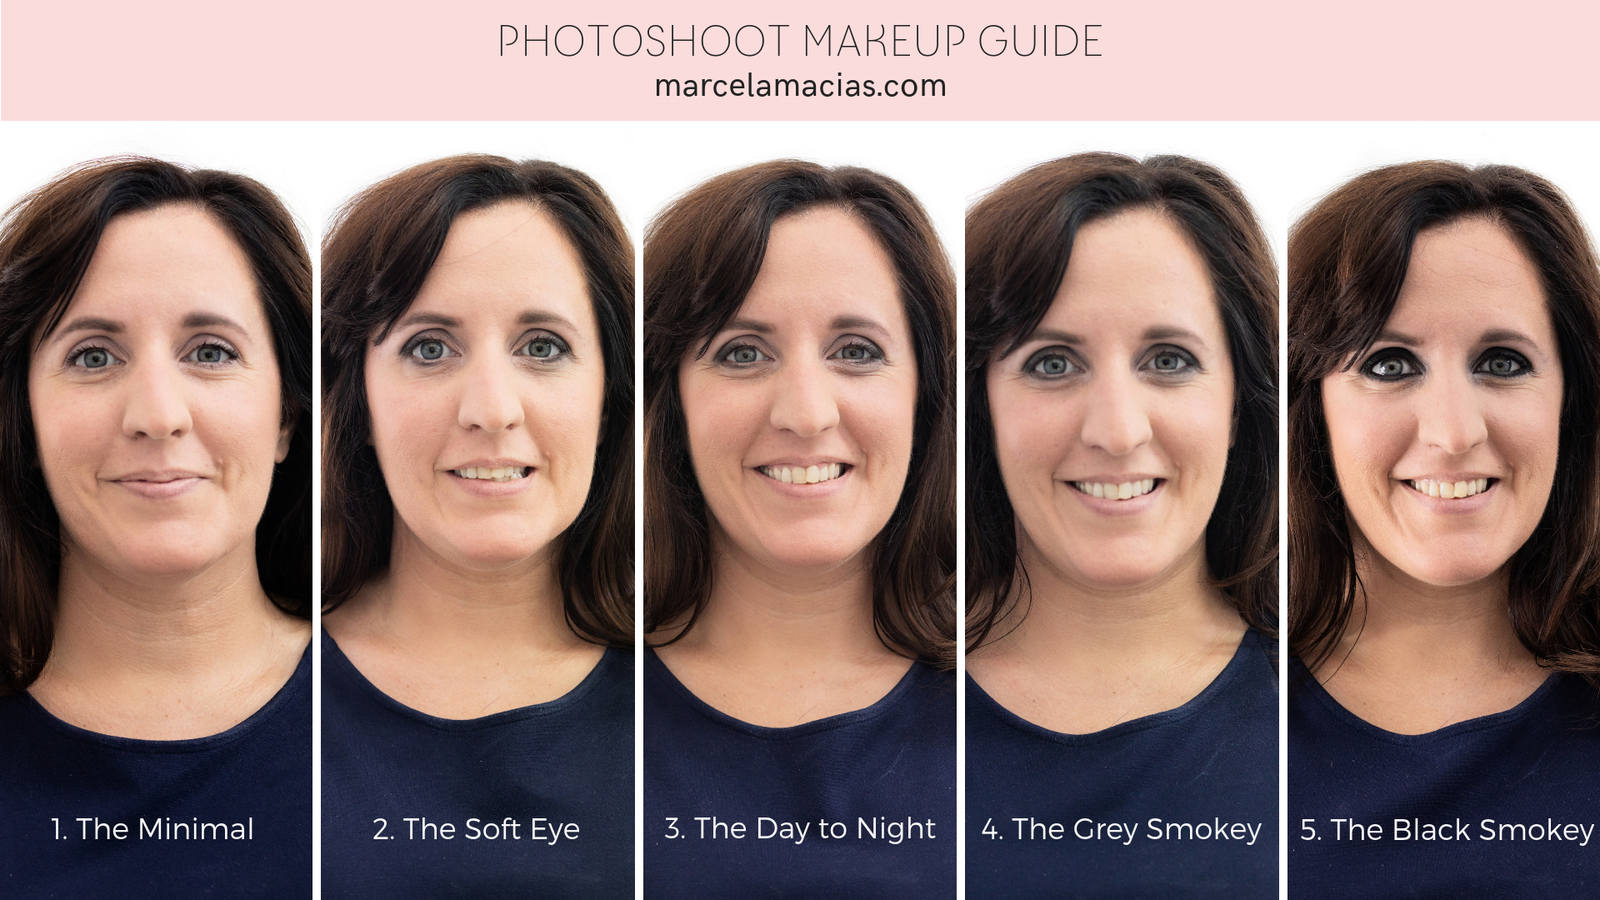
 

MAKEUP GUIDE 5


Do you have dark skin with warm undertones? We have a makeup guide for you too, created by makeup artist Izmir Henry

Check it out here: 

4


PS: I’m now booking photoshoots in Europe and the Middle East for 2019 I. Check my packages here: https://marcelamacias.com/shine


8 Mistakes you should avoid when creating a Flat Lay

8 Mistakes you should avoid when creating a Flat Lay

Copy of creative process


Have you ever started creating a flat lay for your business, only to discover that you can’t manage to make them look like you had in mind- but you don’t really know what you’re doing wrong?

Today is your lucky day, because in today’s video I will show you the mistakes you need to avoid when creating a flat lay for your business- and what to do instead.


Check Margalida’s video here: https://www.youtube.com/watch?v=uqr1HrAj-FA


Prefer to read? Here’s the transcript:

This video is a collaboration with landscape architect Margalida Nadal, who will show you how to arrange flowers in a flat lay so they look their very best.  Margalida has an amazing youtube channel with plenty of tips for your garden – so if you speak Spanish, go check it out after this video.

Let’s begin!

So, what is a flat lay? A flat lay is a photo of a desk or any collection of objects taken with a bird’s eye view- or in other words, from above. Flat, because that’s how all objects look from that view (there’s nothing tri-dimensional  no objects out of focus, no background other than the one where the objects lay. They’re very popular on Instagram because they’re relatively easy to take with a phone camera and you don’t need funny lenses to do so.

They look easy- but if you’ve tried to take one yourself you may have realized they’re not so much so. So, to help you out, I’ve compiled the most common mistakes I’ve seen online-so you can avoid them, and simple easy solutions you can put in practice today.


Mistake Number 1: You don’t have a strategy behind your flat lay

This is the number one mistake most people make. Having a strategy means: you know in advance where you want people’s eye to go, what you want them to focus on, what feeling you want to provoke in them when they see your photo and how and where you will be using the photo.

You are a smart ladyboss, you make sure you know this before you begin:

  1. What do you want to showcase: A product? Lifestyle? Some object you want people to identify with you.
  2. What feeling do you want to evoke: Fun? Ease? Aspiration? Comfort? Cozyness? Joy?
  3. How will you use the image ? Will you add text? Will you crop it in several different images? Will you overlay blocks of color?
  4. What objects that you have around your house speak about you, about who you are, about your values, about what matters to you? Could you add these to your photos?


Taking a few minutes to answer these questions will help you create faster and with ease photos that enchant your customers and grow your business.


Mistake Number 2: You don’t have a clear focal point or you’re not using it correctly.

The biggest mistake. This is when it’s not clear in the photo what you should focus on, or the most important objects are away from the places where the eye is naturally drawn.

You need to decide what you want people to notice FIRST when they see your photo, and place that object in the right place for that to happen.

What’s the right place? Here are a few examples:

Center: The easier one, where the rest of the objects frame the object in question and direct the eye to it. 

Rule of thirds: draw two horizontal lines and two vertical imaginary lines in your background and place important objects in the intersection between two lines. Movies and series do this all the time (show framing of Outlander). 

ONE NOTE: If you are creating a flat lay with negative or white space where you are planning to add text, consider text your focal point and style accordingly.


Mistake Number 3: There are too many objects distracting from the focal point

I love props. I adore them. Scouting them, buying them, styling with them. But the key with props is to use them STRATEGICALLY, to direct the view and to say things that you can’t say with words. Objects denote luxury, coziness, spirituality, fun, child-like joy, or your heritage..and pretty much anything you want to say, and, as such, are powerful assistants.

But when they clutter the image, they detract from your focal point (and remember, the focal point is what brings sales!) . Cluttered images are overwhelming…and an overwhelmed person won’t buy.

Allow the eyes to rest….and when in doubt, remove until what stays feels  just right.


Mistake Number 4: The lines in your flat lay take the eye away from your focal point

Remember those foam hands with pointed fingers that were everywhere in 50’s adds? Or those images of a woman pointing at text?

The objects in your flat lay need to act like those fingers, they need to be like arrows pointing at your focal point.

So here’s what you need to do:

1) Take a look at the shape of the objects you’re planning to include in your flat lay and make sure that they’re directing the eye where you want them to. Example: pen, post its, erasers, spoons.

2): Use hands to draw attention to the most important objects by holding them or framing them


Mistake Number 5: The composition is not balanced

You either have too many objects on one side or none at all. Remember: The Human eye likes symmetry, so unless you’re creating a flat lat to act as a frame or partial border, make sure there’s balance in the number, position and height of your objects…

Which brings me to the next point…


Mistake Number 6: Some objects are out of focus

In a flat lay all objects should look crisp and sharp. You should be able to quickly visualize everything in them- which is why they’re so great to photograph with your phone camera

But in order for all objects to be in focus, you need to take care of two very important things:

1) Have the right camera settings. If you’re shooting with a DSLR, make that your aperture is higher than 4. I shoot flat lays at 7 or above (depending on the lens, the sharpest aperture varies). Lower numbers are great for close ups because they blur the background, but terrible for flat lays.

 2) Make sure that all objects have similar heights.

Want to use flowers in your flat lay? Trim them! I cut the stems super tiny and put mine in a small glass of water (the tiny ones from Ikea). And always, always, always, set the focus on the most important object (your focal point).


Mistake Number 7: Whites are not white

This is the trickiest one, especially if you shoot with natural light, from a window that doesn’t reach the floor. Have you ever seen flat lays where objects that were supposed to be white look yellowish or blue?

This problem is called white balance. Some times, it’s easy to fix, sometimes it’s not.

Here’s what to do:

  1. Adjust white balance in your camera, and use custom white balance. The way this works is you shoot something very white first, so the camera can understand what constitutes pure white and adjusts automatically the color afterwards.
  2. Adjust white balance in post production. I correct minor color problems in camera raw, for example
  3. If all the above sound too complicated…choose backgrounds in another color. I promise you, there will be much less to adjust and you can add some personality to your flat lays.

Greys, blues, wood and pink and great options. Look at your brand colors and choose backgrounds that will make your products pop!


Number 8: Your flat lay lacks personality- or has a personality other than your own


You are a business woman, and as such, your flat lays (and all your photos) should promote your business and help you sell. The way to do this is for each and everyone of your photos to contribute to telling your brand story.

They should showcase your brand personality, remind people of who you are, start conversations.

Lots of people fall into the trap of the “luxe lifestyle” photo and end up choosing images that have nothing to do with them, their message or their target audience and end up alienating prospective buyers.

When you choose stock images or create your own, make sure your best friend would recognize YOU in them.

Think:

what do you talk about in your blog and social media posts?

What objects remind you of defining moments in your life and career?

What objects could act as anchors of your message and your personality?

What objects reproduce the shape of your logo?


Got it?


These were the mistakes you need to avoid when creating a flat lay and what to do instead.

If you liked this video, subscribe to my email list below because many more are coming!

See you soon, with more videos to help your business grow beyond your wildest dream

PINK M

Want photos that look like you- and no one else?

Click here to book a call so we can discuss your needs 


How to select the best photos for your brand

How to select the best photos for your brand

How to select the best photos for your brand

Last year, when I was offering consulting calls about photography and visual strategy, I met with over 15 entrepreneurs who had the same question for me:

How do I choose the best brand photos for my business?

How do I know what will work?

I understood, back there and then, that this was a major source of anxiety for my fellow business women. And, since then, I’ve been on a mission to find a system that you could follow in order to make sure that the photos you’re selecting are the best ones for you and your business. And today, I want to share it with you.

We’ll go, one by one, through everything you need to consider, and I’ll explain you why each of those items is important. I even prepared a handy (and pretty) checklist for you to go through it every time you need new photos, which you can get right here (but wait, read until the end, so you can understand why every item is there)

Ready? Let’s begin!

1.Start with the basics

A. Decide where you’ll use the photos

This is really the first question you need to ask yourself because it will affect a lot of other decisions.

Will you use them in your website? In printed material? In social media? If you think you’ll only use them for one thing and in one place, I encourage you to read this post I wrote a while back, to spark your imagination. It’s better to know how photos will be used before investing, to make sure that you can end up doing everything you desire with them.

Here are some of the uses you may desire: web design, graphic design for web and social media (lead magnets, memes, ads, promo material), printed material, branding collaterals, office decor ( by printing them and framing them) and many more.

B. Determine which sizes you need. 

The next thing you need to pay attention to, once you’ve decided what you want the photos for, are the sizes you require. For example, if you’ll use the photo as full screen background, like I do in my home page,  you’ll need your image to have a minimum of 1920 px wide in order to look good. If you’ll be using it for Instagram, you’ll need it to have at least 1080 px on each side (Instagram uses a square format), and if you’re planning to use it for Facebook ads, adding text with an overlay, your images need to be 1200 px wide x 628 px high).

If your images are bigger (like any images you get from me, which are generally 5500px wide x 3500px high), it’s easy to reduce size in Photoshop or with free compressing tools (I have video tutorials for my clients to know how to do this). However, if your image is smaller than your required sizes, it will look awful and you’d better not use it.

C. Find out which resolution your photos need to have. 

This is another important aspect you need to consider, especially if you’re looking for photos in stock sites, like Getty Images, where price varies according to size and resolution. If you’ll only use your photos for web, a lower resolution will do, but if you’re planning to print your photos, make sure you purchase or commission images that have a resolution of 300 dpi.

D. Verify that the license authorizes the photo to be used as you need. 

As a smart business woman, you already know that you can’t lift images off the internet because, if you do, you risk having to pay a lot of money for the mistake. But that’s not all. You also need to make sure that you’re using photos according to the terms of their licenses. In other words, make sure that you get photos with a license authorizing you to use it in the ways you intend.

I’ll write more about the different types of licenses in my next post, but for now, make sure to read the license you’re given thoroughly before purchase. Contact the photographer, or agency if you have any doubts regarding what you can or  cannot do. If you’re using images from a free site, review and download a pdf copy of the license they provide. And if you’re using a creative commons license, make sure it’s one authorizing commercial use.

2. Go deeper

Once you know the basics, it’s time to dig deep. Remember: the objective is to get photos that actually work to assist your positioning, and bring in new customers, so “pretty” alone won’t do.

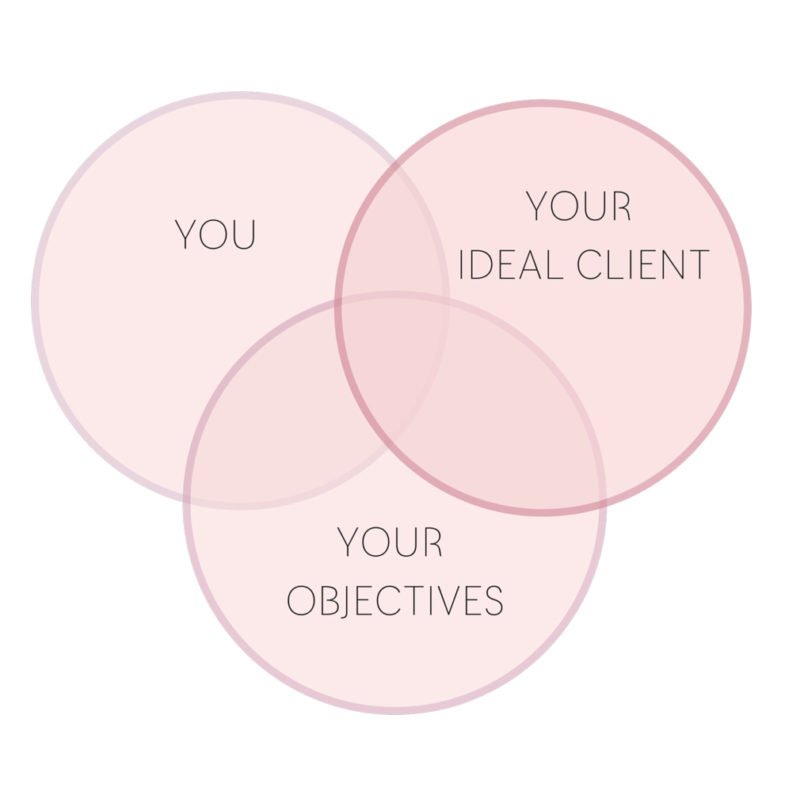
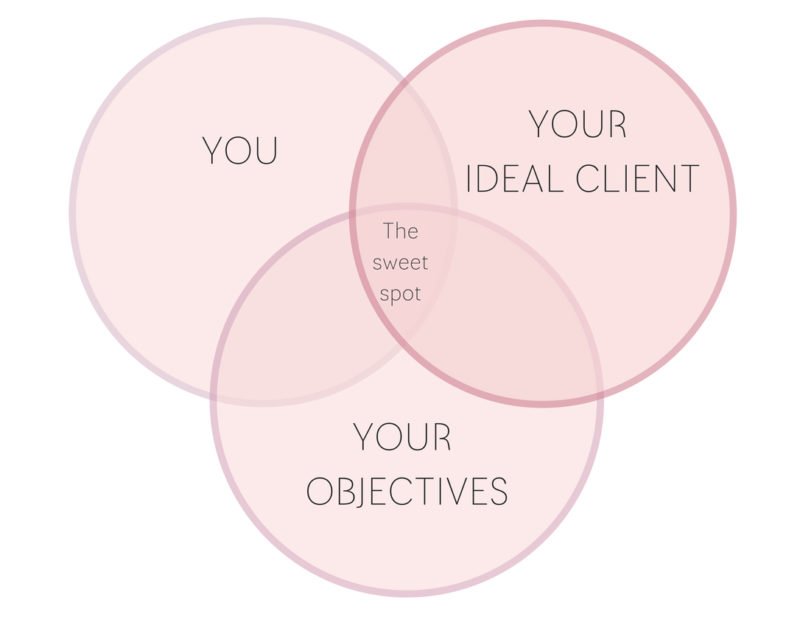
When you’re selecting photos for your business, there are 3 things you need to consider: who you are, who your ideal client is, and what your objectives are. I call this The Triad of Photos that sell

Take a look at the Triad’s graphic below. In the next paragraphs I’ll explain what each of those circles mean, what you need to do with each of them, and how their interaction affects your photos.

TRIAD OF PHOTOS

a. Decide what your objectives are. 

objectives

This is the aspect that’s  most often overlooked, yet it’s fundamental to consider it in order to get photos that actually work.

By objectives, I mean what you want to achieve with the photos you’re using. This has two dimensions:

  1.  What are you using your images for? What are the business goals your images will support? 


Are you looking to build awareness about your brand? Differentiate your business from the competition? Educate consumers or potential clients about how you work and what you can do for them? Grow your fan base?  Engage your biggest fans so they keep you on top of their minds? Introduce a new product? Support a Launch? Position yourself as a thought leader?

Knowing what’s the ultimate goal you want to achieve is key, not just for selecting or commissioning the right images, but also for evaluating whether they actually worked or not after you’ve been using them for a while

[Tweet “Knowing your goals is key for selecting photos and for evaluating their results”]

Let me give you a couple of examples: If you’re using photos to educate your customers about how your products work, allow them to see how they would fit their lifestyle, and show your product range, you could use a mix of the following:

  • Styled photos with your products in them (creating scenes to make your customers dream about the lifestyle they aspire to, and visualize themselves there),
  • Photos of your products in action, showing key aspects that make them different from others,
  • Product close ups,
  • Photos of your shop (if you have a physical store),
  • Photos of your working space with your products in it.

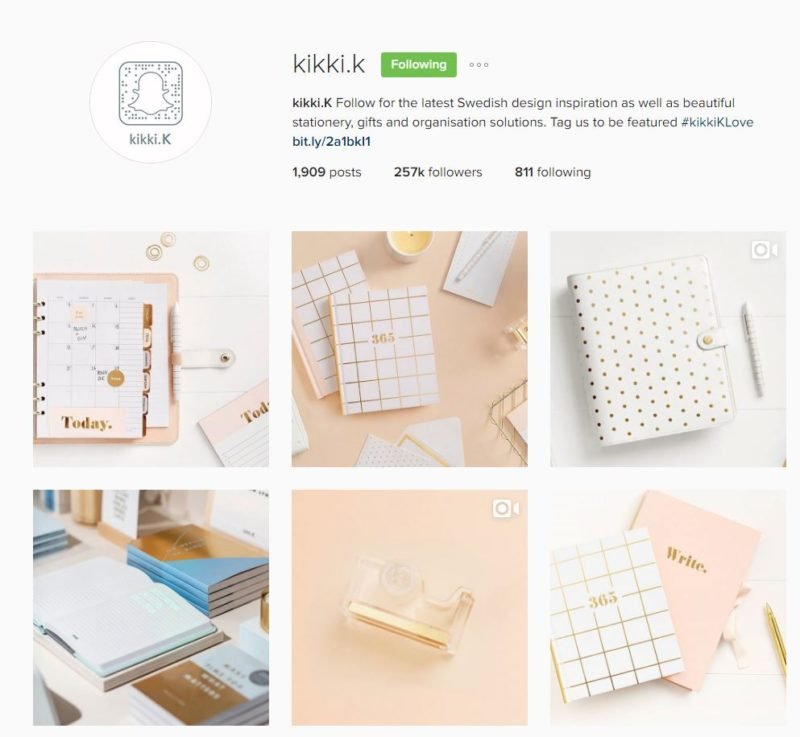
Want an example? See how one of my favorite stationery brands, kikki.k uses photos in her Instagram profile. 

kikki.k

If you’re trying to show your product range, create hype about new products, and create community around your creations, you may also:

  • Feature customer photos (and encourage your customers to tag you in them, maybe even creating a custom hashtag),
  • Share backstage photos, including photos of your creative process, and photos of products in the making, apart from the type of photos mentioned above

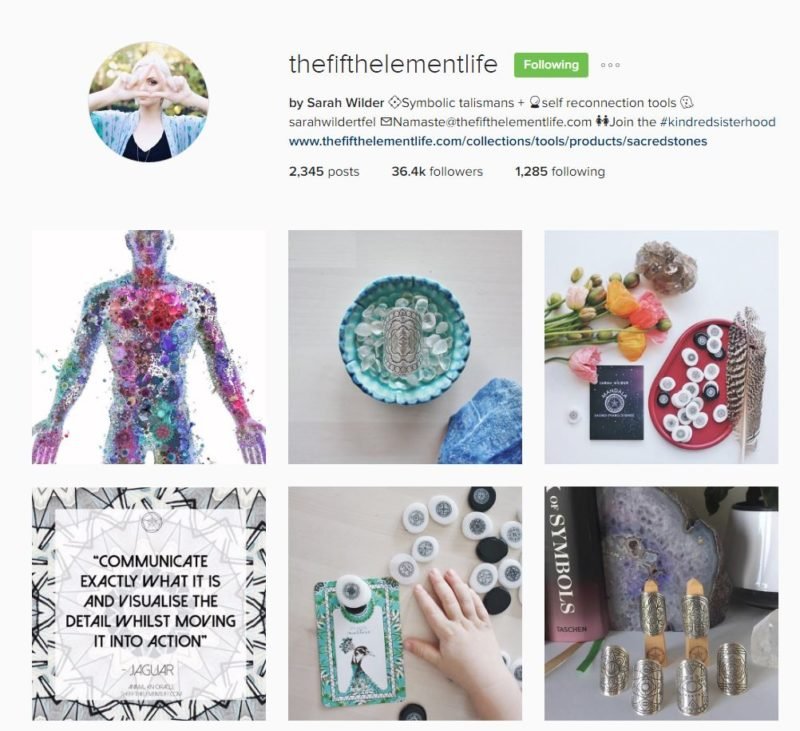
Need inspiration? Check how The Fifth Element Life uses photos in her Instagram profile, and check this case study of work I did for Art Joyeux. 

tfel

Think about what you want to achieve, and treat images as part of your content strategy to get you there.

Think about the written content you’ve planned, and ask yourself:  How can written and visual content interact and support each other so they both tell the same brand story? Which type of photos would help me reach my business objectives?

2. What practical objectives do you have for each photo?

In the question above we looked at photos as a compound, and I asked you to ponder whether every photo you choose or commission fits within your overall strategy, and supports your business objectives.

In this question, I’m asking you to look at each photo and ask yourself what effect you want that specific image to have on your audience.

Do you want people to pay attention to your words? Do you want them to feel shocked  Do you want to intrigue them? Do you want people to dream of a life they’ll love living (and you can help them achieve)? Do you want them to feel understood? Do you want your customers to relate to your personality and way of doing things?

Let me give you some examples:

  • Have you ever wondered why desk photos became so popular? It’s because they allow us to feel like we’re part of the life of the persons we’re doing business with, especially when there are hands in them. Purchasing items or services online may be very practical but we all crave personal connection, and we are more loyal to businesses we feel like friends. Real photos and videos, allow us to feel like we’re right there, creating with you. They allow us to feel that we’re doing business with real people, who care about their craft and their customers. If you want people to connect with you, and differentiate you in a crowded market, real photos are key.
  • If you want to show people how you work, so people can understand what goes into your craft, how special it is what you do, and so they can relate to your business,  you may choose backstage photos, lifestyle photos of your work space (or similar), the details you care about.
  • If you want to show the dream life your services help your customers achieve, your images will paint the picture of what’s possible, instead of showing their current reality.
  • If you want your audience to be subtly reminded of evergreen products to increase sales off season, you may add them in lifestyle scenes that you share in blog posts and social media, all along the year. You can read about how we did this with Mayi Carles here. 
  • If the purpose of your photo is solely to call attention to your words (for example for an ad), it’s better to select images of people looking or pointing at them.
  • If what you desire is for someone to pay attention, you may want to choose a face looking straight at the viewer.
  • If you want people to relate to your images, you may choose to show human presence without showing a face (eg: hands, legs, someone’s back).

Different photographic techniques, different lighting, different angles generate a different reaction in the viewer, so it’s important that you’re aware of the reaction you want to cause.

Before you go browsing for stock photos, or commission some to a professional, take some time to think about these two type of objectives and select 2 to 3 for each category. Your objectives should always guide your decisions.

Knowing what you want to achieve will make any search faster and more fruitful.

b. Determine what your brand is about, and the story you want to tell with your brand photos.

you1

You know what you want, now it’s time to connect your objectives with what makes your brand unique. It’s time to show some personality and character, and use your photos to tell a compelling story.

This is the YOU circle and it’s the key to having photos that people identify with you and you alone (even if they’re stock). But I need to offer one word of caution when it comes to this, if you have a personal brand: Remember that we bring who we are to our businesses, yet our businesses are not us. They have their own soul.

[Tweet “We bring who we are to our businesses, yet our businesses are not us. They have their own soul.”]

Why does this matter?  Because your photos need to focus in those aspects of your personality that are important for your customers, because their function is to reinforce your positioning.

Here’s how to do it.

1.Start with you

Ask yourself the following questions:

  • What qualities do you bring to your business, that make it unmistakable and unforgettable?

Are you detail oriented, fun, quirky, kind,loving, bossy, strong? Do you think strategically and have the ability to make the complicated, simple? Do you see the bigger picture with ease and can show someone the next steps? Are you cutting edge creative? Do you inspire transformation? Do you help others connect to a sense of peace and childhood innocence?

Make a list of the 5 most important qualities you bring to your business. The ones that make you different from everyone else you know. The ones your clients keep telling you were important for selecting you.

If you’re not sure which ones these are, ask! It’s always quite a revelation when this happens.

  • What do you want to be known for in your market?

I first heard this tip from Miss Monetization, Star Kechara and thought it was genius. How do you want others to think about you and your business? Are you the Spiritual Aromatherapist? The Rebel Chef? The Loving Jeweler? The Mystic Nerdy Photographer? (Wait, the last one is taken, that’s me 😉 ).

The point here is this: Be conscious about what you want to be known for and bring those qualities to your images.

  • What makes your services and products different from similar ones offered by others? Why should people choose you?

What makes your rings different from other gemstone rings? What makes your clean recipes different from those of other nutritionists? What makes your healing services special?

Let me give you a few examples:

  • When I started photographing Life is Messy Kitchen, we chose two words to guide the photography of the book: Lip-licking delicious, and Real. A key concept of the book was that clean eating didn’t have to taste like cardboard, so it was important that each recipe was shot in a way that made people WANT to cook healthy. We also wanted all photos to look real, as in possible to make without chef’s kitchen equipment. We wanted all recipes to be styled like beautiful and inspiring family scenes. We wanted people to desire cooking those recipes, and to feel confident that they would turn out as in the photos. We chose these words because we knew that delicious and doable was what made LIMK recipes different.
  • Derek Halpern mentions another interesting example in this blog post, where he talks about the genius photography of the MacBook Air. In it, he shows a photo of the original ad, where someone (a hand) is putting the laptop in a yellow envelope. Why does this matter? Because size is what made the Air different, he explains, and the photo allowed everyone to understand that quickly.
  • In my case, people chose me for two things: highly customized, holistic & strategic photos, and kind, do it all for you and make your life super easy service. The symbols in my website photos (though not immediately apparent) talk about this: the color pink, the rose quartz, the vescica piscis, the phoenix, the flower of life, the cookies, the cappuccino, the spiral, the heart. In future blog posts I’ll explain the symbolism behind every photo I take (nothing is random in my styling), but for now, think about your “special sauce” and make sure you’re crystal clear about it.

2. Think about the story your brand tells. Ask yourself: What story about your brand and the results your provide are your photos helping you communicate?

The people that make your audience want to know who you are as a human being, to see if they can trust you.They want to know whether other areas of your life re-affirm what you claim you can do in your business.

Let me give you an example from someone I admire greatly, Tara Gentile. Tara mentioned once that the reason she posts photos of her love of artisan-brewed beer and the food she prepares, is that it reinforces her image as a detail-oriented person. Whoever reads her work, and then follows her on social media, can get a clear picture of the personal qualities she brings to her job.

Tara lets people peek into her life, while giving a cohesive message of who she is and what she can do, at the same time.

You should do the same.

The perfect photos for your business need to make people think about you in the way you want them to. They need to help you tell a consistent and cohesive brand story. 

[Tweet “The perfect photos for your brand need to make people think about you the way you want them to.”]

And remember: everything has a visual attached to it, because humans have thought with images since the beginning of time. Symbols and archetypes have always been our way to understand the world around us. So there’ll always be a way to put into photos the qualities you want your business to be known for (more on this in upcoming blogposts too).

[Tweet “Everything has a visual attached to it, because we, humans, have always thought with images.”]

Want to read more about why this matters? Check this blog post I wrote last year. 

c. Who’s your target audience? Who’s your ideal client? Who are you trying to reach?

ideal client

You already know that you should write content and copy with your clients in mind. It’s the same with photos.

As I’ve mentioned in this post, if your clients are nowhere to be found in your photos, they won’t engage or buy. Your photos need to appeal to those who 1) you can help with your work and 2) want to be helped by you and are ready to pay you to do so.

Demographics (age, gender, location, social status) and psycho-graphics (needs, feelings, problems, perception of self) influence how your audience responds to the photos you select, and what they’re attracted to.

Do you remember this post, where I told you why you should be careful with luxurious-looking stock photos if they’re not what your brand represents? In it, I told you about my client Laura, whose customers didn’t connect to aspirational photos, and preferred photos that looked more real, closer to their own lives. This is why knowing your audience matters so much.

Let me give you a few examples of what happens when you don’t create photos with your customers in mind:

1.What do you think about when I say the word WIZARD? I tested this with several people, in different groups and I found that Baby Boomers pictured Merlin, Generation Xers thought about Gandalf, and Millennials said Harry Potter almost immediately. Why? Because different generations were influenced by different literature, different TV shows, different music, even different brands and different ads. Here’s a mini poll I did on facebook, as an example

wizard

2. Do you think some TV shows are wide-known classics across generations? Think again. I recently found out that many teenagers have no idea, nor have they ever seen the 90s TV show Friends, which is a favorite of mine. If my audience was teenagers and I was talking about my “Rachel” Haircut, and showing photos of it, we wouldn’t connect. 

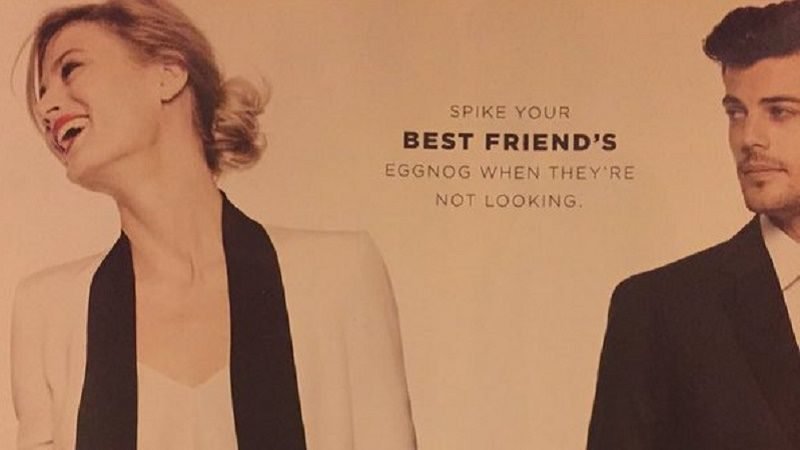
3. A creepier example is that of a failed Bloomingdale’s Christmas ad below.

Blomingdale

I have no idea who approved this ad, or frankly what they were thinking, but the implicit suggestion of adding a roofie, and of date rape back-lashed pretty fast. I’m not even going to get into how this looks like statutory criminal offense to me…for the sake of keeping this on topic let’s just say that, at the very least, this is really bad customer research.

Choosing photos that our clients adore and are happy to share is a matter of care, connection and empathy. Getting to know your clients is about actually caring about making their lives better.

Remember:When you fake it, it shows. Don’t put a cupcake in your photos if you don’t like them and talk about how much you love them, just because your clients like them. Don’t be that person. 

In order to make sure you’re on the right track, ask yourself these questions:

1)Who do you love working with? 

Remember the time you worked with someone who inspired you to do your best work? Someone who loved the work you do, and appreciated everything you bring to your business?  It doesn’t matter if that person was not a client…maybe it was your boss when you still were in a 9-5, a teacher in high school or a colleague you really clicked with. What matters is that you remember how you felt, because as Mike Iamele teaches, that’s how you can call in the same energy.

Once you’ve connected to that energy, think: What do those that you love working with have in common? Is it the way they talk? The music they listen to? The brands they prefer? Or is it the way they’re feeling when they reach out to you for help?

Ask yourself:  How do your best clients live? Where are they in life? What do they like? What kind of life do they aspire to have? What makes them happy? What are their values?  If you’ve been in business for a while, answering these questions is a matter of talking with your favorite clients. If you are new to business,  you can read this blog post where I give you ideas on how to research this, and explain what to pay attention to, and listen to this episode of Cult of Hybrid.

Here are some more questions to guide you:  What do your best clients like? What causes do they support? What’s their spirituality? What books do they read? What movies do they adore? What do they watch on TV? What do they do in their free time? Who do they want to become? What are their hopes and dreams? Who do they identify with? Who do they follow? What quotes move them? What makes them cry? What makes them laugh? What do they need? How do they want to feel that they’re not currently feeling and why? What magazines do they read? What do they pin?

Make a list of their qualities, likes and dislikes, find the connection. Pay attention. 

I make it practice to connect regularly with my clients on social media. Ok, it’s easy because I love them, but it’s also always a joy to find the similarities between them, and the things in which we are similar. I call it understanding the flow of energy that connects us.

The more you know about the people you want to attract, the easier it is to gear your visual content to speak specifically to them. If you want your photos to generate all the Ohhhs and Ahhhs you work deserves, it’s important that they’re tailored to your market.

2) What do your customers need from you? What do they want from your products or services?

I mentioned above the importance of knowing your “secret sauce” when planning/selecting your photos, and this is similar, yet slightly different.

In this case, I’m asking you to consider your products and services from your client’s point of view. I’m asking you to make sure that you really understand your client’s motivations for buying from you. I’m asking you to make sure that you understand that what your clients truly want and the reasons why they want it are sometimes unsaid.

Take eating healthy for example. Do your clients want to eat healthy to prevent disease, to gain energy, or to lose weight? Are they driven by fear, frustration or tiredness? What would the ideal solution be for them?. Ask yourself these questions. Make sure that you know the answer.

Why does this matter? Because photographing the end result and the specific qualities that attract your customers to your products and services makes your photos more effective. You’re showing them what they need to see to commit. 

[Tweet “Photograph the qualities that pull your customers to your products to make photos more effective.”]

Ask your customers about these reasons. Observe how they use your products.  Then select or commission photos with your findings in mind.

3) What do you want your audience to feel when they see your photos?

Did you know that different camera angles, colors and photographic techniques cause different reactions? I’m not asking you to know how to use these techniques, study archetypal symbolism or learn about visual persuasion. That’s my job, don’t worry.

What I’m asking you to do is be aware of this fact, and be clear about what you intend others to feel when they see your photos.

Pick no more than 2 or 3 intended feelings, then do this exercise: Go to Pinterest and create one board for each of those feelings. When you find a photo that, for you, conveys that idea, put it in its board. After a while, review the board and observe the patterns: Do they have colors in common? Angles? Maybe a certain filter, mask or texture? This will help you gain clarity, and it will make searching or commissioning photos easier and faster.

Review the answers to all questions above and keep them handy. Download and print the worksheet, and get ready.

Now comes the fun part.

3. Connect the dots

You’re clear about the basics and your objectives.

You know who you are, what differentiates you, and the bigger story your brand tells.

You know exactly who you want to attract.

Here’s what to do next:

Grab a page,  and draw three big circles in it (You can also download the worksheet).

Based on the questions and prompts above, do the following:

  • In the first one, write everything related to your objectives.
  • In the second one, write everything related to you and your brand.
  • In the last one, write everything about your ideal clients.

Looking at these  independently, won’t tell you much, but here’s the secret: The magic happens in the connections. 

Let me show you:

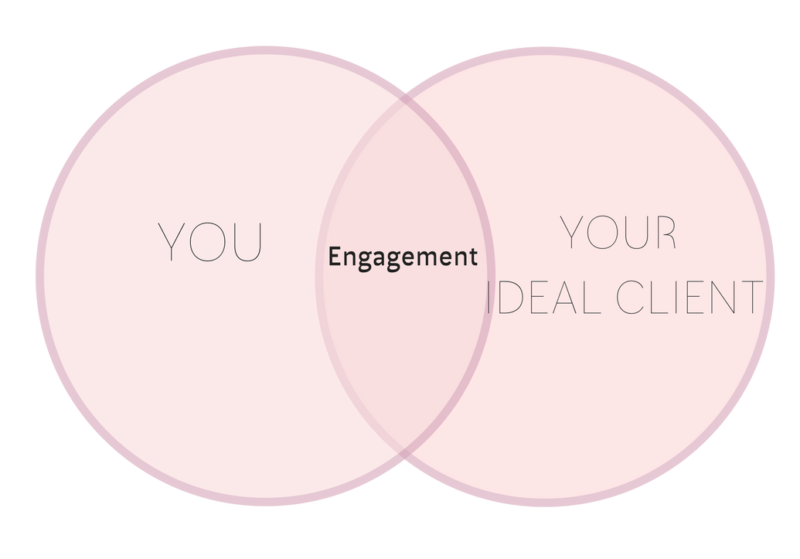
A. The Engagement connection

Remember this post where I showed you this graphic?

14

In it, I told you that unless your ideal clients were present in your photos they wouldn’t engage and you wouldn’t sell.

This combination has the  “She really gets me! ” and the “OMG she’s like me!” effect. This is what happens when you post a photo of your Yoda action figure knowing your best clients are also Star Wars fans, a photo of your green smoothie knowing your audience cares about eating healthy like you do, or a photo of your cat sleeping on your keyboard, knowing your ideal clients are cat owners too.

When you create, select or commission photos that connect the core of who you are and, as stand for as a brand, with deep knowledge of your ideal clients and what you have in common, the results are powerful.

The result is true connection, engagement, identification.

When your photos resonate with your audience, they will comment on them, share them, and remember you more.

[Tweet “When your photos resonate with your audience, they will comment on them, share them, and remember you more.”]

How to use it: Get the YOU list and the IDEAL CLIENT list and look for what you have in common. Start sharing images of those things on social media, and monitor reaction. Pay attention to what resonates and what doesn’t.

When to use it: All the time, especially when building an audience.

Risk: Only one, remember that just because people connect with you, it doesn’t mean they will buy from you (or subscribe to your list, or join your facebook  group). In order for them to do that, you need to be clear about your objectives too. This is what we’ll talk about next.

B.  The Sweet Spot

Sweet-Spot- Marcela- Macias-Photograhy-Cyprus-How-To-Select-Best-Photos-brand

This is where the real magic happens. I call it the ” She gets me and she has exactly what I need. I’ll talk about her to everyone” effect.

These are the photos that, not only help you connect, but also help you grow your business. The ones that help you expand your brand message, grow your email list, convert into sales.

These are the money making photos. 

These are the photos of your product, artfully placed in a desk scene that resonates with your customers and reminds them to buy. These are the before and after photos, showing the results your products provides. The photos of your crocheted baby toy, in the hands of a sleeping baby, telling a new mom that your creation will help her baby soothe herself at night. The photos of a lunch table full of diverse people, telling others your recipes are loved by everyone, and can help them create special moments with their loved ones.

How to use it: Take a look at the YOU, IDEAL CLIENT and OBJECTIVES lists, and find out:

1) what you (your brand) and your ideal client have in common, and

2) what your business provides that your ideal client needs.

Use these words as keywords when searching for photos. Give the info to a professional photographer when commissioning images.

When to use it: Always. This point of connection is particularly useful during a product launch, promotion of evergreen products or seasonal products outside of their peak season (example, promoting planners in June, or fitness/diet products in January).

Risk: None

And the other intersections?

They come with some warnings.

1.If you choose photos that only talk about YOU and are solely focused on your objectives, your visuals may not connect with your audience. This is what I call the “ME, ME, ME, Look at me, I’m so awesome” risk. I recommend that you avoid it, with one exception: when you are testing engagement, and seeing what resonates with your ideal clients.

At the beginning, when you’re getting to know who you want to work with, and attract your first fans and clients, you’ll need to test. And when you’re testing, you start with what you know best: YOU.

It is important, though, that you pay attention to what resonates with the right people, and as soon as you have a clear idea, switch to either engagement or sweet spot, for maximum impact.

2. If your only focus on the connection between ideal clients and objectives, you miss the chance to add personality to your business and you risk becoming forgettable.

So there you have it: the method I use for creating photos that engage and convert.

Now download the worksheet below and start using it to make sure your images help your business grow.

Questions? Doubts? Comment below, I’m here to help!

how to select ipad 1

PINK M

Want photos that look like you- and no one else?

Click here to book a call so we can discuss your needs 

By continuing to use the site, you agree to the use of cookies. more information

The cookie settings on this website are set to "allow cookies" to give you the best browsing experience possible. If you continue to use this website without changing your cookie settings or you click "Accept" below then you are consenting to this.

Close