by Marcela M. | Oct 30, 2012 | Blog, cupcakes, Parties, Sweets, Uncategorized
Halloween is almost here!
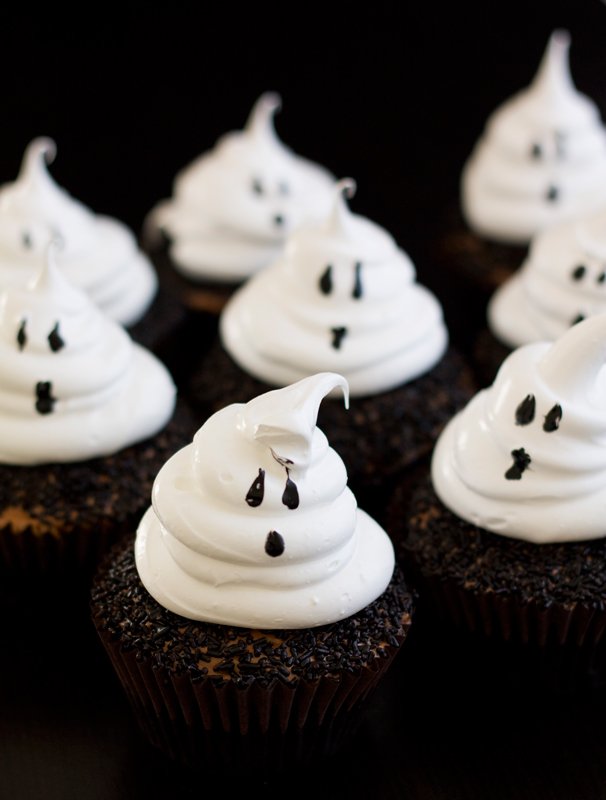
Today was a day full of holiday expectation: Luka and Zoe were playing with their costumes all afternoon (Zoe will be a witch – we almost named her Hermione, so what else could she be?, and Luka will be a vampire) and relinquished them reluctantly at bedtime, which made me very happy. They also brought back from school jack-o-lantern masks and bats they had made by stamping their hands on paper, and adding googly eyes, and wanted to read Room on the Broom by Julia Donaldson over and over again. This morning I had made the cupcakes above for them to bring to school tomorrow (inspired by these ones by Jenny Steffens) and, as you can imagine, it was a little difficult to keep them away from the refrigerator and to convince them to wait until tomorrow to have one at school! But that is what holidays are all about, don’t you think? Special days, with special traditions that we share with family and friends, and to which we look forward to year after year.
Last year, right before leaving for our family trip to Argentina, I wrote a post with a list of links to parties, food, ideas and free printables from around the web and, this October, that post was one of the ones that got more views. So I thought to do the same this year, in case you need some quick last minute inspiration. Here it goes (click to be redirected!) :
– I love these free printable Halloween candle wrappers and these printables lanterns too
– This post by none other than Amy Atlas has great dessert table ideas and free printables as well
– This witch crash cake has to be my all time favourite (and it looks super easy as well!)
– These Halloween ideas from The TomKat Studio for the DIY network are also great and easy to do
– An easy ghostly treat: mini marshmallows, clear bags, marker and black ribbon!
– No time for baking? Store bought cupcakes, cupcake liners and just a few extra supplies is all you need to make these witch hat cupcakes
–These extra cute owl mini cupcakes have been all around the web and only require oreos and m&ms to decorate them
This is a great video by Wilton on how to decorate easy halloween cupcakes
If you need more inspiration, don’t forget to check the rest of my Halloween pinterest board, and my post from last year!
Enjoy the holiday and, if you are in the USA NE region, stay safe!
* For the cupcakes above I used my favourite chocolate cupcake recipe, from Vegan cupcakes take over the world. I then frosted the cupcakes with milk chocolate swiss meringue buttercream (using a spatula, nothing fancy), covered them in chocolate vermicellis (store-bought), and finally piped a swiss meringue ghost. To make swiss meringue for 15 cupcakes I used 110 grs of egg whites and 220 grs of sugar (let me know if you need instructions on how to make it!). I drew the eyes and mouth with a toothpick dipped in black food coloring.
Con sabor latino…
Halloween ya casi está aquí!
Hoy fue un día lleno de esa hermosa anticipación que se siente con las fiestas: Luka y Zoe jugaron con sus disfraces toda la tarde (Zoe será una bruja (como que casi casi la llamamos Hermione!) y Luka un vampiro) y me los entregaron a regañadientes a la hora de ir a dormir, lo que me hizo muy feliz. Hoy tambien trajeron de la escuela manualidades alusivas: un antifaz de calabaza tallada, y un murcielago hecho con la impresion en papel de sus manitos y ojitos saltarines (de esos de plástico, que se mueven para todos lados), y quisieron leer una y otra vez el cuento Room on the Broom (lugar en la escoba) de Julia Donaldson. Esta mañana, mientras ellos estaban en la escuela, yo les había hecho las cupcakes fantasmagoricas que ilustran este post, para que las lleven mañana a la escuela (y que están inspiradas en estas de Jenny Steffens) y, como podrán imaginarse, con tanta expectativa, a duras penas pude mantenerlos alejados de las mismas, y convencerlos que esperaran a mañana para comerlas! Aunque de eso se trata, no? Las fiestas son justamente esa expectativa, esas tradiciones, ese momento especial compartido con seres queridos, que hacen que las esperemos año a año y que la sola idea de su llegada nos llene el corazón de recuerdos alegres y esperanzas.
El año pasado, como estábamos de viaje para esta época, publiqué un post con links a las mejores ideas halloweenescas que había encontrado en la web y, este año, desde octubre, ese post ha sido uno de los más buscados y leidos. Por eso este año, se me ocurrió hacer lo mismo, pero actualizado. Internet está llena de ideas fantásticas, asi que, si necesitan inspiración de último minuto, chequeen los links que dejé más arriba (en la versión en inglés). No se van a arrepentir!
Y si necesitan aún más ideas, pueden ver el resto de mi pinterest board de halloween, y el post del año pasado, del que les hablaba!
Espero que disfruten muchísimo de este Halloween y que el paso de Sandy los encuentre sanos y salvos!
* Para hacer las cupcakes de las fotos usé mi recete de cupcakes de chocolate favorita (de Vegan cupcakes take over the world) . Las cubrí con swiss meringue buttercream de chocolate y luego les espolvorée granas de chocolate arriba. Para terminar, usando la manga sin boquilla, puse un copón de merengue suizo (hecho con 110 grs de claras y 220 grs de azucar para 15 cupcakes), a los que les dibujé ojos y boca con un palillo escarbadiente mojado en colorante alimentario negro.
by Marcela M. | Jul 8, 2011 | Blog, Cooking basics and tutorials, cupcakes, Recipe Box, Sweets, Uncategorized

Good morning everyone! I hope you are having a lovely day.
Today’s post was inspired by the blogosphere. For the past several months, I have noticed a profusion of super cute owl parties (such as this one, this one and this one) and owl related products (such as these and these printables, these cake-pops and these t-shirts). All these were such a joy to look at that I felt compelled to create something owly too. Who wouldn’t want owls after looking at all those beauties, right?
So yesterday, I did. I had three cupcakes in the freezer, unfrosted, and a few bits and pieces of fondant left from other projects, so I decided to create a few Owl fondant cupcake toppers. I looked at some owl drawings and tried to de-construct their different shapes. Then I took the fondant I had and this is what I came up with.
I- The Yellow and Orange owl, inspired by this adorable birthday t-shirt by Modern Frills.
In order to make it, you will need the following materials:

1- Fondant in three different colors. I tried to stick to the original color palette as much as possible, so I used yellow, brown and red. I also used white fondant for covering the cupcake, and attached to it the topper itself.
2- 1 round cookie/fondant cutter (I used one from a set I got from Ikea, but any would do. In the past I have even used caps from coca-cola bottles!)
3- 1 small star-shaped cookie/fondant cutter
4- Round Piping tips number 10 and 12
5- Royal icing (I used one in a tube because there was no point in making a whole batch from scratch for just 1 cupcake topper)
Procedure:
1- For making the owl’s body, roll yellow fondant and cut one circle. Separate the circle from the rest of the fondant and then, very softly, roll the rolling pin on top of it just a couple of times, so that the circle becomes slightly wider at the sides.
2- For making the Owl’s wings, roll red fondant and cut two circles, using the back of the number 10 tip. Roll the rolling pin on top of them so that the circles become ovals. You could also use a leaf-shaped cutter for doing this.
3- For making the eyes, roll red fondant and cut two circles using the back of the number 10 tip (as for making the wings). Roll the brown fondant, and cut two circles using piping tip number 12 (the tip itself, not the back). Place a brown circle on top of each red circle.
4- For making the ears, roll yellow fondant and cut two triangles using the points of the star-shaped cutter. Trim of necessary.
5- For making the nose, roll brown fondant and cut 1 triangle with the star-shaped cutter (as for making the ears). Roll the rolling pin on top to make the triangle longer and trim the sides to achieve the desired shape.
All the parts should look like this before assembly:
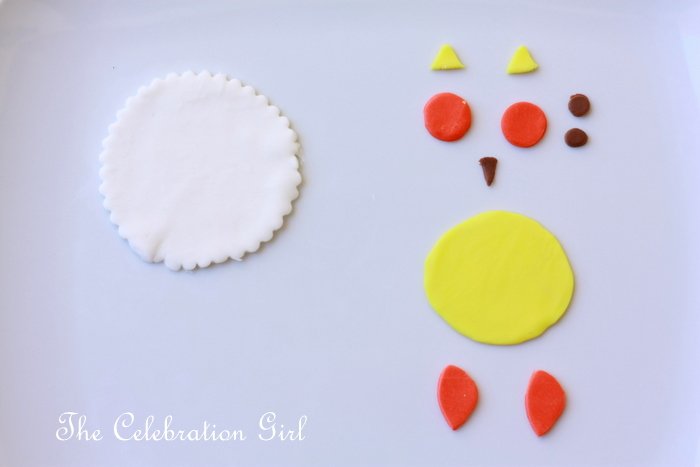
In order to assemble the owl, simply place the yellow circle that forms the body on top of the white fondant circle . Glue it with water or sugar syrup (Argentinians friends: almibar). Attach the eyes, nose, ears and wings. Finally, place little dots of royal icing on the wings.
Here’s how it looked right after I finished it, before placing it on top of the cupcake:

II- The second owl was loosely based on this cute gift package designed by Delicious Tea. I started with every intention of doing that design, but then thought it would be funny to make a slightly angry owl, so I re-shaped its eyebrows and eyes 😉
In order to make this owl you will need the following materials:
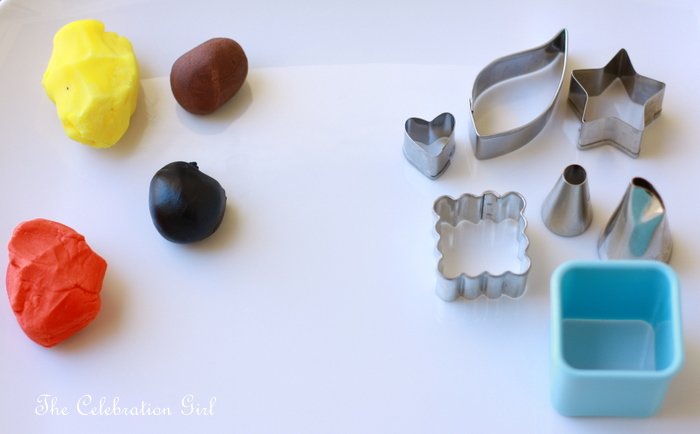
1- Fondant in 4 different colours. I used red, yellow, brown and black.
2- 1 small square fondant/cookie cutter (mine comes from the same Ikea set I mentioned before)
3- 1 big piping tip. (It could be a D2 or M1. I used a petal shaped one because I had it handy, but since what you need is its back, any big one would do)
4- 1 medium size leaf-shaped cutter
5- 1 small heart-shaped cutter
6- 1 small star-shaped cutter
7- 1 pipint tip number 12
8- 1 scalloped square cutter (mine came with a Wilton set)
Procedure:
1- For making the body, roll red fondant and cut a square. Using the small scalloped square cutter, press softly with one side only to shape feathers. You can also draw the feathers with a food decorating coloring pen.
2- For making the eyes, a- roll yellow fondant and cut 2 circles using the back of the big piping tip, b- roll white fondant and cut 2 circles using the back of the number 12 tip, c- roll black fondant and cut 2 circles using the number 12 tip itself. Place one black circle on top of each white circle and then attach the latter to each yellow circle.
3- For making the eyebrows, roll brown fondant and cut a circle with the back of the number 12 tip. Cut the circle in half and, using the the same cutter trim the centre of each half to shape the eyebrows.
4- For making the wings, a- roll brown fondant and cut 2 leaves. Take 1 of them and proceed as with the eyebrows. This is the wing that will be attached to the left side. Take the remaining wing and trim the edges until it looks as in the picture. b- Roll the red fondant and cut a heart. Separate the heart from the remaining red fondant and, using the same cutter, cut again, removing the lower part. c- Roll yellow fondant and cut a heart out of it. Place the piece of red heart on top of the brown wing, then attach to its lower part the yellow heart (it will look as if there was a red heart below the yellow one)
5- For making the nose, cut a triangle using a point of the star-shaped cutter.
This is how all parts should look like before assembly:

To assemble this owl, simply place the eyes on the upper part of the body (about half the eyes should be inside the body, and half should be out). Attach the eyebrows and shape to give the owl’s look the desired expression. Attach wings and nose. It’s like working on a collage, very simple!
This is how it will look like, once finished:

III- The third owl, was inspired by this cute invitation by the Sugar Bee Bungalow.
In order to make this owl you will need:

1- Fondant in 5 different colours. I used blue, orange, brown, black and white.
2- 1 round-shaped cutter
3- 1 scalloped square cutter
4- 1 Number 12 piping tip
5- 1 star-shaped cutter
Procedure:
1- For making the body, roll brown fondant and cut a circle (with the medium size cutter). Detach the circle from the remaining fondant and roll the rolling pin on top of it, so that it achieves an oval shape (If you have an oval -shaped cutter, just use that one).
2- For making the belly and the wings, roll blue fondant and cut three circles using the back of the number 12 tip. As with the body, roll the rolling pin on top of them, so that they become ovals.
3- For making the eyes: a- roll white fondant and cut 2 circles using the back of the number 12 tip, b- roll black fondant and cut 2 circles using the number 12 tip itself, and c- Place a black circle on top of each white circle.
4- For making the ears, roll the brown fondant and cut 2 triangles using the points of the star-shaped cutter.
5- For making the nose, roll orange fondant and cut 1 triangle. Detach the triangle from the remaining fondant and roll the rolling pin on top of it,so as to make it longer. Trim if necessary.
6- For making the feet, roll orange fondant and cut 1 square using the scalloped square-shaped cutter. Cut the square in two using the same cutter, then divide one of those parts in half. Each half is 1 foot.
This is how all parts should look before assembly:

For assembling this owl: a attach the body to the white circle that will cover the cupcake, b- attach the belly to the body, c- attach the eyes to the body (they should be half on top of the blue belly, half over it, more or less), d- attach the wings, e- attach the ears, f- attach the feet. And that’s all!
Here is how this owl looked just after I finished making it. As you can see it is still shiny from the water I used for attaching the different parts. After a few hours the water dries out, don’t worry.

And here is another look at all three owls before putting them on top of the cupcakes.
For placing them on the cupcakes, I put apricot jam on the said cupcakes, lifted the toppers with a spatula, placed them each on top of a cupcake, and pressed very, very lightly on the sides so that they would attach properly to them.
As you can see, they are very easy to make!

I hope that you liked this tutorial! If you have any doubts about any of the explanations, let me know and I’ll try to guide you through the process the best I can. And if you make them, please share your pictures, I would love to see them!
Have a wonderful weekend, full of love and laughter!
by Marcela M. | Jun 29, 2011 | Blog, Cooking basics and tutorials, cupcakes, Recipe Box, Recipes, Sweets, Uncategorized

Hello there!
This blog is one month old today, so we’ll celebrate with a double post! In this one I’ll reveal the secret to my birthday’s flowery cupcakes and in the next one we’ll talk cake-pops.
The secret is…that there is no secret 😉 My flowery cupcakes were inspired by Glory Albin’s fabulous hydrangea cupcakes. I saw them in her blog, Glorious Treats, long ago, but the right occasion for making them never seemed to appear. Until my last birthday! And I will definitely be making them again.
My cupcakes were chocolate ones, as Glory’s, but I did not follow her recipe. I used, instead, one of the recipes that Bakerella shares in her book . This is a recipe my children LOVE, so if you have the book, I recommend it*. But if you don’t have the book, your favorite chocolate cupcake recipe will do. You could also try this one or this one (which Bakerella says adapts very well to cupcakes, without the frosting), which are delicious as well.
For the frosting, I used regular vegan buttercream, from the same batch I used for frosting my birthday cake.
How did I make those flowers? With the help of my trustworthy friend, Wilton’s 2D tip:
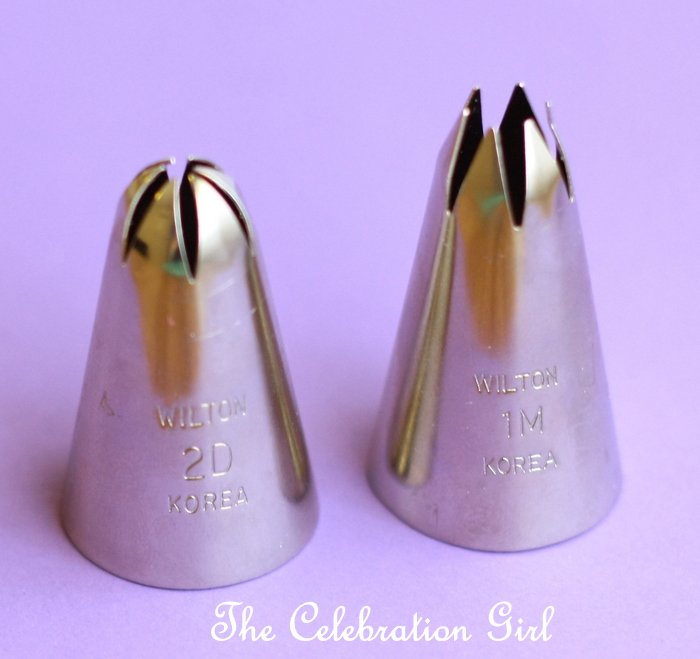
I divided the frosting in two, coloured each batch, put both colours side by side in the piping bag and then I simply piped the flowers. In order to see a VERY clear tutorial on how to do it, including pictures, check Glory’s blog here. Actually you should go visit her blog anyway because her confections, dessert tables and crafting ideas are truly amazing!
So there you have it: the secret to beautiful and easy hydrangea cupcakes!
I’ll see you later today with a post on cake-pops! Have a nice morning!
Note: There is a Dutch and a Brazilian version of Bakerella’s book “Cake Pops”. So one in Spanish may be on its way too!
by Marcela M. | May 31, 2011 | Blog, cupcakes, Recipe Box, Recipes, Sweets
Hello everyone!
Today’s post is proof that something good can come of something bad. Don’t worry, I don’t mean to get too philosophical here, it’s just that, when it comes to cooking, I have always found that the biggest failures many times lead to interesting discoveries.
These cupcakes were not intended to be cupcakes at all. They were intended to be a frosting: Swiss Meringue Buttercream frosting, with which I intended to cover a cake with lots and lots and lots of ruffles. I wanted to make a cake like this one, from fantastic baker Sweetapolita, which I have been drooling over for some time already. And in order to achieve a cake like that, I first needed to be able to make the required frosting.
Swiss Meringue Buttercream is composed of egg whites, caster sugar (beaten into a swiss meringue) and butter. The addition of egg whites and the additional beating makes it much softer, subtle and luscious than regular buttercream, which is composed of just butter (or margarine/shortening for vegan varieties) and powdered sugar and is, therefore, quite heavy. Don’t get me wrong, regular buttercream tastes well, but I don’t think I could eat a ruffle cake with regular buttercream frosting-there would just be too much buttercream in it.
So I prepared everything to make Swiss Meringue buttercream, read carefully Sweetapolita’s instructions (which are GREAT) and saw this wonderful video. I had everything, except one thing: a stand-mixer. I had read that it was not possible to make this frosting with a hand mixer, but I was willing to try to make it with the appropriate attachments of my Moulinex Master Chef food processor.
I followed the instructions in the video to the letter: I separated egg whites from egg yolks with looots of care, put the former in a bowl beating them slightly, brought the bowl on top of a simmering pot being careful that it didn’t touch the water, and added the sugar, beating for about 5 minutes until the sugar granules were completely dissolved.
I then put the mixture in my food processor, equipped with the whisk attachment, and started beating at fast speed until I got stiff peaks. It took me about 15 minutes to get to this point and for the bowl to be at room temperature again. At that time, I changed to the mixing attachment and started adding butter (which I had previously cut ) one little square at a time. At first everything seemed ok. The texture of the meringue turned grainy and then it changed to soupy…but despite beating and beating and beating it never evolved as it was supposed to, it never achieved proper consistency. It never stopped being…well, like soup.
At first, I blamed the warm weather and put the bowl in the fridge for 15 minutes.
It didn’t work.
Then I thought that maybe my butter had been too soft when I put it in the meringue. So I followed the advice I had read and added just a little bit more (colder) butter.
Nothing happened.My very buttery-used-to-be-meringue remained too loose to frost anything.
When I realized that I had been beating for over 30 minutes after adding the first butter square, I decided it was time to stop and accept the fact that there was no way that batter was going to become anything remotely like swiss meringue buttercream. Or at least no way I knew of.
The question was: what to do with it? As a matter of principle I don’t throw food, so it was time to take a good look at the batter and uncover its potential. I tasted it and it was delicious ( I could feel how great it would have tasted as frosting!). So I decided to transform it into cupcakes. Worst case scenario, if the cupcakes ended up looking awful, I could always crumble them and make cake-pops!
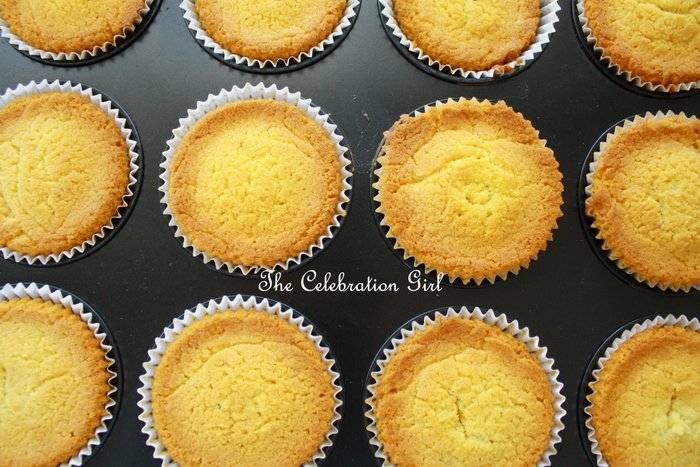
So I added two cups of self-raising flour (the only one I had at home at the moment), 1 teaspoon of baking powder, 1 teaspoon vanilla extract and, at the last minute, I also added 2 heaping tablespoons of cornstarch, which I thought would help make the cupcakes lighter – and it did. The mixture was enough to fill 12 cases. I used muffin cases because I wasn’t sure how the batter was going to react in the oven and I didn’t want it to overflow. I preheated the oven for about 5 minutes only, at 150 C, and cooked them until golden, for about 15 minutes.
This is how they looked straight out of the oven:
Goodbye Swiss Meringue Buttercream, Hello cupcake!
I let them cool completely and decided that, instead of frosting, I was just going to serve them with some powdered sugar sprinkled on top (1/2 a teaspoon for each cupcake).
And then it was time for the final frontier: the taste test. Because, as good as they looked, the important thing was whether they were actually good to eat.
And they were! They tasted very well, actually!
They were very moist, soft and buttery – but not too buttery.
Here is how they looked on the inside:
Do you want a bite?
Here’s the recipe:
Ingredients:
From Dyann Bake’s recipe for Swiss Meringue Buttercream:
– 1/2 cup egg whites (I used 3 XL)
– 1 cup granulated sugar
– 12 oz (3 sticks/350 gr) butter
– a pinch of salt
Added by me:
– 2 cups self-rasing flour
– 1 teaspoon baking powder
– 2 heaping tablespoons cornstarch
– 1 tablespoon vanilla extract
– 6 teaspoons powdered sugar (to serve)
Instructions:
1- Separate egg whites from egg yolks. Cut the butter into little squares and set aside on a plate, outside of the fridge.
2- Put egg whites in a heat-resistant bowl, add salt, beat slightly and place over simmering water. Add sugar and continue beating until the sugar completely dissolves (when you can no longer feel the granules at the touch).
2- Once the sugar is completely dissolved, start beating with the whisk attachment of a mixer-or by hand if you are very strong! Continue beating until reaching stiff peaks and the bowl’s temperature has completely cooled down and is back at room temperature (otherwise the butter will melt when added).
3- Start adding butter, one little square at a time, until the batter is smooth but still liquid. If you are the proud owner of a stand-mixer, stop after this point or you may actually end up making swiss meringue buttercream! 😉
4- Add vanilla and mix until combined.
5- Mix the dry ingredients in a separate bowl. Add them to the egg and butter mixture, little by little, and mix until well combined.
6- Divide the batter between the muffin cases, putting just enough to fill about 3/4 of each of them.
7- Pre-heat the oven to 150C (302F). Place the muffin pan into the oven and bake for about 15 minutes or until golden.
8- Let cool, sprinkle powdered sugar (or other frosting) on top, and serve.
Moral of the story: If life gives you failed swiss meringue buttercream, add flour and make cupcakes!
Have you ever come up with a good recipe when trying to make something different?
——————————————
El rinconcito Latino:
Aquí está la receta en castellano:
Ingredientes:
De la receta de Dyann Bakes para Swiss Meringue Buttercream:
– 1/2 taza de claras de huevo ( yo usé 3 de huevos XL)
– 1 taza de azucar
– 350 gramos de manteca
– 1 pizca de sal
Agregados por mí:
– 2 tazas de harina leudante
– 1 cucharada de té de polvo de hornear
– 2 cucharadas soperas de maizena
– 1 cucharada sopera de escencia de vainilla
– 6 cucharadas de té de azucar impalpable (para decorar)
Instrucciones:
Inicialmente, procedan como si fueran a hacer swiss meringue buttercream, o sea:
1- Separen claras de yemas y coloquen las claras en un recipiente que resista el calor. Saquen la manteca de la heladera y cortenla en cuadraditos. Dejen los cuadraditos en un plato afuera de la heladera.
2- Coloquen agua en una olla (poca) y lleven a fuego muy lento hasta que hierva. Agreguen la sal a las claras, batan ligeramente, y coloquen el recipiente sobre la olla , batiendo siempre. Agreguen el azucar y sigan batiendo (para evitar que las claras se cocinen) hasta que el azucar se disuelva totalmente (cuando al colocar un poco de la mezcla entre el índice y el pulgar no se sientan más los gránulos de azucar)
3- Lleven la mezcla a una batidora/procesadora, o continuen batiendo a mano hasta que se formen picos firmes y el bowl no esté más caliente al tacto. La mezcla debe volver a estar a temperatura ambiente porque, de lo contrario, la manteca se derretirá al incorporarla.
4- Incorporen la manteca de a un cuadradito por vez, batiendo bien luego de cada adición hasta que la mezcla esté uniforme y lisa pero aún líquida. O sea, si tienen batidora tipo Kitchen Aid, dejen de batir al llegar a este momento o puede que logren hacer swiss meringue buttercream! 😉
5- Agreguen la vainilla y mezclen hasta que esté incorporada.
6- Mezclen los ingredientes secos en un bowl aparte. Incorporenlos de a poco al batido de huevos y manteca, mezclando hasta que estén bien incorporados.
7- Dividan la mezcla en pirotines para muffins, llenandolos sólo 3/4 de la capacidad total.
8- Pre calienten el horno a 150C por 5 minutos. Lleven las cupcakes a horno por aproximadamente 15 minutos, o hasta que estén doradas.
9- Dejen enfriar, espolvoreen con azucar impalpable (u otra cobertura) y sirvan!


